Simple Garb
Informal Clothing for Pennsic
August 2004
August 2004
Sharon and I have been going to The Pennsic War for years, and we have a selection of garb to wear, but most of it is nicer clothing. We didn't have a lot of informal lounging or working garb, and sometimes it got to be a drag seeing the nicer stuff get dirty and sweaty. Since we were going to spend an extra-long time at Pennsic in 2004, I decided to use some of the free time I had from being unemployed that summer to sew as much simple garb as I could.
I'd sewn before, both by hand and by machine, but never anything I would have to wear. I didn't want to go buy patterns or anything, because I don't really like patterns. I scoured the net until I found the simplest instructions I could for making the kinds of garb I wanted, then I bought some fabric and dove right in. Over the course of a few weeks, I made about two dozen pieces! We had plenty of garb for Pennsic, which was good because Pennsic was rainy that year. If only I'd brought more socks.
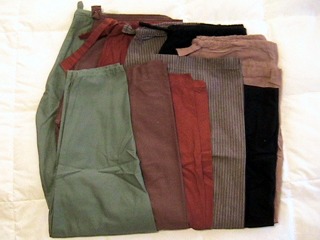
First off, I was very tired of wearing some of my old "business casual" cotton slacks as pants. This is OK, but they are very heavy to be wearing in the August heat, and aren't very comfortable with the rest of the garb. So, I found some simple instructions to make braes. Braes are baggy, drawstring cotton pants. Eventually, I got pretty good at it. I wound up making six pairs from various fabrics, mostly lightweight cotton in various colors from the quilting department at the fabric store.
I did have one major advantage helping me with braes. It turns out that after adding the extra inches for the leg hems and the drawstring casing, I needed 45 inches of fabric. Since the fabric I was using was 45" wide, I just cut my pieces from the fabric sideways instead of lengthways. This probably introduced subtle differences in the way the fabric hangs, but most of this fabric is thin enough that I haven't noticed
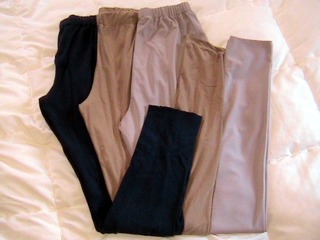
I also needed few more pairs of leggings to go under some of my other outfits. Leggings are what you call them if you don't want to tell your parents you let other people see you wear tights. I used the legging pattern from one of the outfits that Sharon made for me, although I kept altering it as I went so that they would be more form-fitting. For the gold-colored ones, I didn't trim the ends of the legs and wound up sewing them shut to make footie-leggings! (That's a little weird, but I can always cut the footies off later.) I also made a pair of black ones that aren't in the picture.
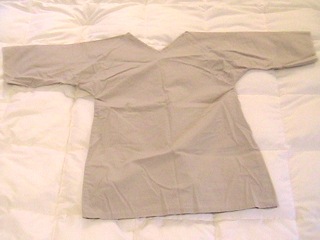
To go along with all the bottoms, I made some tops. Tunics are simple shirts. The sleeves and body are not separate pieces, like on modern shirts. In fact, the whole tunic is one piece of fabric, except for the neck facing. At least, that's the way these simple tunics, known as "T Tunics" (ha ha) are made.
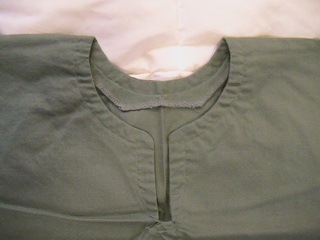
The neck facing is the most complex part of this whole garment. It takes less than 2 hours to make one, and probably half of that is just on the neck. Once I found a way to make necks that worked well and fit over my head easily, it was fast going
My first couple of tunics weren't very nice. I hadn't been convinced a neck facing was even necessary. It seems like a bitter pill, that much time for what seems like such a small part of the tunic. It may be small in terms of square inches, but as you may recall if you're worn a shirt with a badly fitting or scratchy nuckline, it's important to get it right. Anyway, these two are more like medical scrubs than anything else, but they make good undertunics, so I keep them.

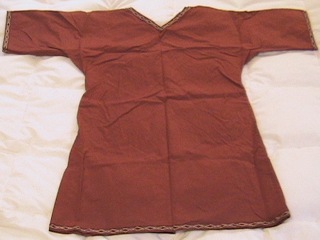
After I got most of the basics down, I decided to get fancy. These are basic tunics, but I've sewn trim around the edges. As you can see, it really dresses up the basic design. I just used trim from the fabric store, since I didn't want to wait until Pennsic. The trim around the arm holes gets sewn on before you sews the sides. The trim around the necl gets sewn on when you top-stitch the neck facing. The trim around the bottom can be sewn on when you hem the bottom.
I can see that I still have much to learn about trim. It puckers a bit in the wash, and you have to be careful about the ends fraying.
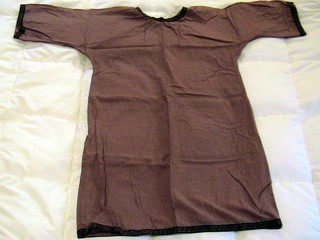
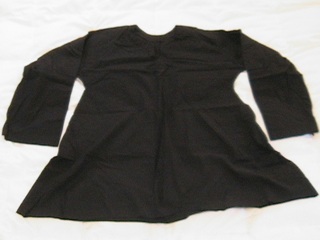
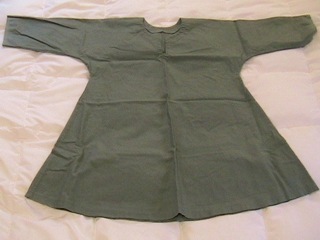
Next, I made a couple of plain tunics. I extended the sleeves on the black one, using scrap material from under the sleeves. The sage-green one is similar, but not extended. Both of these use the keyhole neck that I designed, and pretty much use for all my tunics now. I trace this onto interfacing, so it's the same every time. Around the neck it's octogonal, so it's easy to serge the interfacing to some fabric to make the neck facing. I got really good at making this kind of neck, and they are very comfortable.
As you can see, both of these also flare significantly at the hem. This makes them extra-poofy, if you like that.
I also made three light-colored tunics, but they didn't photograph very well, so they're not shown. The first was a normal-sized tunic made of light muslin. It was one of the early attempts, so it had a scoopy neck. Another tunic was made of muslin, but came all the way down to my shins. This was best for wearing under the surcoat described below. It was a later effort, so it has one of my keyhole necks. We also had a mid-weight, sort-of poplin material that was 60 inches wide, so I made a long-sleeve tunic. Given how wet and cool most of Pennsic was in 2004, I wore this one a number of times, and it has the stains to prove it.
Yes folks, that makes 9 tunics all together, and this only counts what I made for myself. I made some more tunics for Sharon, probably three or four.
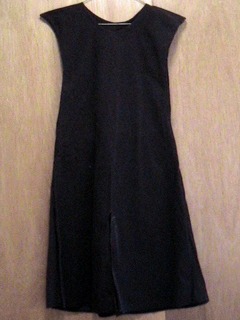
Probably the most difficult thing I made during this time was this surcoat. Surcoats were what a knight or other warrior would wear over their armor, to protect the armor from moisture and to display their colors. Surcoats were often worn when out of armor, as well. Typically, a Knight's surcoat would display some heraldry, but mine is just plain blue corduroy.
Yes, it does look kind of like dress, but it's not. A Knight wouldn't have to bother explaining that, he'd just hit you. The arm holes go all the way down to the waist. The bottom is split both on the sides, and in the front/back. The splits would let the wearer ride a horse. I like to wear a long tunic underneath, and maybe some leggings for that full-coverage feeling. I might wear sandals if it's hot, but usually boots.
I used a variety of fabrics, mostly cotton from the quilting department, and muslin from just down the aisle. You can use just about any fabric for the pieces I made, although natural fibers are recommended.
The instructions below work from measurements, not from printed patterns, so they will fit you well if you're careful. I am eternally endebted to the authors of these pages.
Be careful though, there are some errors in these pages (Lady Moira missed a divide by 2 in one of them!). Other than that, they'll tell you everything you need to know. Trust somebody who lived through it.