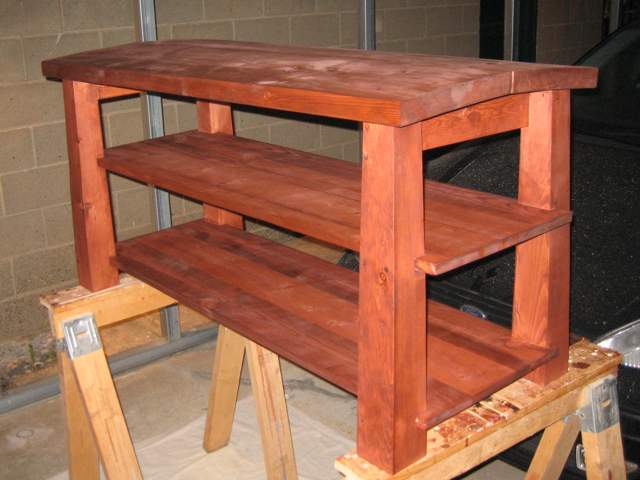
Genkan Bench
Seating and Shoe Storage

July 2008
July 2008
The genkan is the part of a traditional Japanese building where you remove your shoes as you enter, and where they are stored until you are ready to leave. In Clan Yama Kaminari, we try to adhere to the shoeless tradition inside the clan pavilion we use at Pennsic. However, we had a problem which was no true genkan, and no reserved place to sit while removing your shoes. Sir Ogami, the daimyo of the clan, asked me if I'd solve the second problem, and he'd make sure some room was set aside to solve the first.
So, I made this bench. It's not only a place to sit while removing your shoes, it's a place to store them once they're removed. They're protected from rain by a large seating surface, which is sloped to shed water and make it uncomfortable for long term lounging.
The legs are made from pine 4-by-4, which I've cut so that it gently tapers towards the top. The shelves are 3/4 inch edge-glued panels. The seating surfaces started out as 2-by-12, which I beveled at the edges to form the peak and keep the outside edge vertical. The seat pieces are supported by angled pieces of 1-by-4 that are attached between the legs. It's assembled with screws and glue, but the screws are hidden behind doweling for the illusion of wood peg construction.
It's finished with a light "Red Oak" stain to give the plain jane pine a little color, and sealed with an oil-based polyurethane engineered for outdoor furniture.
Because I was spending clan funds for supplies, I thought it wise to start with a formal plan. Download the plan if you're interested. This plan represents the "as built" design, and has been altered from any plan you may have seen before construction.
Some pieces had multiple cuts made in them, so it was important to get the order correct.
After the cutting was sanding. There were lots of saw marks in everything, and it all had to be sanded smooth. Even the ostensibly smooth faces of the engineered lumber were sanded to clean them up and give a fresh surface for gluing and finishing.
Once that was done, it was time for assembly. Again, everything had to be done in the right order, or it was probably going to be very difficult to fix later. Primary assembly was done with glue and 3 inch drywall screws.


Some of these steps, of course, required more twisting and/or pounding with a mallet than those instructions might indicate. In particular, pounding the last leg onto the shelf edges and twisting the shelves to line up with it was stressful. Also stressful was trying to twist the entire bench to make the front and rear halves of the seat. In the end, I gave up on that pipe dream. The seat halves fit pretty well, but I hade to do quite a bit of filling later.
Next was hiding the screws to simulate wooden peg construction. If I'd wanted, I could have used a similar method to actually replace the screws entirely with pegs by drilling my holes deeper and using more dowel, but I decided to stick with screws for the most part. Anyway, for each and every last screw (30 screws in all):

I don't have one of those fancy flush-cut joinery saws, I just used a jig saw since all of my dowels were close enough to the edge. For sanding, I used Sharon's trusty belt sander again. Trying to use the finish sander for this just wore holes in the paper.
Next was the wood filler step. I buy stainable wood filler by the 8 ounce tub, which is good becuase I needed plenty. I mostly blame the warping of the 2x12 pieces for the big gaps, but there were plenty of minor imperfections in the wood itself to be filled, as well as tear-out from drilling for the dowels, and a couple of spots where I managed to chip shelf edges during assembly. Along the center of the seat area, I had to do quite a bit of filling to compensate for the way the two pieces didn't fit together as well as I'd hoped. There's about an eighth of an inch of filler running basically the whole length of the bench.
After that way dry it was time to sand the entire project again and start staining. I diluted the stain 50/50 with solvent to lighten it up a bit, since I just wanted a little color. This worked pretty well, and brought out the grain very nicely. Some of the parts of the BK panel stained differently than others, but what can you do? At this stage, the color looked more like red cedar than red oak.
Once the stain was dry, it was the beginning of a full week of finishing every day after work. First, I turned the bench upside down and polyurethaned the bottom side of everything, plus all the vertical surfaces like the legs and the shelf edges. I've found I have beter luck if I finish vertical surfaces with the finish running "up" the inverted piece instead of down the upright piece. It gives me a chance to fix any egregious errors before finishing the tops. Next, I turned the bench over and finished the tops of everything. Once that was all dry, a light sanding all over by hand smoothed out any lingering rouch spots. Then, a top coat applied the same was as the first coat, folowed by a third coat for all top surfaces plus the edges of the seat and any places that looked like I may have missed them earlier.
And that's it! I think the finish browned up the stain very nicely. The polyurethane I used should hold up for a few years, then I'll give it another hand sanding and a new coat. After a few rounds of progressive finishing like that it should be pretty well armored to leave out in a hurricane.
This bench isn't the prettiest thing, but it is nice. It's super sturdy even though there are not any vertical supports in the middle. Using 2x12s for the seat may be responsible for that. Slotting the shelves into the legs as I did gives the thing plenty of stability even though there aren't really any triangles in the piece. To wobble, it would have to flex both shelves.
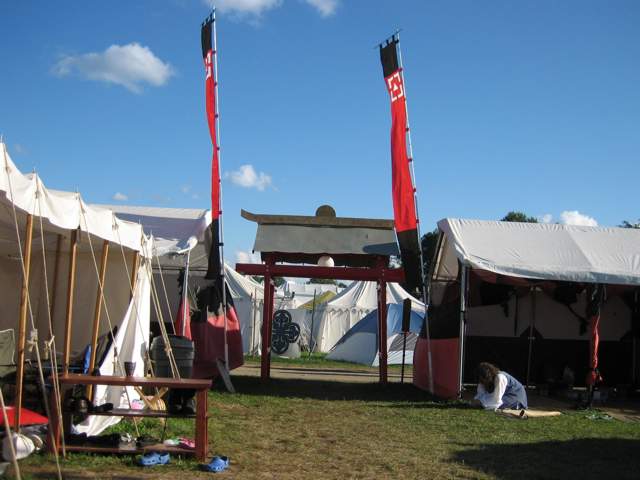
Here's a picture of the bench in camp at Pennsic XXXVII. The bench is in the lower left and you can see the excellent gate and banner of our camp in the middle. The sloped top wasn't completely successful at causing rain to roll off, nor did it keep people from leaving things on top. Nevertheless, people generously complimented me about the bench and caused me to blush on numerous occasions.