Filled Icehouse Pieces
Factory Outside, Hot-Glue Inside

This set, June 2000. More below.
This set, June 2000. More below.
These new injection molded Icehouse pieces are great! Every piece is the same, the sizes are precise, and they're pretty to look at. There's just one small problem; they're a little light for playing Icehouse. In light of all of the positives for these new sets, this is a relatively minor negative, especially considering the large number of other games that use Icehouse pieces, but for those of us who really like playing Icehouse, it's a little more major than for most people.
I thought about it for a few months, and eventually decided that filling in the pieces with something else would make them heavier and more solid while maintaining the factory perfection of the molded exterior. After experimenting with a couple of options, I decided on hot-glue. After filling a full set of pieces with plain hot-glue (as seen at the top of this page), I also noticed that you can buy decorative hot-glue, and a new arm of my Icehouse hobby was born.
Even the cheap glue guns like the one I have get pretty hot, and you can give yourself a pretty nice burn if you're not careful. make sure you don't set fire to your desk or anything also. These things usually don't have power switches, so make sure you unplug the gun when you're done.
There may actually be an advantage to using a cheap gun, in that the glue won't get hot enough to melt the pieces. Try to keep the hot tip of the gun away from the piece walls, and keep an eye on the pieces to make sure they're not getting soft. I haven't had a problem, but if you're using a real nice glue gun, you might.
Read all your instructions and stuff.
 |
You'll need:
|
 |
Basically, you're just going to squirt hot glue into each piece. Like I said, I was going for several layers here, so I went from piece to piece, but you could do them one-by-one if you want. |
 |
Here you can see the pieces starting to fill up. |
 |
The 1-pointers fill up first. When the piece gets full, press it base down onto the pad. |
 |
Press down pretty hard, to force any extra glue out of the piece. You want the glue to wind up level with the bottom of the piece. |
 |
I mean, press really hard. You can also slide the piece a bit to smear glue out from underneath. |
 |
The two-pointers filled up next. |
 |
And finally the three-pointers. I don't recommend doing more than one stash at a time, since the pad gets pretty crowded and you don't want the pieces to stick together. You can see how much glue squirts out from under the 3-pointers here. |
 |
This is the fun part, where I try to get all the decorative glue out of the gun by running a couple of plain sticks through. It doesn't work, of course, so be aware that you'll never get all of the glitter out of your glue gun. Luckily, these cheap guns only cost a few dollars. |
 |
Let the pieces cool for a few minutes, then peel them off the pad. Now's a good time to unplug the glue gun. |
 |
Flex the excess glue back and forth a few times to loosen it. |
 |
Eventually, it will probably fall off, but you can help it with a fingernail if you want to. Don't use anything sharp, or you'll wind up damaging the pieces. |
 |
Eventually, you'll be finished. You can probably play these pieces immediately. This whole process takes less than an hour per stash. |
Here's the finished set, I decided to call it "Buried Treasure". There are little blobs of gold- and silver-glitter buried in red-glitter glue. I'm not totally happy with the way these turned out, I managed to trap some air bubbles inside, but they're not bad.
One benefit of using several layers is that the glue shrinks a bit when it cools. If you fill the piece all at once, the base winds up just a little concave. That's not necessarily bad, but if you fill the pieces in layers, each layer will have a chance to cool a bit before the next one, so the base will come out flatter.
I've made a few of these decorative filled sets now, including:
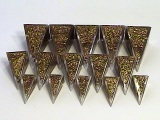 |
Fort Knox Gold (July 2000) |
 |
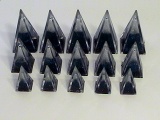
CD Silver (July 2000) |
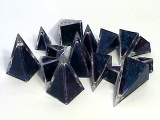 |
Bruise (Blue & Purple) (August 2000) |
 |
Mt. Fuji (Purple base with blue body and Pearlescent tips) (November 2000) |
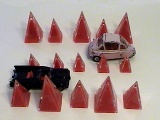 |
Traffic Pyramids (Fluorescent Orange), shown here with an Isetta and the Batmobile (May 2001) |
 |
Pink Icehouse pieces filled with fluorescent pink hot glue (February 2009) |