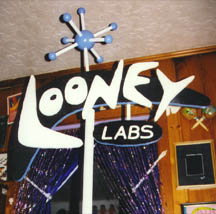
"Looney Labs" Sign
A Big Logo on a Stick

July 1998
July 1998
I'll let Andrew Looney himself tell you the story for this one. As he says in the ( Wunderland Weekly News for July 30th, 1998):
One day in our booth at Origins, I was talking to Elliott Evans and I remembered that he's a clever guy who's always building stuff, so I said to him "Hey! You know what we need in here? We need a life size version of the signpost in the Looney Labs logo! Do you think you could build such a thing?" Eeyore thought about it for a little well and declared that he thought he could. So I asked him if he could get it done in time for us to use at Gen-Con. And he said he'd try. And you know what? He did it! And it's great! We picked it up yesterday, just in time for packing in with the stuff we're shipping out ahead of time by truck, and it's really really cool.
The logo itself is cut from 5/8 inch plywood, and painted various colors with spray paint. The letters are held on with screws, in case they ever need to be replaced. The atom is made out of wooden knobs for the elctrons, glued onto the end of wooden dowels. The dowels are screwed to a large plastic "nucleus" sphere.
[Update 2001.07: The plastic nucleus was too fragile and the plastic kept cracking. I replaced all spheres in the atom with styrofoam spheres. We'll see how well they hold up in the long run.]
The logo is held up in the air by three poles that screw together using hanger bolts and threaded inserts. The base is also the box. Open it up and there's enough room to store the sign and all three poles. This box is made out of 2x4s, 1/4 inch plywood, and 5/8 inch plywood. It's strong enought to stand on.
The key to the process is a little establishment you may never have heard of: Kinko's. Andy sent me an Illustrator file of the logo, and I brought it to Kinko's printing it out in the largest format they have available. After that, I had it enlarged several times on the blueprint copier until it was sign-sized. Then, I glued the paper down to the 5/8 inch plywood and cut out all the shapes on the band saw that was my payment for this project.