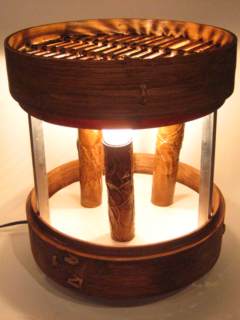
Space Lamp, or 'Splamp'
3D Firefly Fan Art
June 2007
June 2007
"When all you have is a hammer, everything looks like a nail."
That's the way the aphorism goes, anyway, and here's how it works in life: Once you develop some skill; like sewing, painting, crafting, knitting, photography, model making, etcetera; everything you see; like movies, TV shows, etecetera; generates ideas to exercise that skill. Photographers pay attention to how a scene is lit and the shooting angles. Sewers pay attention to the costumes and how they are made. Model makers pay attention to vehicles and buildings. Crafters pay attention to the props and which ones they can recreate.
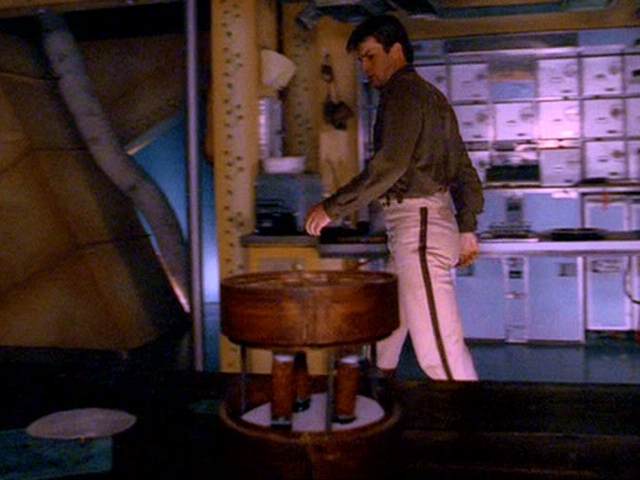
So that's how this project started. Sharon and I were watching the Firefly DVDs, and I started to notice a lamp on the table in the ship's galley. It was visible in every episode that has a scene in the galley. None of the characters seem to pay much attention to it, it's just a lamp to them, I guess. What attracted my attention is that it appeared to be made from a bamboo steamer. Starting with a ready-made steamer, the rest of it looked pretty simple.
I rewatched some of the episodes to listen to the commentary, and every time the lamp appeared I tried to take a screen capture that showed it. These enabled me to draw up plans and make the lamp you see above. (The images below are links to larger versions.)


The name comes from what seems to be an "in joke" bewteen Alan Tudyk (Wash) and Nathan Fillion (Mal). Several times during the comentaries one of them says something like, "And here you see my space pencil, or spencil."
I watched for this lamp in Serenity, but it does not appear as a lamp. There's something on the galley table that looks like this lamp, but it's full of dinner rolls and has a serving implement sticking out of it.
I started with a 10 inch bamboo steamer. The one in the show actually seems to be made from a 14" steamer, but this was a bit more manageable for my purposes. To darken it, I used regular wood stain.
The vertical rails are aluminum channel intended to be used as edging for 1/4" panels. Brass wood screws attach the steamer parts to the aluminum rails to make the body of the lamp.
The bulbs are 25 Watt "ceiling fan" bulbs, chosen for their standard socket base and flame shape. They are screwed into phenolic (plastic) lamp sockets, the kind that have a right-angle bracket in them for mounting to a surface. The bracket is used to secure the socket at the end of a short length of bamboo using a single screw. The hollow bamboo provides a channel for the wiring. The bamboo is secured to a painted disk of 3/8" plywood using glue and nails. Holes in the plywood allow the wiring to pass through. The base is attached to the lower part of the lamp using three more screws.
The cord for the lamp is a standard lamp cord, with an attached plug. I added a switch to the cord.
I began by staining the steamer parts. There wasn't much point continuing if this didn't yield good results.


Then, I drilled the mounting holes in the aluminum rails, and transferred marking for those holes to the steamer parts. I attached the rails to the lower half of the lamp.
I wired up the sockets, and mounted them on top of the lengths of bamboo, feeding the leader wires down through the center. I wrapped the lamp assemblies in tape, and colored the tape using the same wood stain as before. The "candles" also needed a coat of clear enamel to fix the stain.


After laying out the disk design on my computer, I transferred the pattern to a piece of plywood. After cutting and drilling, I painted the disk white using standard interior paint.
Once everything was dry, I mounted the "candles" to the disk and slid the disk into the base of the lamp. I passed the wires through the bamboo slats and spliced everything together. Then, I used screws to firmly attach the disk inside the lamp base. I also secured the wiring using staples.


After that, it was a simple matter to place the other steamer part on top, and secure it with screws to complete the lamp.

The lamp took me about two afternoons to make.