Suzuribako
Ink Stone Box
August 2007
August 2007
A suzuri is a stone used to grind a solid ink stick (sumi) with water to make ink. Historical reasons for this are too complex to discuss here, but it's kind of cool. The ink stick is a few inches long, about a third of an inch thick, and about three quartes of an inch wide. It's made of finely ground charcoal and a glue binder. The ink stone has a sloped well cut into it, and you put about a little bit of water down in that well. You rub the ink stick back and forth on the stone, down into the well and back up to the top, for a minute or two until the water has become ink. This ink is then used for brush calligraphy or painting (sumi-e).
It was common in medieval Japan (and is still common today, actually) to have a lacquered wooden box for storing the suzuri. This box might also store the ink stick, one or more brushes, and a small container of water for making ink. If you search the internet for pictures, you'll find a wide variety of suzuribako, from plain wood up to heavily gilded examples.
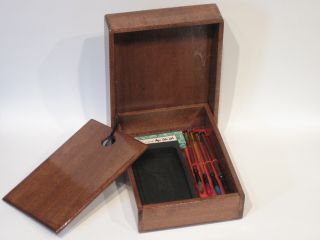
I wanted to make a suzuribako to bring writing materials and supplies up to Pennsic to serve as a planner and organizer. I didn't actually buy a suzuri until after I'd made the box. The size of the box is based more on the size of 1/4 inch wood available than on what is to go inside, but the final box turned out to be exactly the right size for storing my favorite stationery, so I feel pretty lucky.
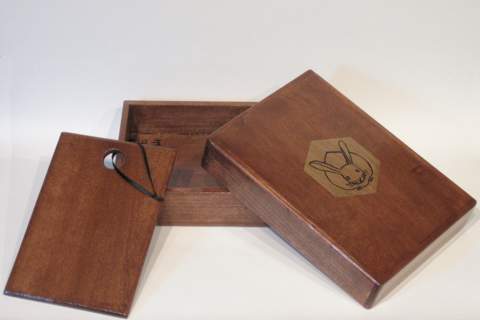
The box itself consists of a lid, bottom, and an extra flat piece that can be used as a paperweight, or to separate materials inside the box. I painted a rabbit design on the lid for decoration, and the whole thing is coated in several coats of clear lacquer. This is not good Japanese natural lacquer, but I think the fake modern lacquer gave me some experience with this type of coating.
The box is made entirely of poplar wood. The Home Despot carries this wood in various widths and thicknesses. The 1/4 inch thickness is much better for crafting than balsa or basswood, and comes in the largest variety of widths. If you buy the wood pre-cut, it's faster and easier to make projects like this. When I saw the wood they had available, I realized I could easily make a suzuribako with very little cutting. I wound up buying one piece of 6 inch wide wood, and a couple pieces of 1.5 inch wide wood.
To fasten the box, I bought some 1/8 inch hardwood dowel to use as pegs.
I also got some water-based wood stain, in a "Rosewood" color. I didn't know how well this new water-based stuff would work, and it turns out that it works great. It doesn't stink up the world the way oil-based stains do, and the color is just as nice.
I also bought some clear, high gloss lacquer to finish the box. This stuff is beautiful when dry, but contains evil, evil solvents. To get a good finish on the box took many coats, much sanding, and weeks of daily coating.
At first, I cut the top and bottom pieces to be the exact same size, figuring that with the lid edges on the outside of the piece and the bottom edges on top of the piece, everything would fit exactly. Then I realized this was insane because it would leave no room for finish, or even natural swelling of the wood, so I cut down the piece that was to be the bottom of the box.
I kept to the plan otherwise, though. The side pieces for the bottom are the length of the bottom plus a half inch. The end pieces for the bottom are exactly length the same width as the bottom. The side pieces for the lid are the length of the lid piece plus a half inch. The end pieces for the lid are as long as the width of the lid piece.
I also cut a piece of flat wood that would fit inside the box, and drilled a hole in it for the ribbon.
I cut a bunch of pegs from the dowel, about and inch long, and sanded the ends.
For assembly, I glued the pieces together and let the glue dry overnight. Then, I drilled holes for the pegs, and glued the pegs in place. The pegs were too long for the holes (by design), so they stuck out. There are two pegs at each corner, and then two or three pegs in each edge. Once the glue was try, I trimmed the excess length so that the pegs would be flush. I used a router bit in the dremel tool to round all the edges, including the edges of the paperweight and the hole through it.
Then, I sanded everything as smooth as I could, cleaned off the dust, and stained the entire assembly. Once that was dry, I started with the lacquer.
Luckily, I'd read a tip several weeks before about the best way to treat your brushes on long projects like this. Instead of cleaning the brush every time, wrap the brush in aluminum foil, put that in a plastic bag, and put the whole package into the freezer. The next day, pull the brush out, let it warm up, and away you go.
I did a couple of base coats of laquer, sanded, then did a smooth coat. Then, I was ready to decorate. I actually had to do the decoration twice. My prigonal plan was to simply draw the usagi (rabbit) design on the lid in gold paint, then top coat it with more lacquer. Unfortunately, the solvents in the lacquer are highly efficient paint removers, and the top coat smeared the gold paint.
I covered the smeared design with a hexagon of gold paint, and let that dry as completely as possible. Then, I did several quick coats of lacquer over the gold to seal it. I could not apply thelacquer and then smooth it, I could only wipe a coat of lacquer on, and let it dry. Then, transfered the usagi design onto the hexagon using white carbon paper, and traced it with black enamel paint. This was also allowed to dry for about two weeks, and top coated with several quick coats. The lacquer lifted the blakc paint a little, so I sanded it smooth and gave it a couple more quick smooth coats.
Finally, I declared it done. I'm pretty happy with it. The lacquer is glass clear and very hard. Here's a picture of the box with writing stuff in it: