Toy Chest
Large wooden toy storage box for some nephews

July 2008
July 2008

Sharon's sister has two sons, and a room of their house is basically full of toys. She and her husband asked me if I'd be willing to make some kind of toy chest to hold a portion of them, and I was only too happy to oblige. Sharon bought the lumber and hardware, I chipped in the labor, and the gift was ready.
When I started planning this project, I had all kinds of fancy ideas for whizzy features to add (drawer, interior tray, secret compartment, fancy joinery) but in the end I just made a big box. There are a couple of nice touches, but getting it finished before the family moves to another state wound up trumping grand plans.
As far as that fanciness goes, the chest has a bottom that is raised above the floor by about four inches, and is fully captive in a dado that goes all the way around. The sides are cut to form "legs" at the corners; cut in nice sweeping curves I might add. The lid is held up by springy supports, which also help keep the lid closed when it's down. The lid itself is a box lid, not just a flat flap.
For safety, there are two large holes bored in the back of the chest. These are air holes, because kids are silly sometimes and climb into things. The box isn't really airtight to begin with, but a little more ventilation can't hurt.
The box is constructed almost entirely out of half-inch plywood. We chose this material because it is lighter than 3/4 inch wood, but much more durable than the 1/4 inch ply that I normally use for boxes. This needs to survive two growing boys, remember. We bought two 4'x8' sheets of this plywood at the hardware supermarket, and had it cut into quarters since no piece was larger than 24"x48". This gave me three extra pieces of plywood, but I'll use it eventually.
There's also some nice hardware.
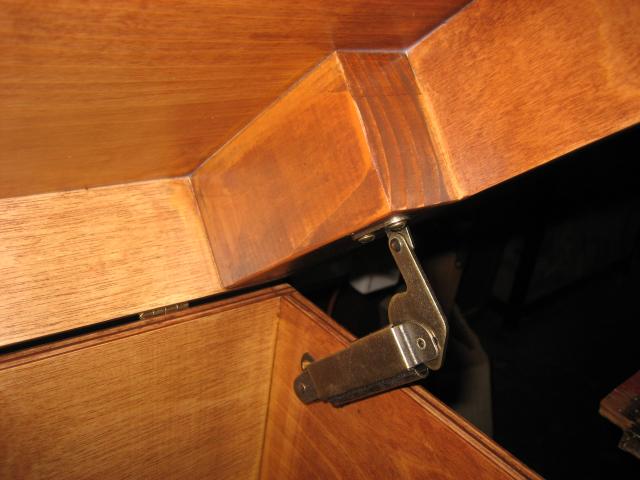
These springy supports hold the lid up when it's open, keep it from closing too quickly, and keep the lid down when it's closed. They're meant for flat lids, not box lids, so I had to glue blocks in place mount them. They came with long screws, about 1.5 inches, which were good for mounting to the blocks but not so good for attaching to the side walls. I replaced these with shorter brass screws.

Two knobs on the front of the lid make the box easier to open. These match the end handles below and have a nice "antique brass" finish. These attached like standard drawer pulls, with a scew that went from inside the box through a hole into the knob. I added some brass washers on the inside to make it just a little less likely that the screw heads would eventually pull through the holes.

These chest handles for the ends are just great. They match the knobs, of course, and attach with two screws through the side walls. I was a bit nervous about getting my screw holes spaced correctly, but it turned out to not be as hard as I was fearing it would be.
They have a nice feature that keeps the handles from banging against the chest while they hang down, and keeps them from pivoting up much past the horizontal when they are lifted.

The hinges are simple, mildly decorative brass hinges. They're holding in the plywood fairly well, but I'm nervous that the springs in the lid supports are pushing them in odd directions. There are three hinges across the back, spaced evenly. I might have been better off with a long piano hinge, but this works reasonably well.
In this picture, you can also see the air holes again. These are 2 inches in diameter. This is a common size for "desk grommets", so once the boys get a bit older it will be easy to buy covers for these holes if the holes become a problem.
- Cut the pieces. I used a table saw for this step, which is so much easier than using a circular saw.
- Each end piece is 20"x20"
- Front and back are 20"x40"
- Lid top is 21"x41"
- Box floor is 20.5"x40.5"
- Cut dadoes for the floor. The front, back, and end pieces need a slot in them to hold the floor captive. I used a stacking dado set to cut these, and it goes really quickly. The dado in each piece is about four inches from the bottom.
- Assemble box. Assembly goes quickly also, when you have a nail gun. It's tricky making sue all your nails are placed correctly so they don't stick out through surfaces, but my success rate is actually higher with the nail gun than with a hammer. Plus there's much less splitting of the wood.
- Nail to front to sides. This puts nail holes on the front, but it also puts the edges of the plywood on the sides where they are not as visible.
- Place and glue floor. Sliding this into place is a bit of a pain, but eventually it gets in the right spot.
- Nail back to sides. This seals the floor in place. I actually nailed through all sides into the floor to keep it from shifting.
- Nail lid on. This closes up the box and is the last chance to make everything square, so be careful here.
- Create lid. The box is now sealed shut, and to open it back up we need to cut the top off creating a lid. It's easier to do it this way than to create the lid and box separately and makes sure that the two parts match.
- Mark lid cut. I made this mark all the way around in pencil, about four inches down from the top.
- Drill holes for hinges. By placing the hinges now, along the pencilled line, and drilling holes for the hinge screws, I could make sure that everfything was properly aligned, and that there was a small gap between top and botom of the finished box.
- Cut top off box. I had to use a circular saw for this, since the completed box was too large to push around on top of the table saw.
- Fill gaps and nail holes with wood filler. This takes forever, but gives the completed box a more professional look. It also fills minor voids and knot holes in the plywood.
- Shape legs. On each side, about three inches in from each edge, I drew a three inch radius arc, then connected the arcs across. I then cut out the waste wood and sanded the cuts and curves with a sanding drum chucked into the drill.
- Drill air holes. I used a 2" hole saw for this. I needed a fresh battery in the drill for this, as using a hole saw causes significant drag on the motor. Maybe it would also help if I had better quality hole saws.
- Test attach hardware. I prefer to do all the drilling and test fitting for hardware before finishing. For one, if you do need to try the hardware in a different spot, it's easier to patch extra holes at this step than if you wait until the end. Also, you find out if your hardware doesn't fit or work as you expected. This is the point where I mounted the blocks for the spring-loaded hinges.
- Finish the box.
- Sand all joints, surfaces, and filler smooth. This takes longer than you might think, and uses a bunch of sandpaper. I have a "corner cat" style finishing sander which makes this easier, but it doesn't actually speed things up any. Especially sanding the filler down and making the joins flush. It makes a big difference in the final product, though.
- Stain. I used a Minwax "Cherry" stain on this, mostly because it's what I had plenty of. I've also used this stain on a nuch of oterh stuff, so all that stuff will match if it's ever together.
- Seal. I almost always use a sanding sealer on my woodworking projects. The sealer soaks in and raises the grain, then hardens up for good sanding. Since this is for indoor use, I used a water based sanding sealer.
- Sand. After the sealer, making everything smooth creates a great base for the finish coats. If you do everything right, the finish goes on smooth as silk. You actually wind up using less finish, since you're not trying to cover flaws in the surface.
- Finish. Two coats of water based polyurethane/acrylic finish should make this easy to clean. I sand between coats, of course, to keep things smooth. A three-dimensional object like this also has to be finished in two steps for each coat. I try to do the outside first.
- Attach hardware. None of the hardware came with washers, so I went and bought some brass washers to keep the screws from digging into the wood. Since all the holes were pre-drilled, this was just a matter of cleaning out the holes a bit, and screwing everything together.
- Take some pictures

Here's what it looks like to be trapped inside.