Deluxe Volcano Box / Board
Plexiglas Volcano Board with Integrated Storage
December 2002
December 2002
So in discussion on the Icehouse mailing list, we came up with the idea of a transparent Volcano board so that you can place a starting pattern underneath to help you set up the pieces. I wanted to go to a plastics store to get transparent, square, eighth-inch acrylic rod, but I wound up getting opaque, square, eighth-inch PVC strips at the hobby shop.
After I glued the strips down to some Plexiglas in the same pattern I used for my wooden boards, I realized that I hadn't bought enough to go around the outside. Unwilling to go back to the hobby shop in late December, I had to come up with a way to edge the board using materials I had around the house. I also wanted to figure out a way to hold the pattern underneath the board.
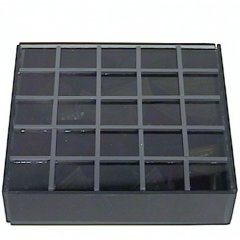
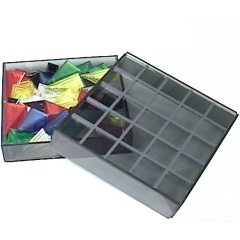
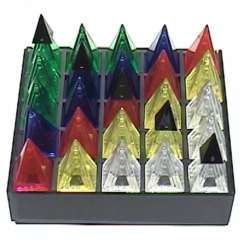
One morning, I figured out how to solve both problems at once. If I turned the board into the top of a box, and made the sides of the box come up past the edges of the board, then the sides would become the rails I needed. If you then inverted the bottom of the box, it could be used to hold a pattern in place! Plus, the box could be used to store patterns and pieces between games.

It was the perfect solution in several ways, so I made it. It came out OK. It's a little messy and fragile because I'm not so great at gluing plastic (still), but as a proof of concept it was very helpful and pointed out some changes to the plan if I ever decide to make another one. I made a small miscalculation in that any pattern that is sized to fit perfectly under the board is too big to rest flat in the box! Oh well.
As previously mentioned, the box is constructed entirely of Plexiglas and PVC strips. The strips came from the Plastruct rack at the hobby shop, and the Plexiglas was left over from other projects.
I used Duco Cement to hold the thing together, because it's the only plastic adhesive that I keep around the house. It's not totally appropriate, but it works well and doesn't have some of the problems that other adhesives have with acrylic.
Similar to the Volcano Board for the top, but I tried out a new method for placing the strips that didn't need to have pieces in place. (I was paranoid about gluing pieces to the plastic, as you might imagine.) What I did was, I printed out the layout for a Volcano board onto a "full sheet label". Then, I peeled the backing from the label and placed it sticky-side-up onto what I use as a light table. I carefully stick the strips down to the label in the correct pattern, following the lines that showed through the paper. Once I had all the strips in place, all I had to do was put glue on all the strips and press a sheet of Plexiglas down onto them. Once the glue was dry I peeled off the label et voila, a Volcano Board.
Then, I cut rectangles that were 5.75"x1.5" for the sides of the top, rectangles that were 5.5"x1.125 for the sides of the bottom, and a 5.625" square for the very bottom.
I constructed the top and bottom separately, of course, then put them together when everything was dry.