Pennsic Boxes
Wooden Chests with `Clothes Bar' Extension
September, 1997
September, 1997
For the past couple of years, Sharon & I have gone to the Pennsic War for a few days at the end. We're not serious medievalists, and mostly do it for the camping, shopping, and festival atmosphere.
We make a decent attempt to fit in, and are slowly amassing a set of reasonably nice garb. Our tent, however is a glaring ananachronism [sic]. It's seven feet tall, the floor is about ten feet by eleven feet, and it's made out of sky blue nylon. Camping is camping, but squalor is squalor, and we can't afford the yurt yet.
There are two problems we have trouble coping with while camping in this tent for a few days in a row:
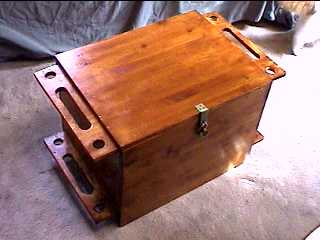
So, I had this idea for boxes that could be used to hold and transport stuff, and would also serve as a base for a clothes-bar. Sort of a portable closet. Sharon and I refined the design into a set of plans, and I built them.
See the holes at the front and back of the handle pieces? We have rods that fit vertically into those holes. The vertical rods will support horizontal rod, from which we intend to hang clothing.
In the mean time, the boxes are sitting in our living room, holding comforters and magazines.
We took these to Pennsic and they worked reasonably well. The whole construction was just barely short enough to fit in the tent, and was very difficult to assemble therein (oops). I think I'm going to trim the poles an inch or two. The boxes also need a lid stop/support. These are wasy to make (a string) or buy.
In other news, a couple of the handles broke. Bleah. I'm going to have to reinforce all of the handles with brass strips. This is easy, but is annoying to have to do. If I had it to do over again, the upper handles would be made of thicker wood, and there would be no lower handles.
These boxes are still serving us very well, both at Pennsic and every day in the living room. Since they're sturdy enough to sit on, they make very good supplementary seating.
The brass reinforcements on the handles work well. I wound up drilling holes in the brass strips, then driving screws through the stips into the wood and grinding the screw heads off. This leaves a smooth surface for gripping.
For the lid supports, I used lengths of fine brass chain, simply screwed into the lid and the isie of the box. If the box is very full, you have to take care to keep the chain out of the way when you close the lid, but usually there isn't much problem. I should have bought stronger chain, though. Last summer I pushed on the lid too hard, and all of the links of the chain came apart! (Oops.) Easily replaced, though.
We also found some nice brass locks up at the war, which go nicely with the other hardware. These aren't secure enough to make us feel safe leaving valuables in our tent, but are enough to assure us nobody can go rummaging casually through what we do leave there.
Wow, it's hard to believe that it's been almost nine years since I made these. We still take them to every Pennsic, even though Sharon has since upgraded our tent to a nice canvas period tent. This gives us a lot more room to stand up in, and we spend more time up at Pennsic. This means more clothes, so the boxes have been getting heavier and the handles have been showing more wear. I finally decided to pull the old handles off and replace them with handles made from thicker wood.
Actually, I modified the handles so that they are made of three pieces. Blocks at the end of each handle are made of 2x4, and the handle itself is made of 1 inch dowel. This should add to structural flexibility, and make it easier to replace any pieces that break.
This was also a good excuse to sand the whole outside of the boxes and give them a new coat of finish. I also patched most of the chips and dents the boxes have received over the years. Hopefully, they are a little sturdier now. They sure do look nicer, since I've learned a lot about wood finishing in the past eight years.
I've gotten a few questions about how the clothes bar part of this project actually works, so I took some pictures up at Pennsic this year.
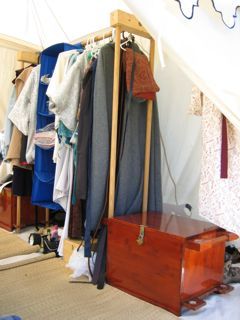

To the left, you can see how the vertical poles fit through the handle holes
and support the bar.
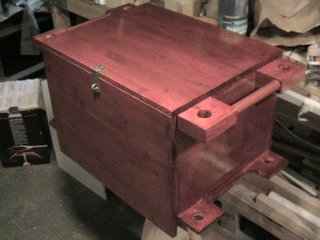
Above, see how a block fits on the vertical poles
and supports the horizontal bar.
The block is made of two lengths of 2x4 that have been joined (with glue and screws) to make a piece of 4x4. The vertical holes go halfway through the block, so that it sits on top of the poles. The horizontal hole goes all the way through so that the width of the entire construction is adjustable.
The poles are wooden poles, about 1.5" in diameter, commonly sold in hardware stores as closet rod.
I guess it took me a month or so to complete this project, but I didn't work on it constantly.