Bargain Lightbox
Portable, Inexpensive, Light Table Type Thingy

July 2003
July 2003
Occasionally, I need to do something like tracing a drawing onto paper, viewing a bunch of slides or negatives, or displaying some clear plastic things with light shining up through them. By "occasionally" I mean "maybe twice a year", but those times really add up over the years. I could just buy a light box, but decent ones start at about a hundred dollars, thus inspiring me to put off the purchase and once again have that realization at some later date that the thing I'm doing would be much easier if only I had a light box.
I knew that if I could just figure out a way to build one cheaply, then not only would I save a little money, but I'd be able to get a project out of it, turning the money I spent into an investment in readership.
The main barriers to building my own lightbox were the two main
components I knew I needed: a translucent surface thick enough to
withstand reasonable pressure, and some fluorescent fixtures to
place beneath it. It wasn't until recently, while shopping in the
housewares store (OK, "Bed, Bath, and Beyond") that I saw two
things that made me say "
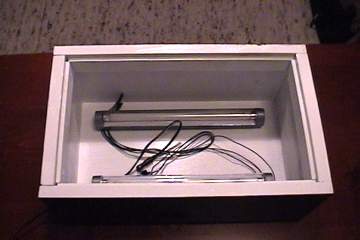
While wandering in the closet area, I noticed some of the items for lighting the interior of a closet without wiring, and saw in particular these foot-long fluorescent tubes. They're meant to be powered off eight (!) AA batteries each, but they also had ports for an external 12 VDC powwer supply. Bing! Those were my lights, and didn't I just see something a couple of aisles back that would be a good surface?
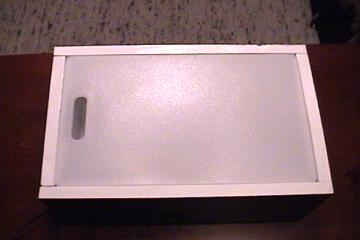
Yeah! Cloudy plastic cutting boards! The handle hole in the board was a bit unfortunate, but these boards were available in 9.5 by 13 inches, perect for working with 8.5x11 inch materials or smaller.
I briefly considered buying a 2 inch deep baking pan to use as the box, but I decided bulding a wood box would give me more control and would be cheaper given the pile of scrap wood in my basement.
The first thing I did was modify the light fictures so that they could both be run off of a single power supply. I opened them up, snipped off the power jacks, and fed the wires for the jacks out through the holes in the plastic. then, I wired up the two fixtures (in parallel), and soldered one of the jacks onto the end of my wiring harness. Once I tested this and found it to be good, it was time to build the box.
I had some boards left over from putting some shelves into a closet, and they were just the right length. I was able to get both of the end pieces from the same board, and I cut both the sides at the same time so I could be sure they were the same length. One quick hammer and nail job later I had a box.
I fit the cutting board into the top, then flipped the box over so that the cutting board was resting flat at the "bottom" of the box. This enabled me to press my rails into place and be sure that the cutting board would be flush with the top edge of the box. I glued the rails lightly into place, then I secured them with staples from a staple gun.
Once that was done, I stapled the bottom panel onto the box. Normally, I would have used nails, but the staple gun was working so well that I decided to just do the quick and easy thing. Using 1.5" finishing nails on 1/4" plywood has always seemed like overkill to me, anyway. lastly, I drilled a hole in the side to feed the power cord in to the lights.
Now that the box was completed, it was time to make it look like something other than scrap lumber. I was in too much of a hurry to do real wood finishing, but spray paint was about the right speed. I painted the inside white to reflect more of light towards the surface, then painted the outside black except for the top edge, which I left white. As soon as that was dry, I stuck the protective felt pads onto the bottom of the box, and I was ready for the lights.
The lights came with some Velcro strips for attaching them semi-permanently to the closet, and I saw no reason to go another route. The peel-and-stick adhesives had the lights installed in no time. I positioned the lights about the same distance from the sides as the ends of the lights were from the insides of the box. I also put an extra Velcro patch in the midle of the box so that I could secure the wiring harness with a bit of Velcro Get-a-Grip.
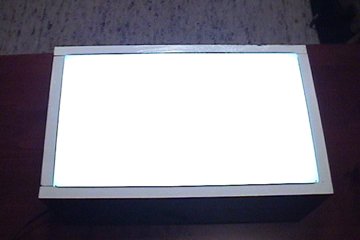
I hooked up the power source, installed the cutting board, and plugged the contraption in! Fiat Luxbox!
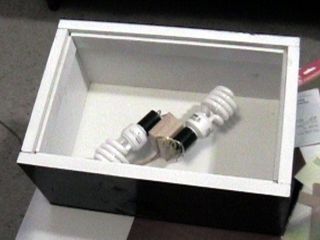
At some point, one of the two cheapo fluorescent fixtures burned out. I think the tube is OK, it's actually the circuit board in the fixture. I decided that the battery operationjust wasn't as important as reliable operation from power, so I pulled out the fixtures and replaced them with actual lightbulb sockets. I had to do that wiring myself, but it hasn't caught fire yet. I put two 100 Watt equivalent compact fluorescent bulbs in there, and the thing is super bright. The bonus is that if I put incandescent bulbs in instead, I could use it as an easy-bake oven.