Pants
A Peck of Pairs
Various
Various
After starting to get pretty good at making shirts, the next step was to get good at making pants. After all, a shirt without pants is still grounds for arrest. I'd made two pairs before, both brown, so I knew I had a good pattern and could make wearable pants. The real goal was to make black/red pants to match the red pocket shirt.
In the fall of 2006, I embarked on the Fall 2006 Pant Marathon, making three pairs of pants. The goal here was to have more pants. Some of my store-bought pants were deteriorating, and I was having trouble finding flat-front cotton pants in standard colors, so I decided to make a few pairs.
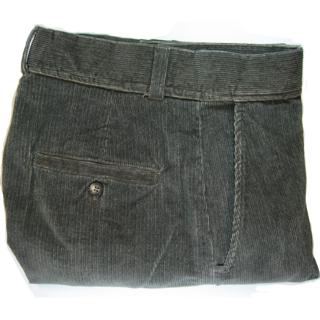
These were my third pair of pants. I had a couple of pairs of green cordury pants already, and they're good for wearing to work at the office. I managed to find this fabric super cheap at a Jo-Ann fabrics that was closing, so it was good practice for the pants I really wanted to make. I even found a set of buttons at the same sale that went perfectly.
For pants made as practice, using deeply discounted remnant fabric, I'm quite happy with these pants. The corduroy is nice, and they look comparable to store-bought pants, at a fraction of the cash price.
I did make one deviation from the pattern. You're supposed to use skirt hook to hold the waistband shut, but I decided to imitate a store-bought pair of pants I have, so I extended the waistband a bit and added a button. Sharon's not sure she likes the way this looks, but usually hidden under a belt anyway.
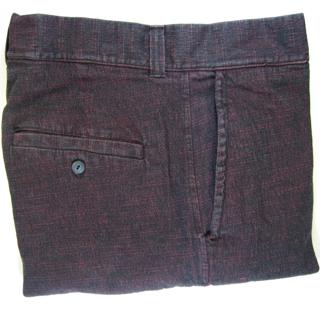
After making the red pocket shirt, I wanted to make pants to match using the black/red side of the denim. This began a hunt of all of the Jon-Ann fabrics in the greater Pittsburgh area before Sharon finally discovered some in the North Hills. I was going to add more utility pockets to this pants, like I did to the shirt, but decided against it.
Lesson learned: fabric that makes a sort-of-heavy shirt makes a sort-of-light pair of pants. They're comfortable though, the bit of stretch in the fabric is great.
I even used the same charcoal-gray buttons that I used on the shirt. They're smaller than the pants pattern calls for, but I haven't noticed any problems.
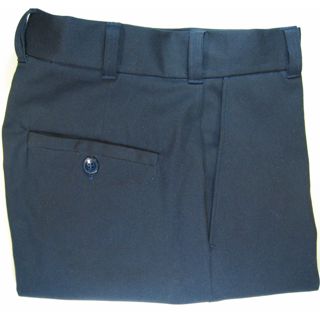
The first of the Fall 2006 Pant Marathon, the Navy cotton pants were the warm up pair. I actually cut the Navy fabric and the Black fabric (for the pants that follow) at the same time.
These actually have mini-pockets (see below) in both front pockets.
| Better Brown Slacks | (January 2006) | |
| Brown Slacks | (February 2005) |

This is a denim fabric,
mostly cotton with a little bit of spandex.
Instead of being blue with a white base,
this denim is red and black.
I'm not sure which is supposed to be the "right" side,
but both look pretty spiffy to me.

 Sweet, soft corduroy,
olive green with a beige base underneath.
This gives the fabric a shimmery look,
even though it's not what you can really call iridescent.
It's more light glimpses of light color within the dark color.
This will be a good pair of pants for autumn.
Sweet, soft corduroy,
olive green with a beige base underneath.
This gives the fabric a shimmery look,
even though it's not what you can really call iridescent.
It's more light glimpses of light color within the dark color.
This will be a good pair of pants for autumn.

 The Navy and Black "bottomweight" twills
are pants fabrics sold by Jo-Ann.
They're actually about 96% cotton and 4% spandex
for just a little bit of stretch.
I'm not totally thrilled with that,
but the fabric is comfortable enough
and doesn't wrinkle too much in the wash.
The Navy and Black "bottomweight" twills
are pants fabrics sold by Jo-Ann.
They're actually about 96% cotton and 4% spandex
for just a little bit of stretch.
I'm not totally thrilled with that,
but the fabric is comfortable enough
and doesn't wrinkle too much in the wash.
For all pants on this page, I used Kwik Sew 3267, "Men's Pants", and just followed the instructions without modification.
My, but this pattern does make a comfy, sharp-looking pair of pants.
Well, I followed the pattern for everything you can see, anyway. I like when pants have small pockets inside the front pockets, so that watches and loose change don't just fall to the bottom. Having everything piled at the bottom of the pocket like that is uncomfortable, so I started adding these mini-pockets to my pants even though the pattern doesn't call for them.
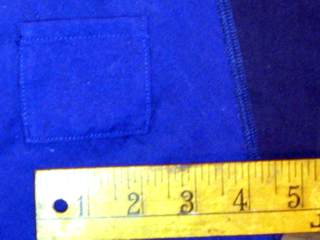
To make these mini-pockets, I cut a 3" by 3" square of lining fabric, and overcast all the edges. Then, I folded about a half-inch of fabric over at one edge, and sewed that down. After that, I folded over the remaining edges about a quarter-inch, and pressed the folds. Once that's done, I just placed the min-pocket on the pocket fabric so that it was about half way down the pocket, and placed midway across the body side of the pocket. Proper placement is vital, as you might imagine, so take the time to figure out the best place.
The photo shows a completed mini-pocket applied to the right front pocket piece for the Navy Twill Pants. I know the mini-pocket it looks tiny in this photo, pants pockets actually are larger than you think.