Plant Shelves
Custom carpentry for Sharon's Plants
July & September 2006
July & September 2006
Sharon is a real plant person. She does all the maintenance and re-potting your supposed to do with houseplants, and they thrive. Often this means that the reproduce, so eventually this place fills up with spider plants and aloes. Sometimes she runs a purge, giving away most of the plants to other people, but sometimes there are just too many plants. This really doesn't become apparent until the fall of most years.
During the summer, most of the plants move outdoors, either to the yard or the porch. In the fall, all those plants come back inside, plus whatever offspring they've managed to produce over the summer. This results in some extreme crowding some years.
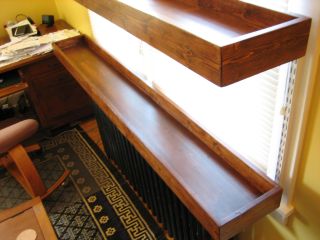
With the recent renovation of Sharon's den in the house, and the ongoing improvements to the living room, Sharon had the idea that I might make some shelves for those two rooms that would seat the plants in front of the windows of those two rooms, which face South. These shelves would have to be sturdy to hold the weight of the pots and dirt, and would need railings of some kind to keep the lousy flealines from pushing the plants onto the floor. Hopefully, they'd match the furniture.
For the shelves themselves, I used pine 1x10 boards, and for the rails I used pine 1x4s. I used Minwax "Chestnut" and "Maple" stains for color, topped with a water-based sanding sealer and a water-based satin poly-acrylic topcoat.
I actually made all three shelves at the same time, but then I messed up but putting the wrong stain on the shelf for the dining room. I finished the two den shelves, and then started over on the third shelf. In the intervening period, I bought a dado set for the table saw, which greatly improved the process and the quality of the finished piece. More on that, below.
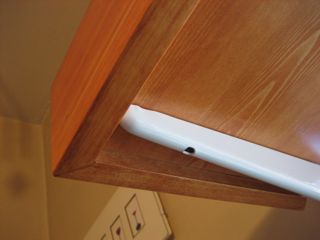
One of the requirements for these shelves was that they have a lip underneath the shelf as well as the railing above. This lip would disguise the shelf brackets a bit, and also keep the shelves from getting pushed back against the window blinds. The lip could only be in the fron an on the sides, though, if the shelf was going to rest flat on the brackets.
The shelf itself was simply cut to length. The front corner ends of the front and side rails were cut at 45 degree angles, so that they would join cleanly in front, with no exposed end grain. The back corner ends face outwards, so I decided not to care. The back rail itself was trimmed by an inch along its entire length so that it could simply sit on top of the shelf.
The front and side rails are simply nailed onto the edges of the shelf. It was something of a pain to keep them lined up so that a quarter inch of lip would hang down, but I was as careful as I could be. The back rail was nailed in place at the ends, then along its length from the underside of the shelf up into the rail.
I had to do a lot of filling and sanding to cover all the nail holes and gaps due to my lousy joinery, but after staining, they started to look very nice. The sealer and finishing really deepened the grain of the wood, so I was happy with the final product.


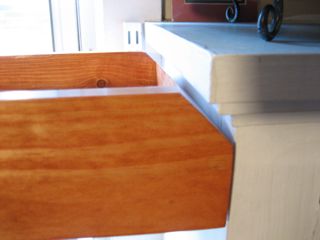
As I mentioned before, I had to redo this shelf and I decided to get fancy on the second round. The rails are beveled at all four corners. The front and side rails have a dado (a slot) along their entire lengths, so they fit onto the shelf snugly, and keep it straight. The back rail has a rabbett so that it sits on top but overhangs the back edge. This results in a shelf that has the same exterior depth as the other two shelves, although it's a little bit smaller inside the rails.
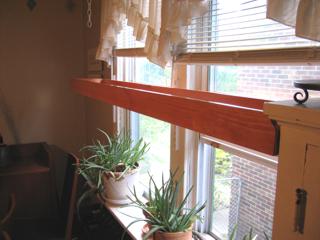
This shelf also had to be beveled at one end so that it would fit under the crown molding of a nearby built-in cabinet. I actually managed to do this by mitering and beveling the pieces before assembly
I was exteremely happy with this shelf came out. It all fits together cleanly, and has a professional look that blew my mind (I made this?). I still nailed everything together, but it almost didn't need it. Even if I never use the dado set again, it was totally worth it to mke this shelf.