Cloth Satchel
A useful bag to carry things in

Completed November 2003

Completed November 2003
In my everyday life, I have pockets. Pants pockets, jacket pockets, shirt pockets, etcetera are all useful for carrying around the dozen or so miscellaneous things I tend to need during an average day. When I'm in costume for some reason, I typically don't have the number of pockets to which I'm accustomed.
Often, it's possible to find some way to add pocket space to a costume that doesn't have any. For instance, for most Pennsic-wear, leather pouches are highly appropriate. They're so appropriate that at least a dozen merchants sell leather pouches of one kind or another. Often, though, even leather pouches don't cut it. For the most part, this happens when the costume has no belt, or is from a culture that didn't use a lot of leather for that kind of thing.
For instance, I bought this great Bedouin-type robe from a merchant, and combined with the long tunic underneath it, there were zero pockets, no belt from which to hang a pouch, and that wasn't really appropriate anyway. So, Sharon made me a nice fabric pouch, and I spiffed it up with some additions.
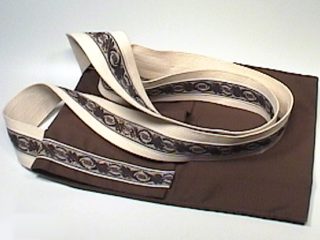
The pouch itself is a double layer of fabric, with interfacing between the layers. The fabric is just a nice green cotton cloth. The strap is some canvas webbing we bought from a tent merchant. The ribbon is a piece of trim I bought up at Pennsic, sewn onto the canvas to prevent people from thinking it's a baldric.
The pouch actually uses a method I learned from my seventh grade home economics teacher. Start with a piece of fabric that's more than twice as wide as the pouch you want, and a little more than 2.5 times as long. Fold it in half lengthwise and sew that into a long tube. Sew one end of the tube shut, and turn that inside out. Flatten it out so that the seam is in the middle of the top (this will be the inside of the pouch). Put the interfacing inside the tube to stiffen the pouch. Fold the edges of the open end of the tube inside, and sew the tube shut. Next, fold the bottom 2/5 up and sew up the sides to make the body of the pouch. Fold down the top 1/5 to be the flap.
Next, I sewed one end of the canvas to the back of the pouch. I did this by hand. I pinned the other end of the strap to the pouch back and wore it around for a day to make sure I had it the right length, then I sewed it in place as well. This is when I started getting comments from people about how I should distinguish it from a master-at-arms baldric or some people might get upset with me.
So, my plain little pouch had to get a little fancier. I decided to run the trim along the whole length of the strap, down across the front of the flap, and fold under a little. The first bit I sewed onto the flap by hand. What a pain. I then machine sewed the ribbon along the strap. It's a little crooked, but not bad. Lastly, I sewed the remaining bit onto the flap with the machine. I tried to be fancy and sew the turned-under bit simultaneously, and missed a bit on one side.
Anyway, I'm quite happy with this. Having a handy pouch to carry things in is important, and it's always fun to make something instead of buying it, especially if you've never seen the thing you want on sale.