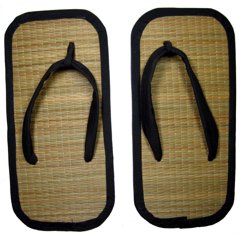
Zori
Japanese Sandals
September 2006
September 2006
Zori are a type of Japanese footwear that have been common for centuries in Japan as day-to-day footwear for those who could not afford or did not need boots. Geta were really only worn when it was wet out, and Waraji were worn for travel, but Zori were daily footwear. Apparently, allied soldiers stationed in Japan after World War II became acquainted with these comfortable sandals and brought them home with them. They've been heavily adapted to modern manufacturing, leading to today's flip-flops.
I decided to make a pair of traditional-looking zori to wear with some of the Japanese garb I've been making when it would not be appropriate to wear geta. This was a pretty simple project, and I'm fairly pleased with the results. The only thing I might do differently is make the straps a bit wider for comfort.
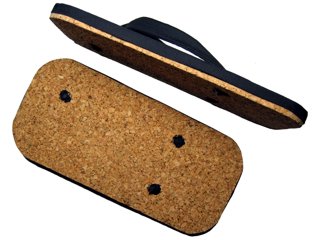
The zori have a core of thin plywood, a sole of quarter inch sheet cork, and a surface of tatami (grass mat). The edging and hanao (straps) are simple cotton cloth. The hanao also contain a layer of cotton batting for padding.
The cloth was all scrap from the scrap bin. The plywood was scrap from the scrap pile. The cork was some of the remains of bulletin-board project. The tatami was purchased new for $3, making it the most expensive prt of the project, but now I have plenty of extra grass mat.
First, I measured my feet. Add an inch to the length and width of your foot to determine the size of your zori. Most traditional zori are rectangular, as opposed to today's curvy, foot-shaped flip-flops. Men's zori are more rectangular, and women's zori tend to be more ovoid. I cut rectangles from thin (quarter inch luaun) plywood to form the core of the zori.
Next, I glued the rectangles down to the sheet cork. I suppose cork like this isn't very historical, but I wanted them to be a little softer than just wood. After the (Elmer's wood) glue dried, I cut away the extra cork with a razor.
With that done, I drilled the holes for the straps. My holes are 1.5" from the toe edge and 1.5" from the inner edge for the toe hole, and 1" from the edges and 3" from the heel edge for the base holes. the placement of these holes will vary according to the size of your feet. The spot for the toe hole is easy to find by standing on the rectangle and sticking a pencil between your toes. The toe hole is supposed to be centered, but you'd need to make somewhat wider zori to make them truly ambipedous. The spots for the base holes should be near the edges of your foot, and somewhere back around your instep. I drilled quarter inch holes down all the way through, and then half-inch holes up through the cork only, to hold the knots.
I could have done this earlier, but I chose this point to round the edges of the sole on the band saw. I used a one inch radius arc. Actually, I used a small can of Minwax wood stain, and just traced around it.
After that, I glued big rectangles of tatami to the upper surface, taking care not to use so much glue that it dripped over the edges or down the holes. Once the glue dried, I trimmed off the extra tatami around the edges, and cut out the tatami over the drilled holes.
The straps and the bit-that-goes-between-your-toes are both made of black cotton fabric. The bit that goes between your toes started out as a strip of fabric about 30 inches long and an inch wide. I sewed this into a tube, turned it inside out, and cut it in half to make two lengths. The straps started out as four strips of fabric about 15 inches long and about 1 inch wide, plus two strips of cotton batting the same width and 10 inches long. For each strap I took two strips of fabric, placed a strip of batting in the middle, sewed down both edges, and turned the whole thing inside out.
Fold the bit that goes between your toes in half and stick it up through the toe hole of the zori. Stick a pencil through the loop and slide the fabric bit between your toes. Tighten the loop a comfortable amount and then tie it off. I had to tie my knot over a bit of hard wire to keep the knot from pulling through the hole later. Trim off the extra fabric.
Then, slide a strap halfway through the toe loop. Stick the ends of the strap down through the holes, and slide the zori onto your foot. Tighten the ends of the strap to a comfortable level and then tie off the ends. It helps to mark the straps where you want them tied, take off the zori, pull the straps way too tight to give you some extra to work with, tie the strap ends to the marks, then loosen the straps back to where they were. Trim of the extra strap so each knot fits in its hole.
Last is the edging. I made two strips of fabric 1.375 inches wide (the width of the yard stick) and 45 inches long (the width of the fabric). I folded each strip in half along the long axis, and pressed it. Then, I folded the raw edges of each strip into the middle of the fold and pressed it again. Lastly, I glued each strip around the edge of a zori, running the fold along the edge so that half of the strip went around the outside, and half around the top. I stuck pins through the fabric to hold it in place while the glue got tackier, then I pressed the curves down with bricks. The ends overlap in the back.