Japanese Garb
Various Pieces of Traditional Clothing
2005, 2006, 2007
2005, 2006, 2007
As I've mentioned many times before, Sharon and I attend the Pennsic War and camp with a Japanese-themed group. While nobody is required to wear Japanese garb in camp, it's definitely encouraged. People around camp will hint, and give sewing tips. After a while, You start to catch on they're trying to tell you something. I had some free time after Pennsic in the fall of 2005, so I made a big stack of garb for myself and for Sharon, my fiancee. This series continued through 2006 and into 2007.
 |
Yellow Hippari (August 2005)This was my first piece of Japanese clothing, ever, so I used this light yellow cotton fabric that was pretty cheap. It's very light, you can see, even in this photo, where the fabric has been doubled and tripled. Hippari are actually not "period" at all. They're traditional Japanese clothing, but a bit too modern for serious SCA wear, which only covers the period from the fifth to fifteenth centuries. I decided I needed some practice with technique using explicit instructions before I went out on my own. Also, this might be a good undergarment for cooler weather. |
 |
Red Batik Hippari (August 2005)More practice, plus the fabric is nice. I actually kind of like the way these hippari fit. The waist ties make them very comfortable, and they stay closed instead of slowly creeping open. I do wonder if I could get away with wearing them in a mundane setting. |
 |
Green Hapi (September 2005)A hapi is a kind of half-lined jacket or overshirt. These are often worn in modern Japan to show team, group, or company affiliation in informal situations. Modern hapi are usually dyed or painted with symbols to display these affiliations, but I decided to keep this one plain. Again, this item is a bit modern, but I hope that by keeping it simple I can get away with wearing it at Pennsic. Just a little extra warmth for evenings and cloudy days. |
 |
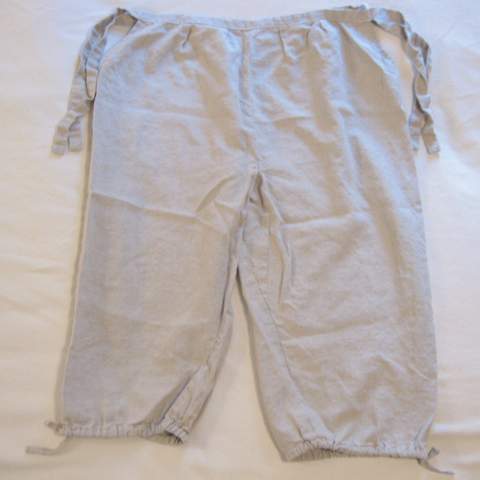
Brown Stripe Monpe (September 2005)Monpe (also "monpei" or "mompe") are simple pants, usually worn by field workers or tradesmen. While most hakama are made with six or eight panels of fabric, monpe only use four panels. Other differences from Hakama are that the legs taper, only come down to mid-calf, and have ties near the bottom. Also, the waist ties are shorter and just tie back-front front-back. Brown Hippari with Brown Stripe Sleeves (September 2005)I realized that I didn't have anything that went with the monpe, really. I had some brown cotton fabric left over from another project, but not enough for an entire hippari, so I made the sleeves from the same stripy fabric as the monpe. coordinated! |
 |
Brown Linen Kosode (September 2005)After making all that stuff from patterns, I felt I had the foundation in technique to try out some more traditional stuff. I found several sets of instructions on the Internet, and putting those together with what I had, I was able to make this kosode. It has its problems, but it looks good enough to wear with the monpe, informal as they are. Some of the problems were failed experiments that made my later kosode better, so it was worth the experiment. |
 |
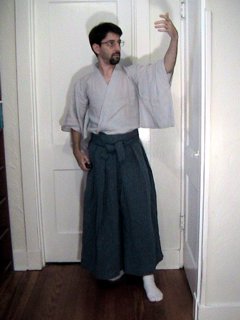
Blue Stripe Hakama (September 2005)My first real hakama. Hakama are much, much simpler than you might think. Period hakama don't even have the back support of modern hakama, so they are most just rectangles, ties, and gusset. These are six-panel hakama, with three rectangles of cloth for each leg, two in front and one in back. Blue Stripe Kataginu (September 2005)Modern and "traditional" kataginu are very narrow in front, but period kataginu are basically just two rectangles that drape over your shoulders with a neck band around a slot that you cut in the middle. However, worn with a matching pair of hakama, kataginu are truly magic. They turn a few pieces of clothing into an outfit. |
 |
Light Blue Linen Kosode (October 2005)This was my second try at a linen kosode, and it came out much better than the first one. I had my technique down, and a better idea of how I wanted it to turn out. This has standard length sleeves, so it should be very comfortable in the summer. You can see I was starting to get bored with the standard boring poses by this point in my photo shoot. |
 |
Indigo Kosode (October 2005)After all that practice, I made this kosode with a great cotton print fabric. The sleeves have an extra half-width of fabric attached, so they go a little further down my arms. The body of the kosode is also a bit longer in case I choose to wear it as a yukata. Lastly, the collar band is a bit narrower so that you should be able to see a standard kosode worn underneath. I usually wear this over the light blue linen kosode and under the blue stripe kataginu and hakama. I have received compliments! |
 |
Purple Batik Hippari for Sharon (November 2005)A hippari, as above, but using this great multicolored batiked cotton. The ties are the same fabric, which is why you can't see them. |
 |
Pink Linen Kosode for Sharon (November 2005)Third linen kosode, and a pretty good version. Linen wrinkles like heck, of course. A simple kosode like this only needs 2 yards of 60" wide fabric! |
 |
Kitty Cotton Kosode for Sharon (November 2005)This is really more of a yukata (bath robe) than a kosode, as the sleeves are attached all the way down, and the garment comes down pretty far. That's OK, Sharon intends to mostly use it as a bathrobe anyway, she says. The sleeves also have an extra half-width of fabric attached to them, so they reach a little farther down the arm. |
 |
Autumn Cotton Kosode for Sharon (November 2005)Another kosode, shorter in length but still longer in sleeve, and using a "leaves and grass" print. Print fabrics like this aren't really period, but I agree with Sharon that it's too pretty to really care. |
 |
Seascape Cotton Kosode for Sharon (November 2005)This print is totally non period, but neither is the karaoke night held by the group we camp with. This kosode is made from a super-funky Hawaiian-shirt kind of print, so it should be just the thing. |
 |
Green Silk Hakama (November 2005)My first silk project, I cut and edged all the fabric one afternoon, and then took the "kit" of pieces to a sewing circle. I managed to fully construct and hem the hakama while at the circle, which impressed some people. Green Silk Hakama for Sharon (December 2005)Hakama skirt, in a length appropriate for Sharon. Both of these are made from a "raw" silk that isn't very period, but is very comfortable to wear. Very little of my garb is made with "proper" fabrics, as these are difficult to get these days and expensive. More on the other parts of this outfit, below. |
 |
Red Cotton Hakama for Sharon (November 2005)Black Cotton Hakama for Sharon (January 2006)Blue Cotton Hakama for Sharon (Spring 2006)All these other hakama we've made are somewhat heavy. Think about how much fabric is involved in a four-panel-per-leg design, and how warm that would be to wear around outdoors in the summer. So, Sharon asked me to make her a selection of lightweight cotton hakama. All three of these are made of lightweight cotton, totally non-period but useful at Pennsic. All three are hakama skirts; that is, the legs are joined all the way down. I'm told this was not uncommon, even for menswear. |
|
Two Grey Silk Kosode (August 2006)For over the green silk hakama, and beteath the padded jacket, Sharon decided we needed fancy "China silk" kosode. Sewing this fabric is like sewing a thin sheet of jello. You need to use a very sharp needle, and you can't use very many pins because they leave marks. Sharon did hand-finishing on hers, but mine if machine finished, which is visible in person if you know what to look for. Two White Linen Kosode (August 2006)To keep the fancy silk kosode from getting filthy with skin oils and sweat, I made us some white linen kosode as undegarments. These are just standard kosode, at which I was getting pretty good by this point. Sharon made the beautiful padded jackets for this outfit. They are described below. |
 |
Yellow Silk Kosode (June 2007)This is the first kosode I've made in a while, and it uses a different design that is supposedly more period. The neck-band only goes down to the bend in the overlaps, and the arm pits are left open. The sleeves are two panels wide, so they come all the way down to my wrists. The sleeves also don't droop down quite as far as on most of my other kosode. This kosode is made from a washable "raw" silk similar to the fancy green silk hakama above. It's very soft. If I can find this again at Pennsic, I want to buy some and make a pair of pajamas. |
 |
Natural Linen Mompe (June 2007)Given the first mompe I made using Folkwear #112, plus all my subsequent experience, I was able to make these mompe more or less freehand. I refered to the previous monpe for some tricky bits, but mostly I just made them from scratch. This linen is slightly heavier than some of the kosode linen, so these should be good "bumming around" pants for around the camp, or even as another layer beneath a regular pair of hakama. Mompe are handy leg wear for bumming around camp. They're also very useful for those 5am runs to the portajohn. Since it can be difficult to tell the front from the back in the dark and when you're in a hurry, I sewed a small button on the inside of the front, just below the ties. This "belly button" works well, and can't really be felt when you're wearing the mompe. |
 |
Natural Linen Fundoshi (June 2007)No action shot of this one. Sorry folks, I just don't post pictures of myself in my underwear. As befits underwear, however, this garment is simple to make. There are several designs, but I saw this one described as the simplest and most comfortable. The panel is about a yard long and a full panel wide. The waistband is a half panel that's been folded into quarters. This fundoshi is worn by tying the band around the waist with the fabric hanging down behind. The panel is drawn between the legs, covering much of the buttocks before passing underneath. The cloth is lifted to cover the loins, then pulled through the waistband to secure. Extra cloth hangs down in front for modesty. |
 |
Gray Linen Kosode (June 2007)This kosode uses a super-soft short fiber linen that was super cheap up at Pennsic one year. I made this kosode following the method I've been using for a while, with some modifications. I left the armpits open like you're supposed to, even though I haven't done this on any other kosode. I also have the neck band only going to the edge of the overlap panels according to a reference work that somebody showed me, instead of continuing all the way down to the hem. This kosode is intended to go with the hakama below, with maybe the light blue kosode worn underneath. It's made a litle larger in the body to accomodate underclothes. |
 |
Light Blue Linen Kosode (July 2007)The last of the soft linen, used to make a contrasting kosode that I intend to wear under the dark-gray kosode sometimes, and definitely with the matching navy hakama. It's made slightly smaller than the dark-gray, but according to the same method. The two layers version should be slightly dressier, and slightly warmer for cold evenings. |
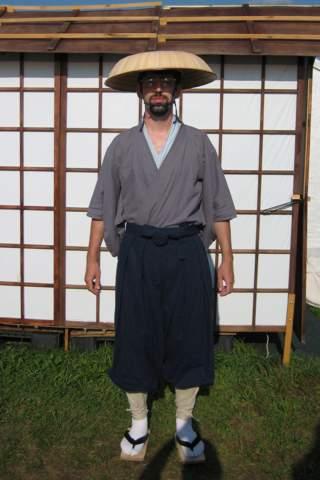 |
Navy Blue Linen Hakama (June 2007)Some more of that soft linen, this time a three-panel-per-leg hakama. I also put cord through the hem of the legs, so the legs can be gathered and tied just below the knee as I have seen in some pictures. I also made some kyahan (shin coverings) to wear when the legs are tied up.. Worn together with the gray linen kosode and light blue linen kosode, this makes a nice outfit. Not as nice or as high class as kamishimo, but certainly solid middle class. The soft linen makes it all very comfy. My brand new san-do-gasa, homemade tabi socks, and store-bought geta round out this stylish outfit. (The spiffy nihonesque structure used as a backdrop for this photo is the camp shower house.) |
To give you a better idea of the texture and color of the fabrics I used, I've scanned swatches of them all and added them here. The swatches were scanned at 150 dots per inch, the resampled to 75 dpi for the web. If your monitor is roughly 75dpi, you're seeing these fabrics at actual size.
 |
Light yellow cotton. It's lightweight, but soft, with a high thread count. |  |
Red cotton fabric with a subtle batik pattern. |  |
Green textured fabric of unknown composition, probably rayon. |
 |
Coarse-woven cotton fabric of several colors; overall sort of a brown. |  |
Medium brown cotton fabric from Jo-Ann's "Country Classics". |  |
Light brown linen, possibly bought at Pennsic or G Street. |
 |
Coarse, somewhat heavy linen with threads of several colors; overall light blue. |  |
Light blue linen, definitely from G Street. |  |
Indigo cotton fabric from Kona Bay, with a light print simulating a yarn-dyed pattern. |
 |
Green "raw" silk, the slubs are small, giving the fabric a knobbly texture. |  |
Pink linen fabric, bought together with the light blue and of similar texture. |  |
A mostly purple batiked cotton fabric. |
 |
A Kona Bay cotton print fabric, with waves, boats, and islands. |  |
A grassy cotton print with autumn leaves in red, yelloe, and orange. |  |
An off-white cotton fabric from Kona Bay, printed with burgundy cats and writing. |
 |
A lightweight crimson red cotton fabric. |  |
More lightweight cotton, this time in black. |  |
Still more lightweight cotton, now in dark blue. |
 |
Medium-weight pure white linen, perfect for underlayers. |  |
Fine gray "china silk" with a silvery sheen. Very difficult to sew given its weight and slickness. |  |
Yellow "raw" silk, similar to the green silk above, but in a light yellow color. |
 |
Soft soft soft linen somebody was selling at Pennsic for cheap cheap cheap. This, in a medium dark gray. |  |
Same soft linen (it was in a fire or something) in light blue. |  |
Same soft linen (shorter fibers make it softer) in navy blue. |
 |
A medium-weight linen fabric, left unbleached for a natural look. |
I used Folkwear #112, Japanese Field Clothing to make the men's Hippari. The pattern and instructions were used without modification.
I used Folkwear #112, Japanese Field Clothing to make my first Monpe. The pattern and instructions were used without modification.
Later monpe/mompe are based on that pattern, but made from scratch given they are so simple. You need four panels for the body, each about a yard long. This garment is one-size-fits-most, so exact length is unimportant. You two quarter-panel ties about four feet long for the waist, and two eight-panel ties about two feet long for the legs. If you're using 45 inch wide fabric, all you need is two yards of material. Download my PDF monpe pattern.
If you have trouble making the thin ties for the bottoms of the legs, you can also use cord or ribbon.
If you're looking for something to do with the extra fabric, I suggest using it to make a kinchaku (draw string bag). Those are always handy to have around. You could also make one kyahan, which isn't very useful unleass you're making a couple of pairs of monpe.
I used Folkwear #129, Japanese Hapi and Haori to make the Hapi. The pattern and instructions were used without modification. I even did the partial lining.
I consulted a variety of Internet sources until I got a feeling for this garment, then I cut the pieces without a printed pattern, and assembled them using my own method based on the techniques I learned from the Folkwear patterns.
Again, I consulted a variety of sources until I figured out what I wanted, then I cut the pieces without a printed pattern, and assembled them using my own method based on the combined instructions I found on the Internet.
This is a very simple garment, so I was able to construct it after studying a single photo from the Internet. This wouldn't have been possible without learning techniques from the Folkwear patterns and experience, though.
The simplest possible garment, this version of the fundoshi is made from a single panel of fabric, about 15 inches wide and about a yard long. Bind the long sides and one end using a serger or narrow hem. The waistband is made from a half-panel strip of fabric, folded lengthwise into fourths with the raw edges in the middle just like hakama ties. Use this band to cover the last raw edge and stitch the band shut all along its length and ends.
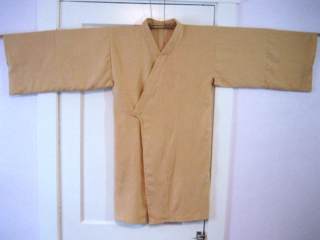
Before I was capable and confident enough to use printed patterns and make nicer garb, I did what most men do: Have the woman do it! Sharon is very good at pattern sewing, and made us two matching outfits. Hers are identical in fabric to the ones she made for me, though obviously sized differently. That was a good base for our wardrobe, and having two pairs of pants in the closet allowed me to start on shirts, which are a bit easier.

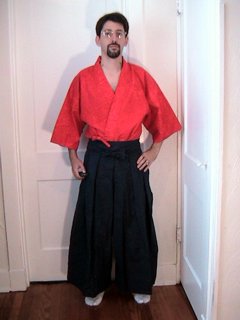
This was a basic outfit she made using the Costume Connection #J01M pattern, Man's Japanese Kimono and Hakama. Both pieces are made of cotton fabric. This pattern isn't super historical, but nobody's criticised us for wearing these garments at Pennsic. I'd recommend these patterns if you're not confident working from scratch. They're comfortable and sturdy, though somewhat wasteful of fabric.

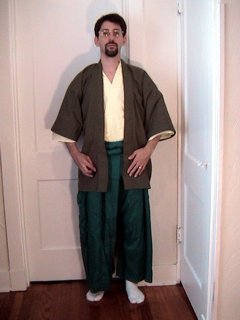
This outfit used the same pattern as the outfit above, but utilized more festive colors. In the photo, you can see the mottled batik pattern in the top. These were good for wearing during fertility festival that the group we camp with throws every year.
I also wore this to Origins in 2005 on the day that I helped judge in the Zendo tournament. I used the pockets at the bottoms of the sleeves to hold the judging stones used during the game.
Folkwear #112, Japanese Field Clothing, also includes these padded jackets. Sharon executed these in this beautiful green and silver silk brocade. The lining in the same pattern as the outer fabric, but it's a dark green instead of a silver color. Combined with the green silk hakama and the gray silk kosode, these make a stunningly fancy outfit.
I used fabric scraps to make a couple of drawstring bags (kinchaku) that you can see hanging down beneath the hem of the jackets.