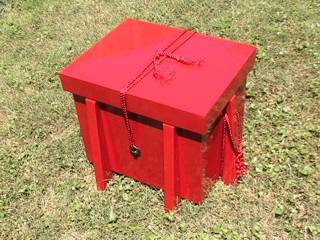
Karabitsu
A Japanese Wooden Chest

July 2005

July 2005
Sharon and I drink quite a bit of wine, and when we go up to Pennsic in the summer we are just as likely to bring wine we are beer. In the summer of 2004, we went up for a whole week, and wound up bringing a whole case of wine with us. We stored it in a standard cardboard wine case, which was not a good idea because the cardboard quickly got wet and started falling apart. I'm quick to recognize an excuse for a woodworking project, so I resolved to make something for Pennsic in 2005.
The group we camp with has a Japanese theme, so I did a web search on "medieval wooden chest", and quickly discovered that such a thing is called a "karabitsu". There's not much special about a karabitsu, except for the fact that instead of four feet (one at each corner), they typically have six feet (one at each end, two in front, and two in back). Some are round, some are rectangular, some are fancy, some are plain. If you search around the, you'll probably find the same pictures I did.
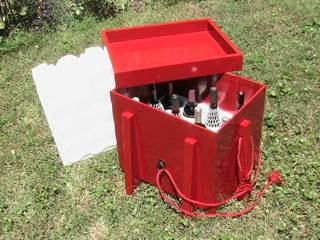
We have a styrofoam case that is specifically designed for shipping a case if wine, so I figured I'd design my karabitsu around that. It keeps the individual bottles separated, and should actually contain spills if a bottle breaks. I figured this will also keep the wine cool if the box gets too much sun on it.

Here, you can see the completed karabitsu open, filled with wine. The decorative rings and ropes give a much nicer look than it would probably have alone.
This seems like a successful project. I won't really know until after Pennsic, but it looks good. It's not really furniture quality, but it's probably nicer than camping quality. Most of that is in the glossy red paint, though. It's amazing what a coat of glossy paint can do for the perceived quality of something.
I think the idea of a raised chest is terrific for Pennsic, because it will keep your stuff up above anything less than two inches of standing water!
I still had some 3/8" plywood left over from making some storage shelves, so I decided to use that. Plywood doesn't give the nicest results in the world, but this was just going to be used to store wine, so I wasn't too concerned. I also figured I shouldn't use nice wood for the very first karabitsu I made, because it might not work out anyway. As it turns out, this was wise because the lid didn't work out the first time, so I had to start again. This would have been a big waste in real wood, but in scrap plywood it wasn't such a big deal.
The legs are simply 2-by-4, cut at an angle. I was able to get two legs out of each length of 2x4, so there's only about four feet of lumber total in the legs. I probably could have done these from scrap too, but I didn't think I had enough, so I went out and bought new. I wound up buying more than I needed anyway, but I'm sure I will eventually find a use for that.
The edges of the lid are thicker lumber, since those are the only edges you ever actually get to see. I started with 1-by-5, then cut it in half to make 1-by-something.
The whole thing was sealed with a water-based sanding sealer, then covered in Rustoleum 'Royal Red' gloss acrylic paint. This paint is really intended for covering metal, but it's the only nice acrylic paint I could find that I thought would be good for outdoor use. I like the results oil-based paints give, but I really hate cleaning brushes, especially since I wanted the sides to dry level (to avoid drips), so I had to do the outside in five separate sessions. The outside got two thick coats to try to cover up the grain (it didn't completely work), but the inside only got one coat just to, you know, make it red.
The rings are drawer pulls. They're actually "Craftsman" style, but I figured the "hand worked" style would be reasonably appropriate here. The ropes are just decorative ropes from the fabric store. I'm not sure if they'd hold up to much use as handles, but they look nice. I took a small short cut with those as well. The ropes are supposed to completely underneath the chest, but these just loop under the legs.
As you might imagine, I started by measuring the cardboard box that held the styrofoam shipping case in the first place. The main chest body is just a rectangular box, so there was no special math to do, just adding wood thicknesses to lengths. The front and back of the chest are the largest pieces. They overlap both the ends and the bottom. The bottom is "fully captive," that is, it fits entirely within the sides and the nails are holding it in, not on. I've seen wooden cases with the bottoms nailed on suffer structural failures, depositing their contents on the ground. Anyway, the cut list was as follows:
| bottom | 18 in. x 13 3/4 in. |
|---|---|
| front/back | 18 11/16 in. x 15 9/16 in. |
| left/right | 14 7/16 in. x 15 9/16 in. |
| top | 18 7/8 in. x 15 1/4 in. |
I used the same structure for the lid as well, even though that meant the top would not be a smooth as I'd like. I also made the lid a little larger than the wood measurements might indicate, to account for the paint I would be adding to both the outside of the box and the inside of the lid. My intent was to make the inside of the lid fairly nice, so that I could also use it as a serving tray. It turns out that I made the lid just large enough, so it's a snug fit sliding it on. I'll have to sand down the inside of the lid, I think.
I cut three identical lengths of 2-by-4 on the miter saw, then ran each through the band saw at an angle to make the tapered legs. I then used the miter saw on each leg, to make the tops and bottoms perpendicular to the angled edge instead of the outer edge, since that edge will be vertical. I also notched the end legs so the ropes can pass through them. Each notch is about a half inch deep and an inch long. I cut the notches on the band saw. The end legs are centered in the ends, and the front/back legs are 3 inches in from the ends. They are attached so that the bottom of the lid edges are about an eighth of an inch above the tops of the legs. I didn't really want the lid resting directly on the legs. The legs stick out below the bottom of the box by about two inches. Each leg is held on by four screws, so they should be pretty securely attached.
After construction, I gave all the wood a good sanding with a belt sander and by hand. I sealed the wood using a water-based sealer before sanding it a second time. I would have loved to put a layer of polyurethane on as well, but decided that would make the paint layers even thicker. I gave the outside an all-over first coat of paint, which I then tried to sand as smooth as possible with high-grit paper. Lastly, I put a thick second coat on the outside for a glossy finish, and a thin coat on the inside just to seal it up and make it red. I wanted the outside to dry flat, so I had to paint it in five shifts, letting each side dry before moving on to the next. This took forever.
While the second coat was srying on the sides, I placed the ring pulls. Drying into the paint should keep the square base plates for the pulls from spinning if the pulls get loose.
The last step was adding the decorative rope. I didn't actually buy enough rope, so there's a small cheat here. The ropes are supposed to pass all the way under the chest between the ends, but my ropes just loop underneath the end legs. You can use the rops to lift and carry the box, but I would not recommend do so for long periods of time as these ropes really aren't designed for strength. I actually have my doubts that they will stay red after the first Pennsic rain.
Anyway, that's it. Now we have a karabitsu for wine. This project isn't a complete success, as it has some minor structural problems, but it came out much better than I was expecting for my first try. I have apparently also inspired others in the clan to make their own karabitsu! That makes me very proud of myself.