bookmark_borderNew “Double Rai” Braiding Pattern

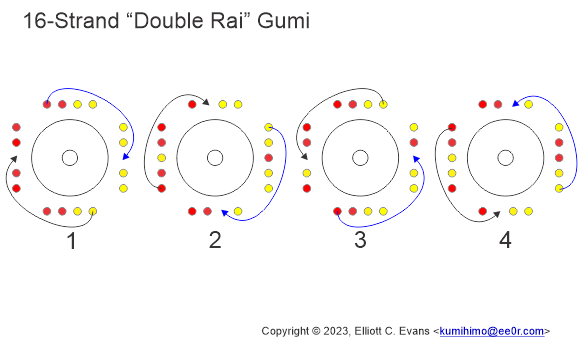
I’ve been doing a bunch of 16-strand braiding these days. All of my donated medallion cords for a few years have been 16-strand braids because I started getting a little bored of 8-strand all the time. It always bothered me that while most of the 16-strand braids in Jacqui Carey‘s Creative Kumihimo are expansions of some of the 8-strand braids in the same book, there was no doubling of the “8J” Yatsu Sen / Yatsu Rai pattern. “No problem,” thought I, “we can figure this out.” Hence:

I haven’t seen this in any books or anything, so as far as I know I made it up. It wasn’t that hard to figure out, though, so I would not be surprised if somebody else provides this pattern somewhere.

I started making these printable “index card patterns” more than ten years ago. They are a pretty good reference, but only if you already know how to braid on the marudai. This is the first new one I’ve made in a while. I think the last one I made was this “Double Maru Yotsu” card in 2012. Feel free to copy these or print them out for your personal use, just don’t use them for any commercial purpose without asking my permission.

Have fun! I’m working my first try at this braid right now, and it’s pretty challenging.

bookmark_borderAction Embroidery

  1. Download the bitmap image that contains the part you want as embroidery.
  2. Crop and edit the bitmap image to isolate the part that you want.
  3. Simplify the color palette in the bitmap image to decrease thread changes.
  4. Convert the bitmap image to a vector format.
  5. Simplify the vector image to reduce the number of shapes and decrease shape complexity.
  6. Export the vector image to a common format.
  7. Import the common vector format into the digitizing software.
  8. Generate stitch patterns for vector shapes.
  9. Save resulting embroidery file.
  10. Copy the embroidery file to the thumb drive.
  11. Set up the embroidery machine and insert the thumb drive.
  12. Hoop fabric and mount hoop on embroidery machine.
  13. Load embroidery file and first color of thread.
  14. Press the “START/STOP” button.
  15. Wait, change thread colors when the machine asks you to, resolve any mechanical problems that occur.
  16. Try to fix problems with the physical expression of the embroidery pattern.
  17. Curse everything, and the horse it rode in on.
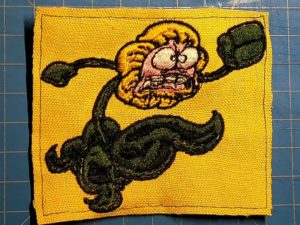
  18. Take a picture of the resulting embroidery.
    Bob the Angry Flower
  19. Post about it to your blog.