One of the wonderful mid-century modern things that came with the house we live in now is a “Cado Royal” wall unit in the upstairs den. This is a really great wall-hung modular shelving and storage system, but the pieces are now collectible and so it’s a pain to expand an existing installation to accommodate, say, an ever expanding media addiction. So, once I had the plant shelf all done with some cherry lumber left over, I decided to try my hand at making my own shelf.
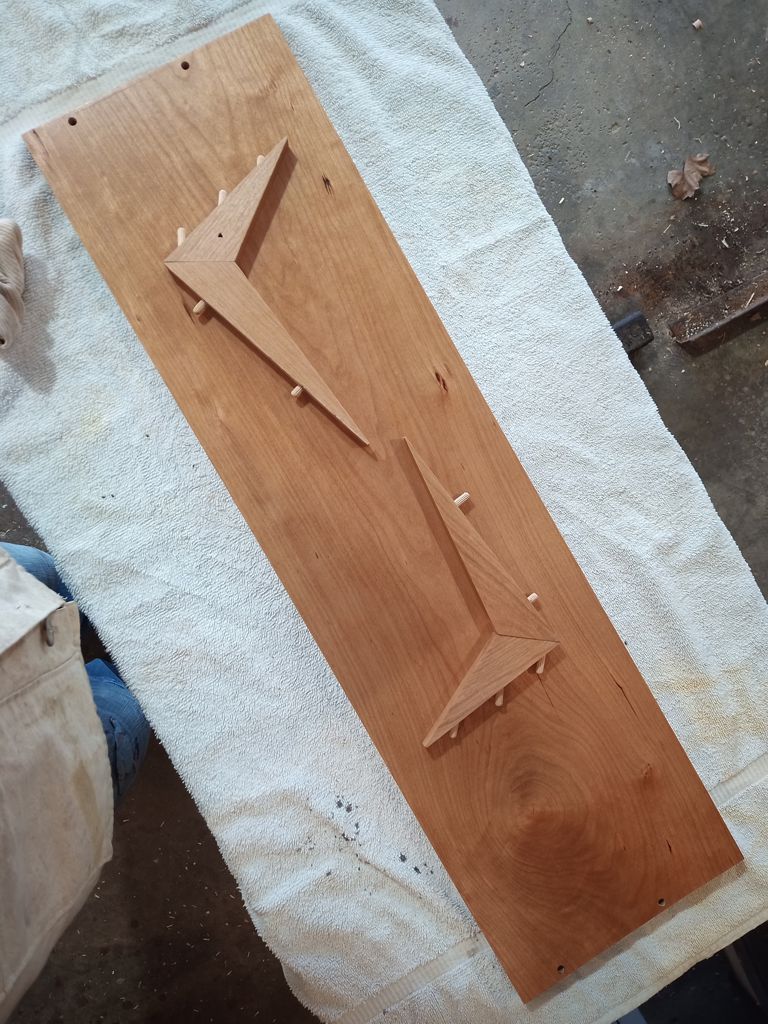
Pieces for One Shelf
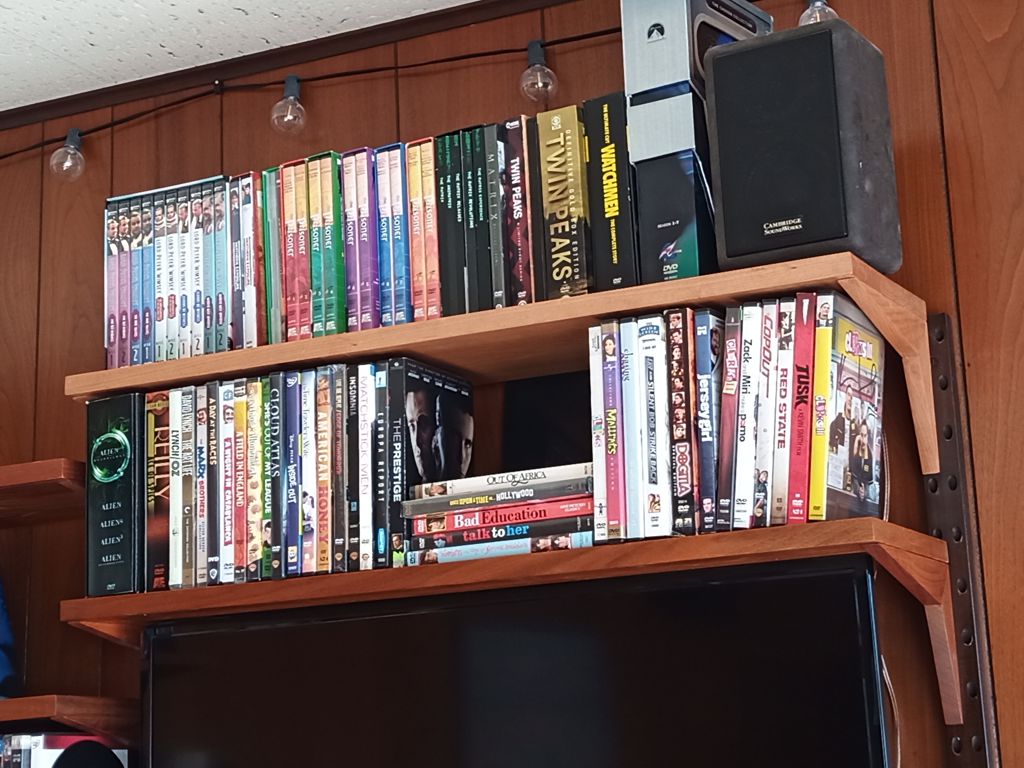
The angle-y, peggy things are the support brackets. The 45-degree dowels slide into angled holes in the wall standards. The 90-degree dowel stubs go into hole sin the underside of the shelf and hold the shelf in place. As you might imagine, accuracy of measurement and placement is vital to this system working as intended. Here is what it looks like with my new shelf added to the existing installation:
Shelf in Use
The cherry will darken over time to match the teak or whatever that stuff is that the existing shelves are made of. I think my shelf is actually nicer than the others. The existing shelves are all veneered, whereas mine is solid wood. The ends of the existing shelves don’t show any end-grain!
Sometimes I do woodworking demos at SCA events, and I have been wanting a less modern water source for sharpening than my plastic container. I was watching the animated film “Spirited Away” and I was like, “I need that bucket.”
I think that in Japan, this low and wide type of bucket was basically used as a basket. In the movie, she has it full of candy (konpeito, basically little bumpy sugar balls) that she’s feeding to the soot sprites. I’ve seen large ones in other movies used to transport cooked rice.
I bought about twelve feet of cedar 1by6 (sold as 4/4 S3S) and planed it down to 3/4″. Then I cut 10 6″ long bits for the staves and 2 15″ long pieces for the handle staves. I tilted the table saw blade to 15 degrees and beveled one edge, then spun each piece around to both bevel the other edge and narrow each piece down to 3+7/8″ wide (on the wider side). Switching the table saw over to a dado stack, I cut a 3/4″ wide by 3/8″ deep dado on the interior of each piece, to accept the floor of the bucket.
I used the band saw to shape the handle staves, then cut the through-mortises on the drill press and chiseled them square.
The floor of the bucket is cut from three pieces of cedar that I edge-glued together and then shaped using a circle jig on the band saw. I cut that as a 14″ circle, but I wish I had gone up at least a quarter inch more.
I dry fit all the pieces using blue tape, so I could figure out how long the handle needed to be. Once I had that length, I sketched out the curve of the handle and cut the shape on the band saw. A bit of sanding smoothed away the blade marks.
Since I already had the pieces taped up, I could apply plenty of glue, roll the bucket up around the floor (inserting the handle at the right moment), and clamp it together with elastic bands. I should have used ratchet strapspn as that would have let me get them really tight. Since I knew cleaning dry glue off the inside would be a pain, I washed the squeeze-out off the interior before it could cure. I left the whole thing to dry overnight.
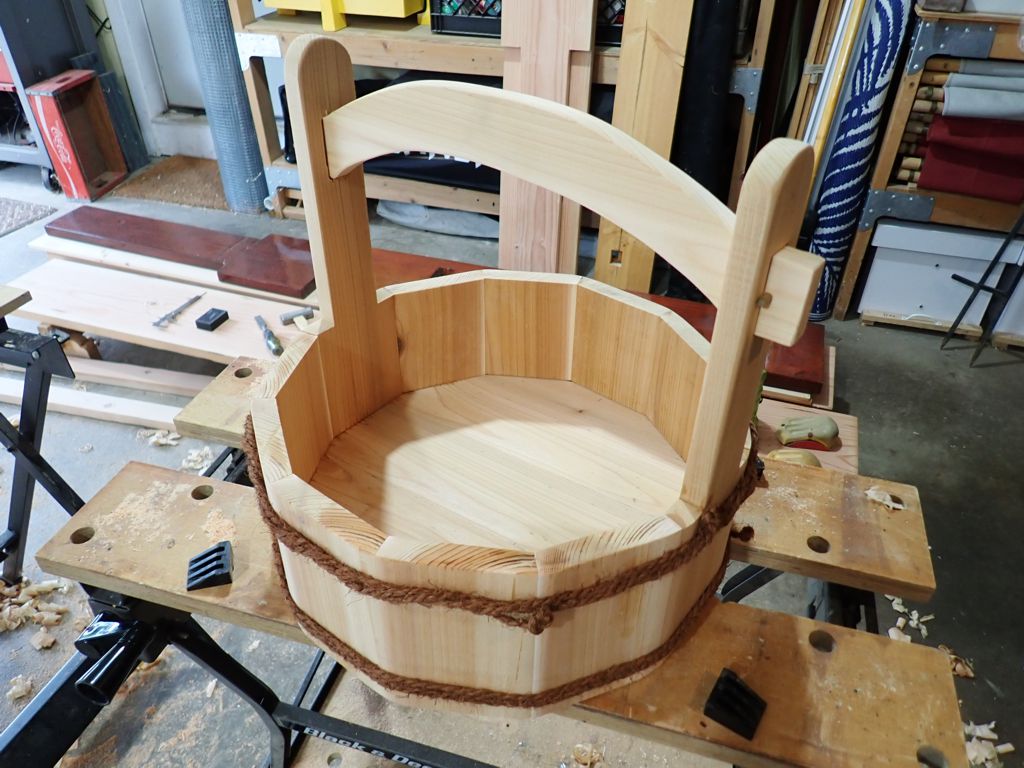
The next morning I removed the elastic and tape. I scraped the squeeze-out off the exterior, then sanded the angled edges of the exterior to round it up a bit. I drilled some holes in the handle tenons so I could secure them with pegs. To finish up, I tied some palm rope around the bucket with constrictor knots.
Mizuoke from Cedar
It leaked almost as fast as the hose could fill it, so I guess it’s not the best bucket anybody ever made, but it looks good, and I learned some lessons that will help me when (if) I make another one.
Cut and shape the staves, then measure the dry fit to figure out how big the floor should be.
Cut the dado to be a tight fit for the floor.
Use ratchet clamps for a tight fit while the glue cures.
In Japan, they take pride that the joinery in their coopering (and boatmaking) is tight enough to be leakproof before it gets wet. The swelling makes it even tighter! I knew ahead of time that my joinery would not be up to Japanese level. Traditional buckets (and barrels) also have good quality hoops that keep the joinery tight as the wood swells. In Japan, making hoops by braiding strips of bamboo is a craft all on its own. I knew my rope hoops would be a little loose, and that I am not capable of metalworking at this level either, so glue it was.
I did not put any glue holding the bottom in place, because I knew that had to be free to swell. In my future tries to learn this craft, I will make the staves first, then measure to determine what size I need the floor to be. I’ll also leave the boards for the floor a little bit thicker, to match what is apparently a slightly over-width dado stack.
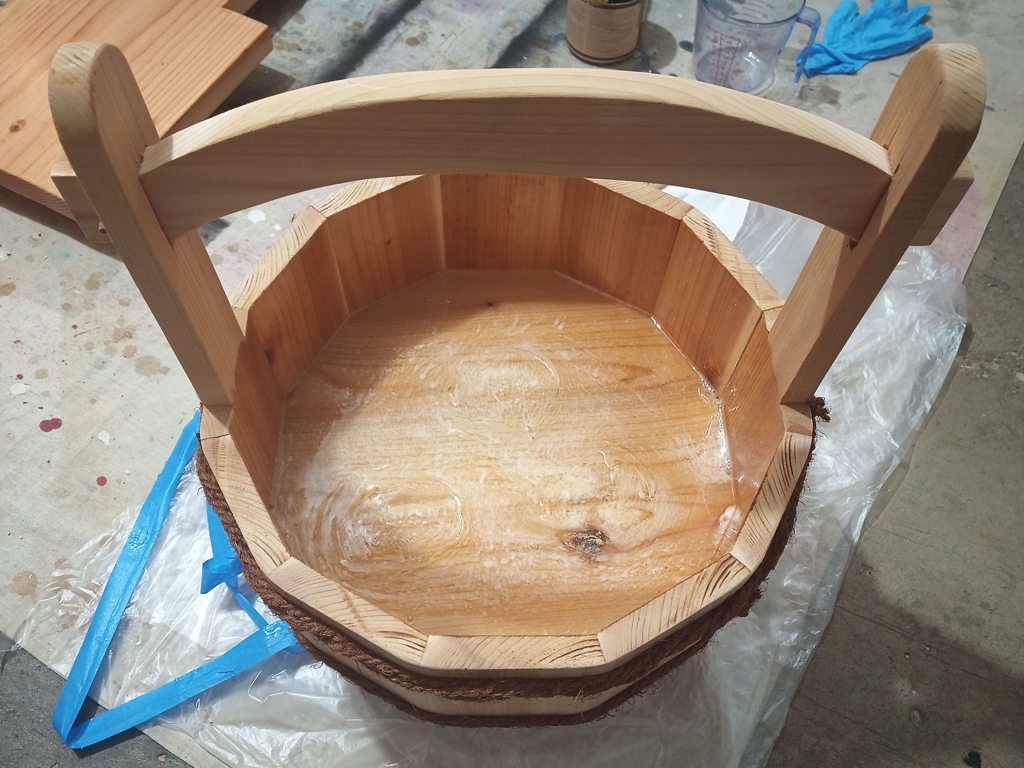
After a few days, I decided to seal the bottom of the bucket with clear finishing resin so that I could use it for its intended purpose. I sealed up the outside of the floor as best as I could with blue tape, then I poured in about 2 cups of mixed resin. I probably could have gotten away with only a cup of resin, since the hardened resin is pretty thick in the bucket now.
When it started to thicken, I brushed the resin up the sides of the bucket, sort of to make a plastic bucket inside. I knew the wood was porous, and I was hoping enough resign would soak in that the wood bucket and the plastic surface would be fully bonded together. One thing I did not take into account was that these pores are all full of air. Since the resin heats up as it cures, the air expanded and bubbled up through the resin. I did not get a perfectly clear layer of plastic in the bottom of the bucket, but it did seal everything up as hoped.
Cedar Bucket Sealed with Resin
It looks good overall though, and I am happy with it. Once you get some water in it, you can’t really tell the difference between bubbly resin and bubbly water. I have my bucket and it really does look like the inspiration. One commentator suggested that I make two more. The theory is that by the time I make the third one, I’ll have all the problems worked out and the third one will be perfect. That will have to wait for Spring, but I just might do it.
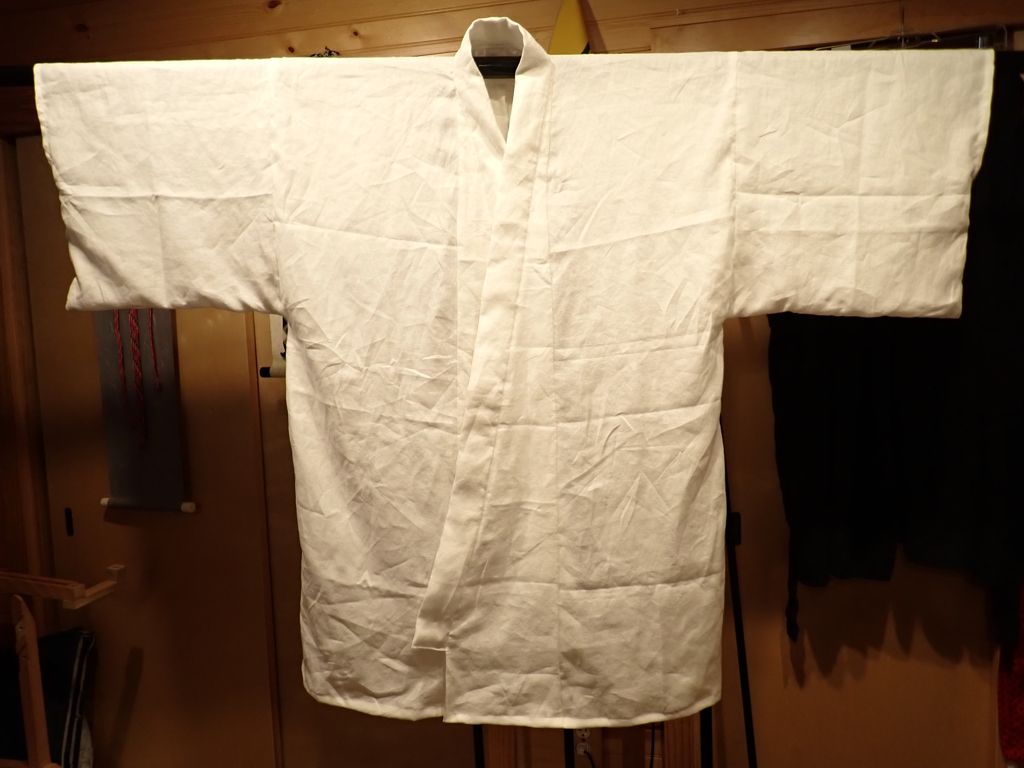
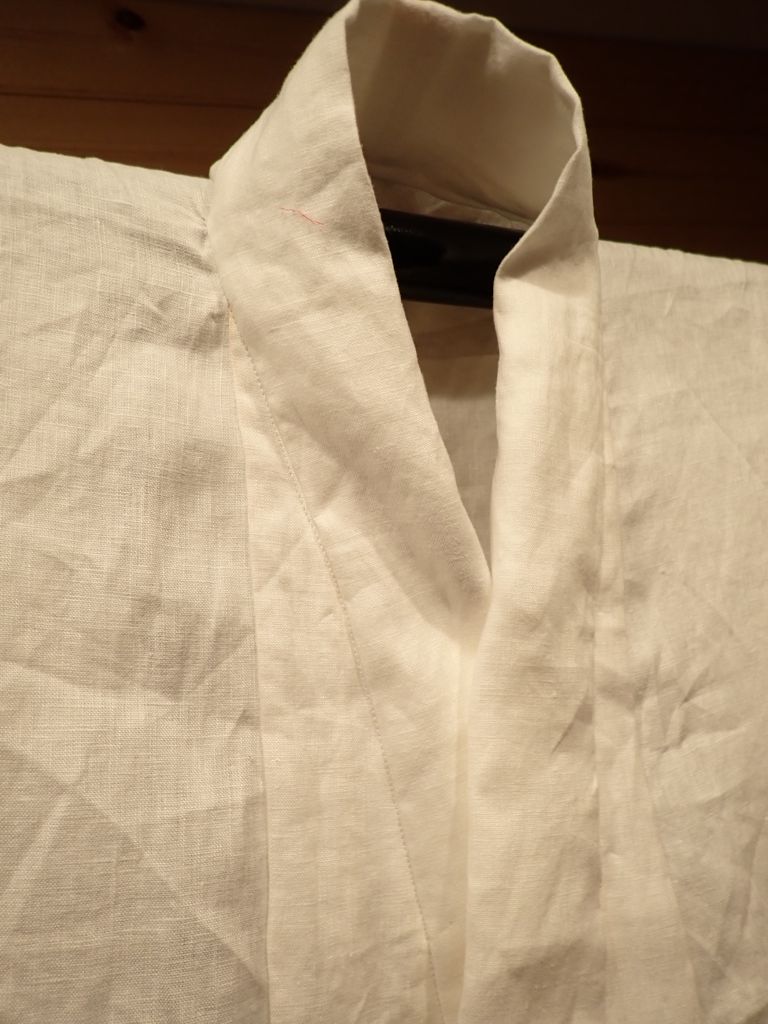
Managed to squeak this one in near the end of the year, but well within 2024. This year’s white kosode is made of some very nice linen that I bought at Pennsic from a vendor who specializes in fabric for historical reproduction. This linen is heavy, smooth, and luxurious. There are some changes in the pattern based on some more recent research that people in the SCA have done over the past few years. Most of the differences are in the overlaps and collar area.
White Kosode from Linen, 2024 edition
The learned can see the difference
Don’t worry, it’s looks better now that it has been laundered and ironed. I’m quite happy with the way this turned out. It does mean that I now have 14 white kosode. This is not only two full weeks worth of kosode, but the shelf where I keep my folded kosode is basically full. Most probably next year I will put one of my old cotton kosode into the garb swap to make room.
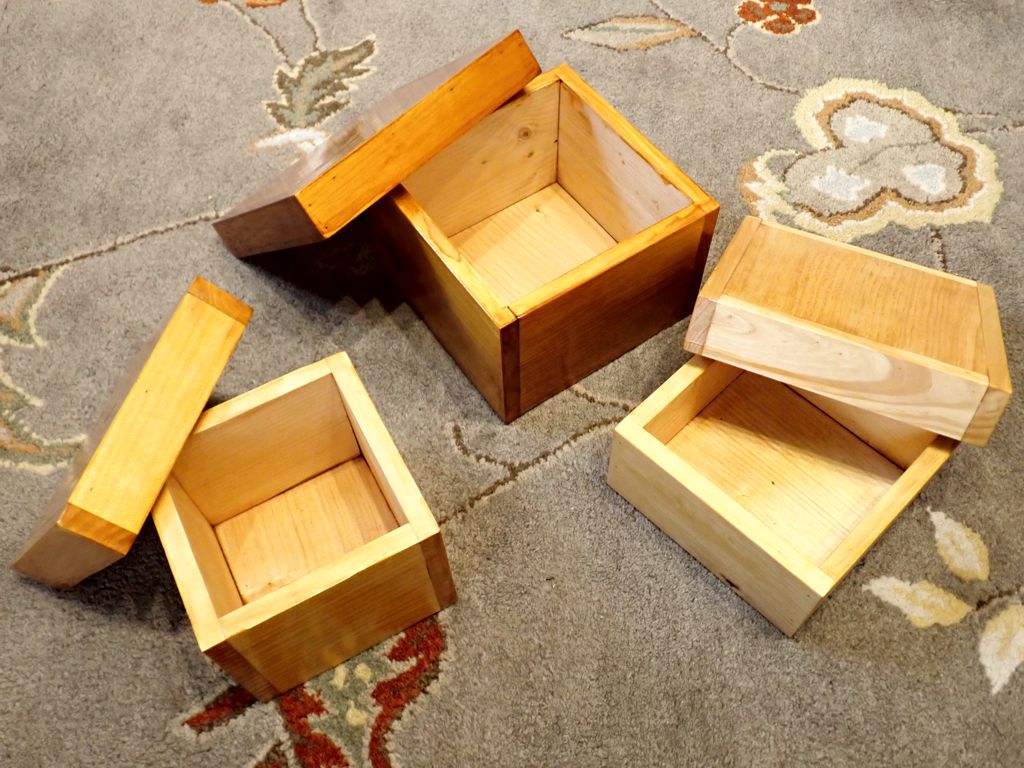
I picked up some small-ish thin pieces of mystery tropical wood from a friend, and I had a pile of surplus from the Storage Trays for Tama project, so I decided to make some small lidded boxes to give away. I started this back last fall, but they sat in the garage waiting for another slice of time I could devote to completing them. The largest of these has an 8″ by 8″ lid on a 5″ tall body, so they are mostly too small for storage but a great size for gifts.
Three small lidded boxes from mystery wood
The mystery wood boxes are finished with salad bowl oil finish, so you could use them as bento boxes, but since I can’t guarantee that they are water-tight or that the wood is not poisonous, I would not recommend it. This wood is only about quarter-inch thick, so the proportions are attractive. I decided how to use the pieces by stacking up all the wood by size and then moving down through the stack making lids and then boxes to match. All the cutting was on the band saw, then glued and pinned together. Unless the pin deflects inside the wood and pokes out, this method is fast.
Three small lidded boxes from pine
These are all made from half-inch pine, and finished with a variety of shellac techniques that I wanted to try. I think my favorite one is the rightmost one in the photo. I started with a really dilute cut of light amber shellac to give the wood a little more color, then top-coated with a thin coat of blonde shellac.
Anyway, I already have plans to fill one of the boxes with braids and add it to a gift basket that our SCA Kingdom is putting together for another Kingdom. In any case, the pile of surplus wood is a little bit smaller than it was, so success.
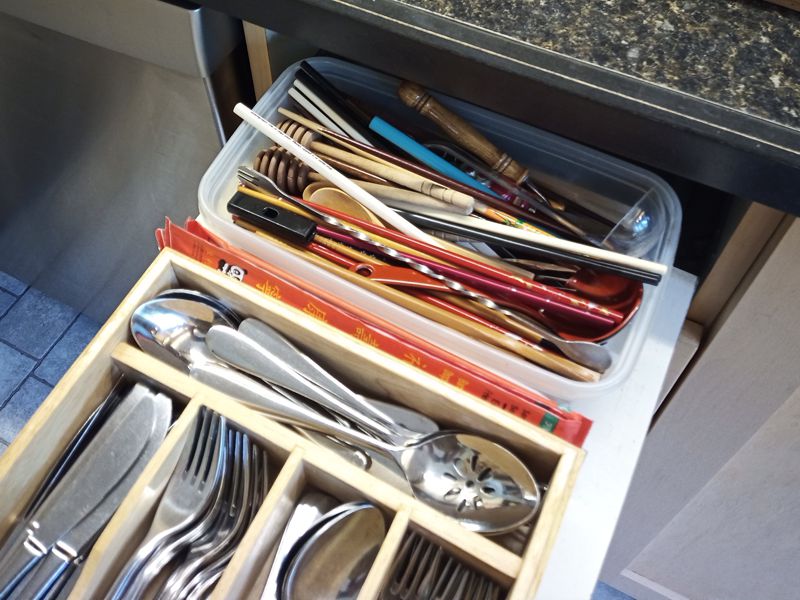
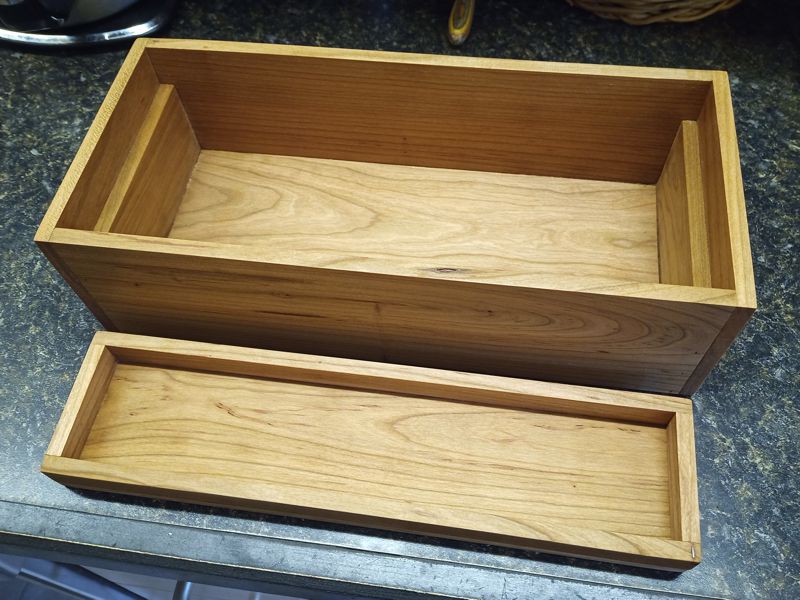
We had a plastic bin at the back of of kitchen utensil drawer that held chopsticks and other miscellaneous items. I got tired of having to dig for chopsticks, and my father had coincidentally gifted me with some cherry grilling planks. We love cherry wood here, and I wasn’t going to just set fire to it, so it’s projectin’ time.
I made a box that’s as wide as the utensil drawer, and a smaller tray to hold chopsticks so that they do not just fall to the bottom and have to be dug out. This construction turned out to be a little too tall, so I shaved some off the top and eventually cut the bottom completely off. Here are the pieces.
The tray slide back and forth, or it lifts right out for easy access to the utensils underneath. Of course we have more stuff than actually fits in the bin, but that can be moved elsewhere.
I finished the whole thing with some salad bowl oil finish, which only takes 3 days to dry, but makes the wood look attractive.
Learn to make things, because people who buy things are suckers.
I have been putting off the next step in this long-running experimental archaeology project more because I wanted to work on it at a particular event than because of my normal level of procrastination. I planed down the 1by lumber months ago, then I cut and assembled the chest at Aethelmearc War Practice. I started this project working on the Mark Zero “proof of concept” chest at War Practice back in 2018 or 2019.
Anyway, this is the fourth try at making a tool chest that looks like one you can see in the Kasuga Gongen Engi-e. This emaki illustrated scroll is from the 14th century and shows scenes from the history of a Kasuga shrine, including the shrine’s construction.
To better match the size and look of the Kasuga chest, I started with 1×6 lumber instead of the 1×8 I used on the Mark 2. It’s only about 39 inches long instead of the fifty-something inches of the Mark 2. I also used the thicker battens like I discussed, which I think worked out well.
Here is what the four chests look like laid out in a row:
I think I really have the look now. The size an proportions may not be exactly right, but it’s pretty much there. I’ll maybe work on a few tweaks at some point in the future.
It’s long enough that I can get some of my longer saws in there, just deep enough that things don’t get buried under several layers, and still wide enough that some of my organizertills fit in there sideways to keep things from sliding around.
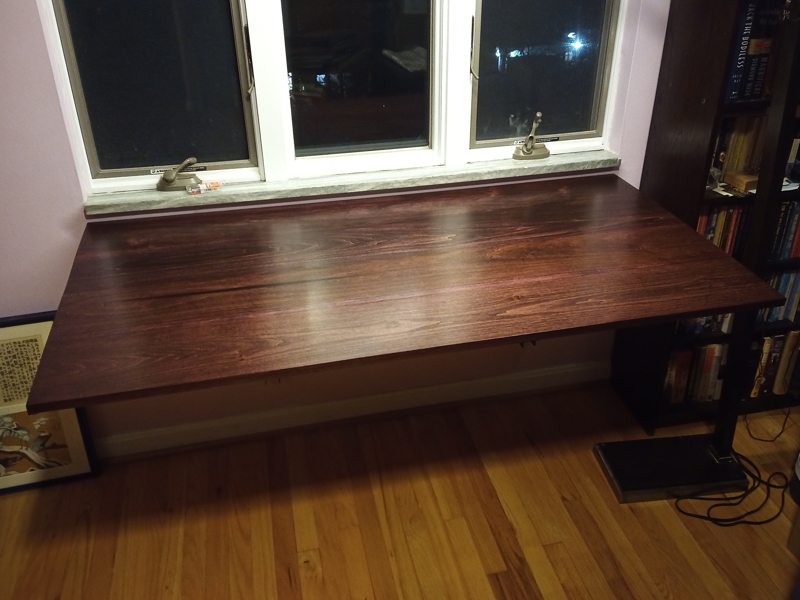
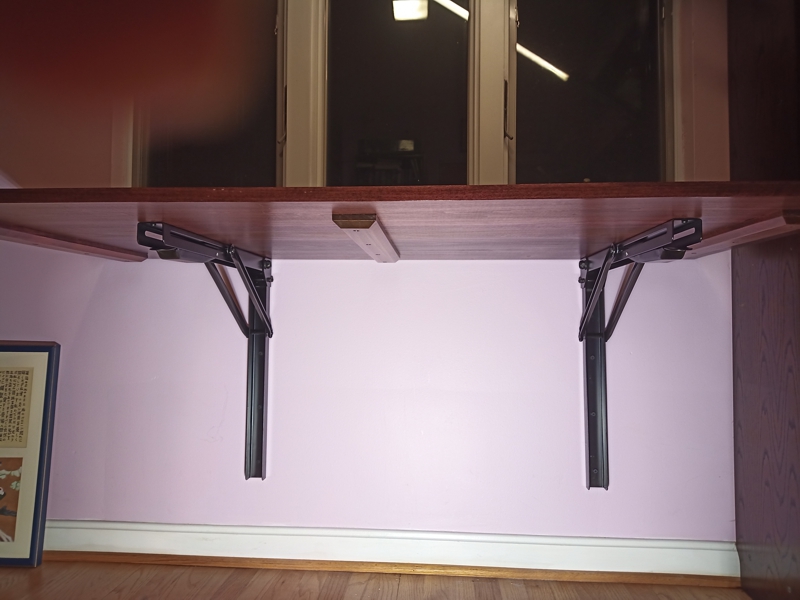
Back in December, we installed a murphy bed in the guest bedroom. The room is kind of small, so the guest bed was taking up most of the floor space in the room. A murphy bed leaves more of the floor open when it is not being used. I saw some nifty-looking wall brackets in the Woodcraft, and these looked good to the landlady, so I went for it and decided to install a wall-mounted fold-down desk.
The desktop is actually four lengths of 1by8 that I edge-glued and doweled. Then, I cut the desktop to length, sanded, stained, sealed, and finished. After that, I just had to mount the brackets on the wall, and attach the desktop to the brackets. Easy peasy.
My sweetie made some fancy Japanese garb for the current Sovereign and Consort of our SCA Kingdom. She did all the work on both outfits except for one part. Eboshi are kind of my thing, so she let me make eboshi to go with his outfit.
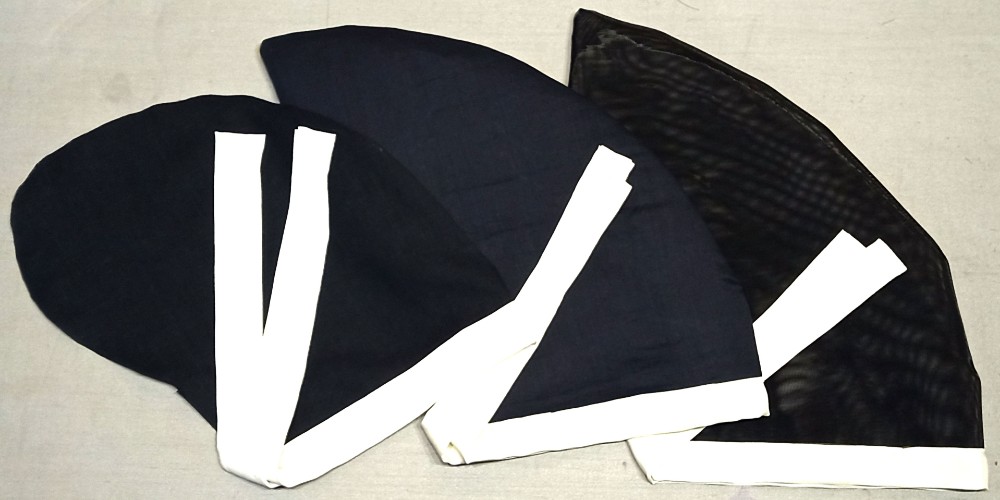
Three Eboshi for King Arnthor
From left to right there is a soft linen nae eboshi, a tall linen hikitate eboshi, and a tall mesh hikitate eboshi. So far, I think I have only seen him wear the mesh one, but I think it is always good to have options. Here’s what the completed outfits look like:
These outfits probably would look awesome even without a hat, but the eboshi really sets the mood, I think.
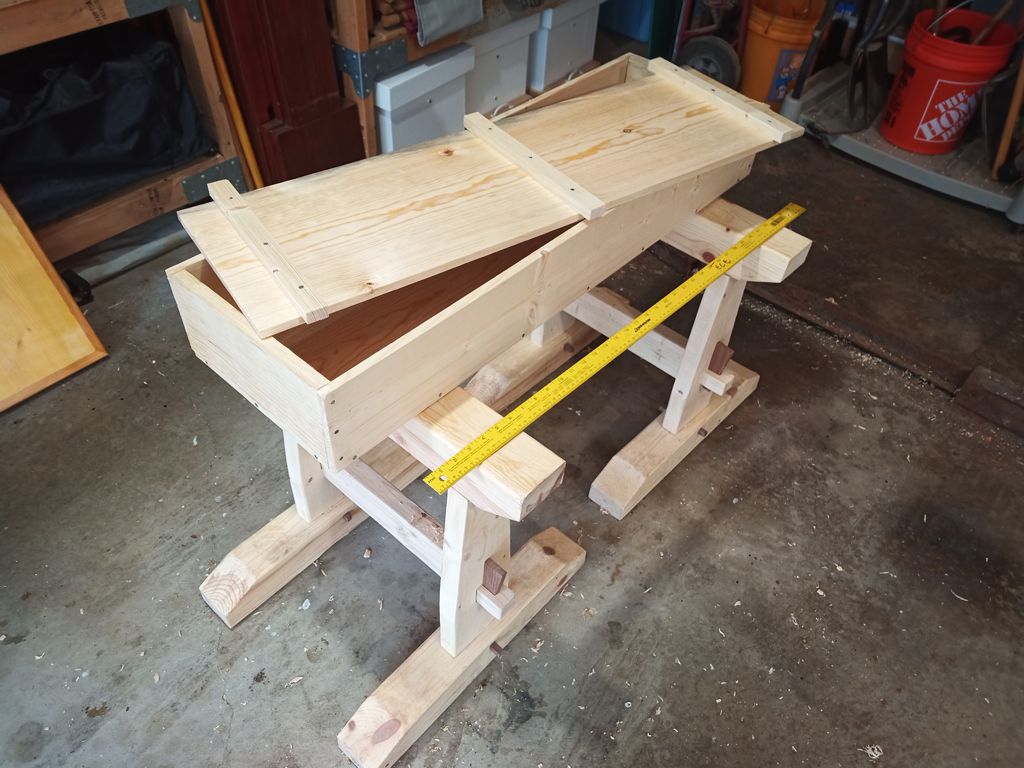
Took a second swing at this project. Here it is up on sawhorses in my workshop/garage:
14th Century Japanese Toolchest
It’s huge! It’s 4.5 feet long and a foot wide. It fits in the trunk of my car ok if I fold the rear seats down, but it’s way too big. Probably at fault is my desire to use 1by8 for the sides. To keep the length in proportion to the height it’s just way too long. Maybe I’ll try again sometime with 1by6 instead. That would make it only about 40 inches long by my reckoning. Compare the image below with the original painting.
Toolchest with Lid Askew
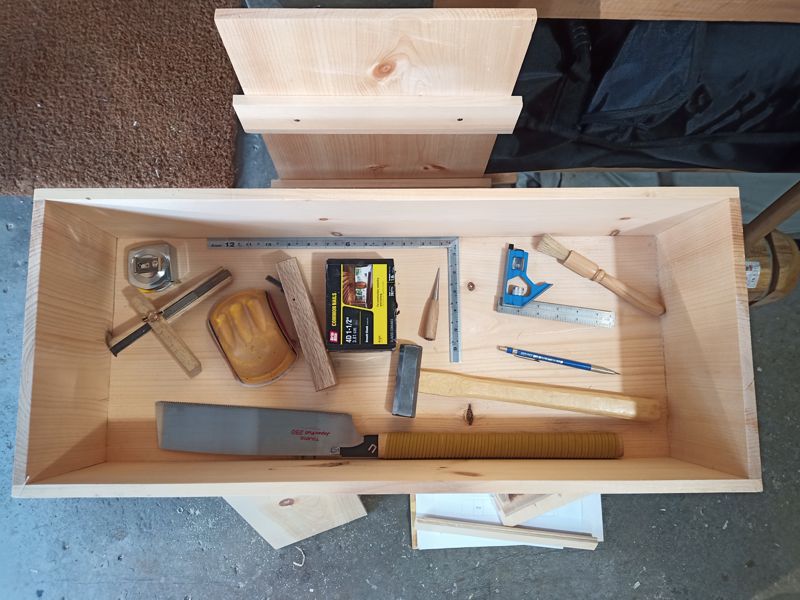
I’m also pretty sure I should be making my battens narrower, and probably from the full 3/4″ thickness of board instead of my 1/2″ planed-down thickness. As a bonus, here is an image of all the tools I needed to construct this Mark 2 chest, stored in the Mark 1:
Tools to Make a Toolchest
There’s not much you need, really, to build a simple chest.
Last week, we attended the “Armistice” event up at Cooper’s Lake Campground. Informally called “Pretendsic”, this was the event that the campground decided to run on their own after the SCA’s Pennsic War was cancelled again. It was a much smaller and informal version of a war, with no organized battles and many fewer classes. We did not even camp up there most nights, and brought all our own food. We spent a lot of time in camp braiding, and I completed these four braids.
Four Kute-Uchi Braids from Armistice
All four braids were made using kute-uchi hand-loop braiding. The two inner braids are Mitake-gumi 10-loop rectangular braids, both using a single ply of acrylic yarn for each loop. The two outer braids are Maru-genji-gumi 16-loop round braids. The inner of the two uses a single ply of acrylic yarn for each loop, and the outer uses two plies of cotton crochet thread for each loop. To keep the loops together in bundles for the 2-ply braid, I used rope kute handles. These were all braided while seated on a bench, and I used my toes to beat the stitches if the braids were too long for manual tightening.


