bookmark_borderChalk Holder

For those of you who, either at my recommendation or independently, purchased the “Dritz Chalk Cartridge Set” chalk holder, or (perhaps more so for you who) did not purchase the Dritz model because it is made of plastic, it should be noted that the chalks that come with the Dritz holder are 3.8mm in diameter, and can be inserted into the “Koh-I-Noor 3.8mm Clutch Pencil 5356″ which is made of metal.

Dritz (top) and Koh-I-Noor (bottom) 3.8mm Holders

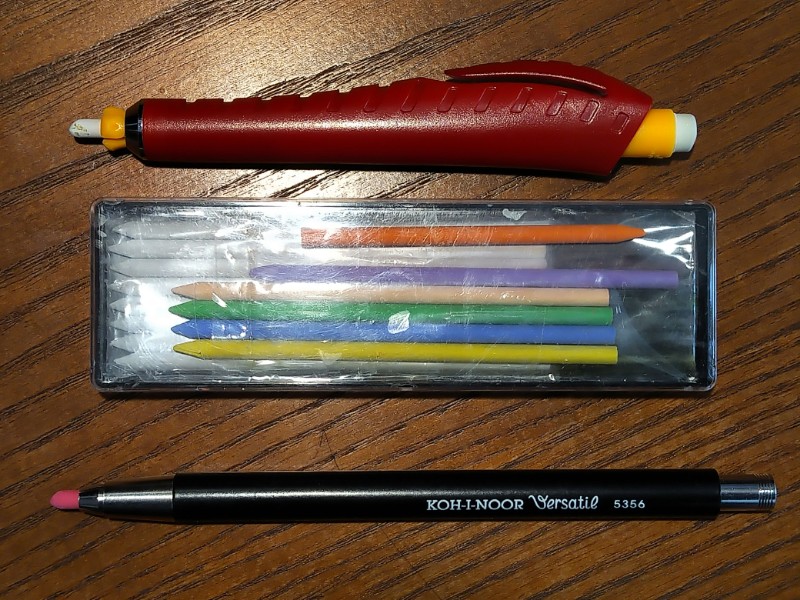
I have never seen the Koh-I-Noor 5356 in any store, but it is available from several online retailers. I won’t attempt to bias you for or against any particular retailer. The down side are that the 5356 does not come with a supply of chalk or a sharpener.

I have yet to compare the Koh-I-Noor colored artist’s leads to the Dritz chalk sticks in terms of marking and washability. So far, the Dritz chalks have lasted several years and one pack may be a lifetime supply.

bookmark_borderGarage Beam Trolley

Back when I was doing some part-time work for Mr. Arimoto, one of the miscellaneous tasks I helped him with was assembling a new woodturning lathe. This was a serious lathe, with a heavy base and a heavy lathe body with a large heavy bed. To lift the top into position on the base, we used a rolling gantry that held a steel beam suspended overhead, and a wheeled trolley with a pulley underneath that rode back and forth on the beam. It made the whole operation possible.

To own something like that, you need to have someplace to keep it when you’re not using it. I don’t really have a place to put a big gantry system, but one day I was browsing in a tool catalog and saw that you can buy a beam, trolley separately, and install it on an existing I-beam. Ding! There is an existing exposed I-beam in the garage! Sometimes we are moving heavy pots of dye onto and off of hot plates, or I am trying to position heavy lumber or machinery all by myself. This would be super handy.

Beam Trolley and Pulley

One trip to the Harbor Freight store and some ladder work, and now we have our own gantry system. HF stuff isn’t always the best quality, but I won’t be using these items anywhere near their advertised weight limits, so I expect it will be OK. This beam runs the full width of a 2-car garage, so it can help us transfer things across a wide area. We could use it to lift heavy loads out of a pickup truck if we ever bought heavy things or had a pickup truck.

bookmark_borderMeasure and Mark Redux

So what did the little collection of tools on a stool look like at the end of the project?

Bit of a mess

You can see I’ve added a sashigane, a larger ruler, a socket awl and a drilling block. The awl is useful for making a hole where the brad point of a drill bit can go to keep the bit from skating around as the hole gets started. The block keeps the drill bit perpendicular to the surface of the wood as the hole is drilled. The other black plastic thing is a right-angle block.

bookmark_borderMeasure and Mark

I’ve been working on a new large carpentry project, and it involves a bunch of joinery that for some reason I have decided to cut by hand. Everything needs to be measured out and marked, regardless of hand or machine cut, since I almost never trust jigs or templates for this kind of thing. Here’s the kit of measuring and marking tools I have assembled for this particular project.

Tools

So yes, there are three adjustable squares here, so that I don’t have to keep setting and re-setting them for the different lengths I need. The tool right in the middle is called a wheel gauge. You set the length you want, run the large brass bit against the edge of the board, and the little metal wheel at the end cuts a groove in the wood. I do have a Japanese kebiki gauge, but I have a difficult time getting accurate distances with it. The larger aluminum tool next to the wheel gauge is a modern Japanese marking square that is awesome because the large sides let you mark around the corners of lumber, so it’s easier to get straight cuts on 2x4s and other similar pieces. The small metal ruler is very useful for drawing lines between marks, and inserting into small holes as a depth gauge. I mostly mark things out in pencil using the blue 2mm drafting lead holder. but the pocket knife in the upper left is helpful for cutting a groove to start saw cuts, particularly on rip cuts.

bookmark_borderAttack of the Clamps

Making a couple of small karabitsu footed chests, and reached the stage of gluing the body of the chest together.

That’s a dozen clamps

It’s quite possible that if I was just better at cutting joinery, I woould not need quite so many clamps. Also, I’m using rice paste and not carpenter’s wood glue, so it takes hours and hours to dry fully.

Once the paste is dry, I can use pegs to fasten all the joinery, which includes securing the floor of the chest. This is the second of two karabitsu, so later this week I will be able to move on to the sanding phase.

bookmark_borderBand Saw Box

All my spare blades for the band saw have been sitting in an inadequate CocaCola crate for years. This state of affairs was becoming more and more untenable when I was switching blades back and forth during the shogi project. While I was waiting for some glue to dry on a more central project, I decided to rectify that.

Band Saw box on Band Saw Table

The faces are some 3/16″ plywood from the scrap pile. The sides and floor of the box are some 3/8″ plywood from the scrap pile. Some of these utility projects are basically just ways for me to justify having kept around these massive quantities of scrap lumber for so long. The whole thing is just glued together with butt joints and pinned with 18gauge brads from the nail gun. One slightly fancy thing about this box are the two finger holes that make it easier to pick up the box.

Anyway, the interior is a little larger than 12″ wide, by 6″ deep. This gives me plenty of room to slide in the blister cards that Lowes sells 93.5″ band saw blades on. Another slightly fancy thing is a bracket for holding the miter gauge. It’s always a challenge finding someplace to put that thing when I’m no t using it. You can see how nicely this box fits on the band saw table, making it difficult for these two items to get separated.

Some months ago, I reorganized the shop a bit to make it easier to get to the band saw. At the old house, the band saw was set up in the middle of the basement and was always available for little things like making useful boxes. I’m so glad I have this saw back where I can use it easily without having to move other stuff out of the way.

bookmark_borderKunz Glue Scraper

Every once in a while, somebody lends you a tool to use, and using that tool elicits the reaction, “Where has this tool been my entire life?” Such a tool is the Kunz Glue Scraper .

Photo courtesy of Highland Woodworking

“This is not,” as I said to Mr. Arimoto, “a tool for delicate work.” When you’re gluing wood together, a certain amount of glue “squeeze” out is all but inevitable. You can swab it, you can sand it, you can plane it, or you can cry about it. The right glue scraper, used over a beefy enough work piece, makes the glue chips fly away from your work piece. This long two-handed handle and thick, sharp, steel double-edged blade makes short shrift of your squeeze scraping. This tool means business.

bookmark_borderRecaulking the Tub

It’s not all fun and games here at the Booth/Evans household. Sometimes you have to do something boring and stupid like recaulk the tub.

The first step is to remove the old caulk. This reveals the secret of why the caulk is failing after only three years. The people who redid the bathroom skipped this step and just smeared new caulk over the existing dried-out old caulk. As part of the renovations, they also coated the ugly old tile with a white epoxy coating. This was also applied over the old caulk, and then caulked over to hide the fact. At least that’s a seal, but I had to be careful not to damage the epoxy coating when removing the caulk.

Anyway, here are the tools and supplies I used, lined up on the workbench.

Tools for re-caulking the tub
Re-caulking tools

From right to left: A set of steel scraping tools that are very useful for removing hardened old caulk. Scrape-Rite plastic razor blades for removing softer caulk. A rubber squeegee for shaping the caulk bead once it has been applied. A utility knife for opening the tube of caulk. A small “squeeze by hand” tube of caulk, which costs almost as much as a full tube, but is just enough caulk for this task and needs no gun. A paint brush for sweeping away residue. A protective glove for keeping chemicals off my skin. A cotton rag and ultra-fine scrubby pad. A can of denatured alcohol for cleaning surfaces.

The set of scraping tools is probably the best and most useful thing I have ever bought at Harbor Freight. Thank heavens for the plastic razor blades. They are just hard enough to slice through silicone caulk, but soft enouch not to scratch the epoxy coating.