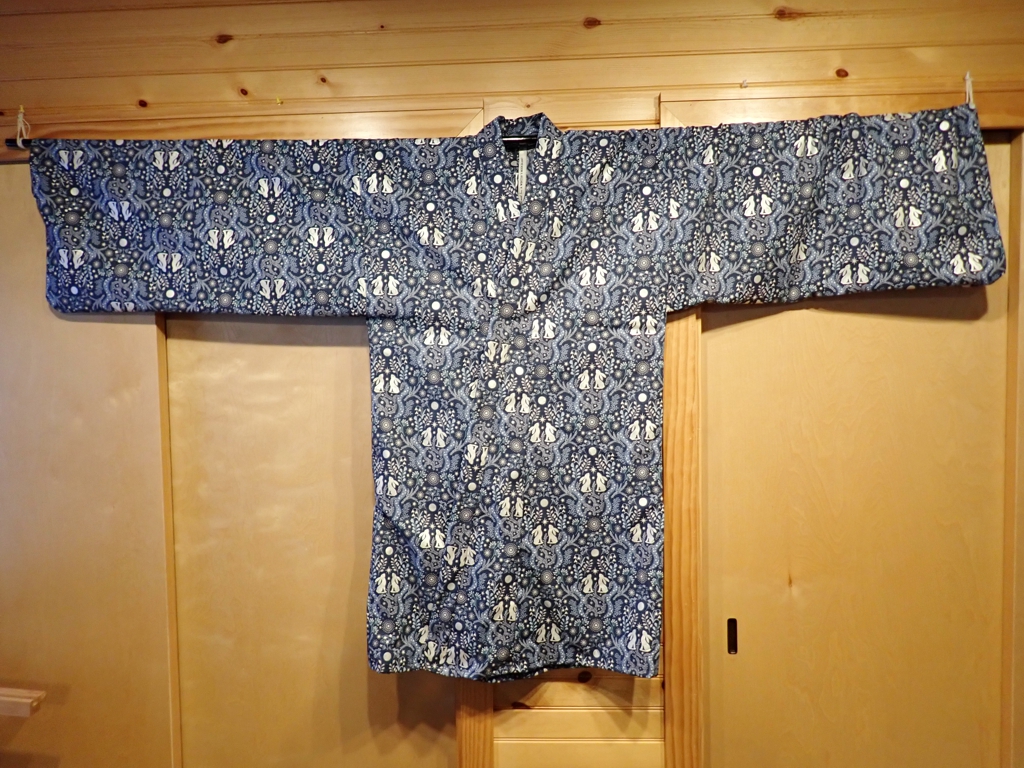
I finished this kosode back in February, but for some reason I never posted about it here. When we were vacationing to visit family at the end of last year, I found a friendly local fabric store that stocked a bunch of cute cotton prints and other attractive fabrics. They had some nice octopus print cotton, but I decided to get this sweet little moon bunny print.
Kosode from blue “Moon Bunny” cotton print fabric
The design of this kosode is not very period, and the fabric is completely modern, but sometimes I just want something fun to wear, and not everything has to be a formal project. One difference from period design that you may notice is the double-length sleeves. I did make an effort to do the overlaps according to the currently accepted pattern, but you’d have to know what you are looking for to even notice that.
A while back, probably a year or two ago, I bought six small-ish (4 inches across) “Black/Red” melamine dishes from one of the Asian markets here in Pittsburgh. See, the problem with most bento is that the tray inside is so big that you can’t actually fit it in the dishwasher. I figured that if I got a few small dishes, then made a box to hold them, I could use the collection as a bento box. Once I’d used the dishes to hold lunch “courses”, I could pull them out and line them up in the dishwasher rack.
Dish Bento from Maple
Here is what the box and lid look like with the dishes inside. You can see that the lid has a little lip around it, but it is basically the same construction as the body, only slightly larger. The corners are mitered, and the surfaces (lid surface, body floor) are rabetted to fit into dadoes in the lip/sides. There are no fasteners in the box, just glue and finish. I did most of the cutting and mitering on the band saw, and did the rabbets and dadoes on the router table.
Dish Bento Body with Dishes
The body interior is just a little bit larger and deeper than the bowls themselves. The interior is about 12.125″ by 8.125″ and 2 inches deep. The maple is 0.375″ thick, so it is sturdy enough to hold the densest of lunches.
Dish Bento Body
The panels that make up the floor and lid surface are actually “book matched”. I started with a 7/8″-thick rough board, then re-sawed it into two thinner boards using my band saw. Then, a few passes through the planer to smooth it out. That’s why the grain doesn’t match up exactly, because my wavy resaw cuts meant more grain was lost to the planer.
Dish Bento Lid
The entire box is finished with “General Finishes” brand ‘Wood Bowl Finish‘, which used to be marketed as ‘Salad Bowl Finish’. This is an oil-based urethane finish intended for food contact. They have taken care with the solvents so that once the finish is cured it is non-toxic and as safe as they can manage. It is much less stinky than the polyurethanes I tend to use, and it dries very hard like lacquer. Due to the (intentional) loose fit of the panels in the edges/walls, the box is not water-tight, but the wood is thoroughly sealed.
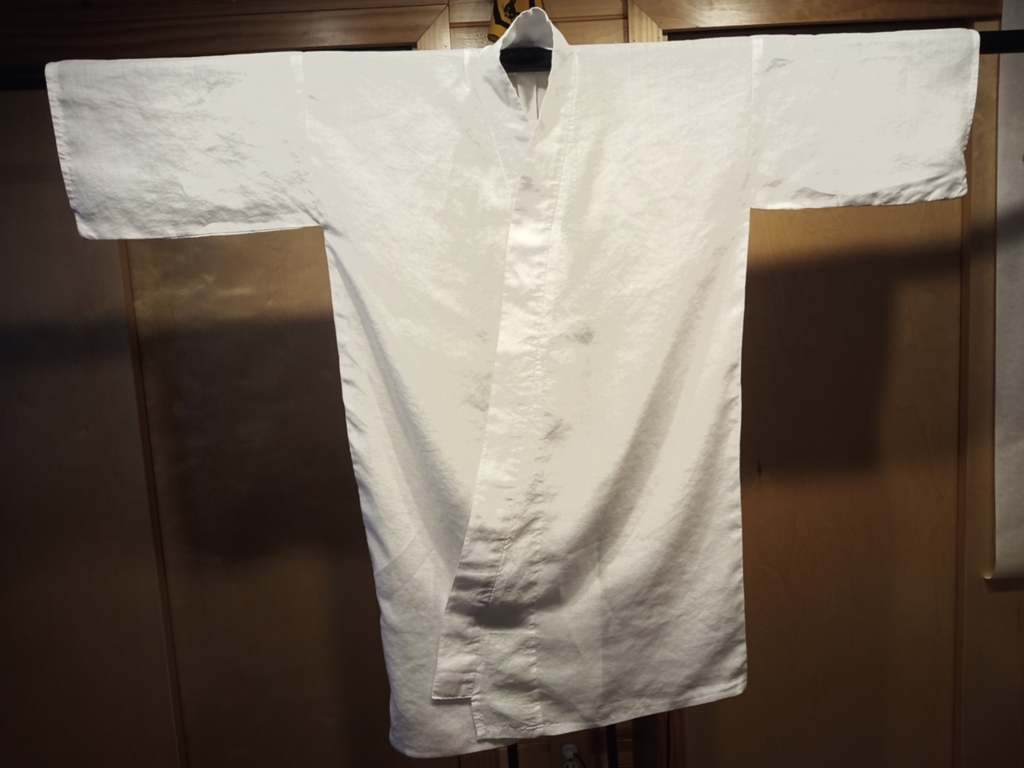
The first is another white kosode. I’m having to retire one of my old, old kosode because the cotton fabric is failing, so I need a kosode with narrow sleeves that can fit through narrow spaces in older garments. I have modified all of my older kosode to maximize the opening where the sleeve meets the body, but some of them just don’t have a lot of height to the sleeve itself.
White Kosode 2025, from Linen
I only had a few months left to make my white kosode for 2025 anyway. This one is from the nice white linen I have been buying at Pennsic for the last few years. Due to some poor planning, I was not able to use the most au courant sewing pattern for kosode. I also decided to cut the piece for the neck band a little wider than normal, so it would stay more visible when worn under other kosode. This meant that the okumi overlaps are a little small. Oh well.
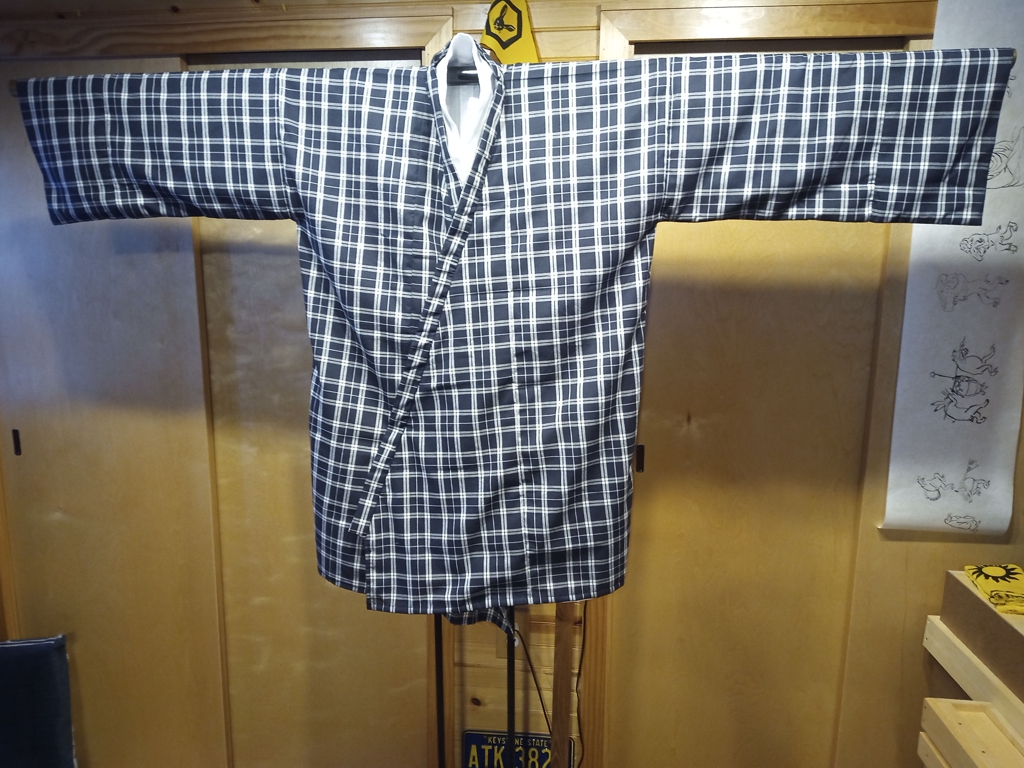
The next one is more exciting and more interesting. It’s made from a black and white linen tartan fabric I also bought at Pennsic, I think from the same merchant who sold me the linen for the recent green hakama. The pattern is woven in, not just printed on the surface. It’s very nice fabric.
The overlaps are a full panel width! They are joined at the edges of the neck opening! Neither the body panels nor the overlap panels are cut to make them narrower or angled, they are just folded! The sleeves are 1.5 panels wide, but those panels are not cut either! The sleeve ends double back on themselves to make self-facings! If you look closely, you can see I’ve done some clever things at the seams where sometimes the grid matches up and sometimes it doesn’t. I know all that sounds very technical and maybe doesn’t make sense to you, but trust me, I’m very happy with the work that went into this one.
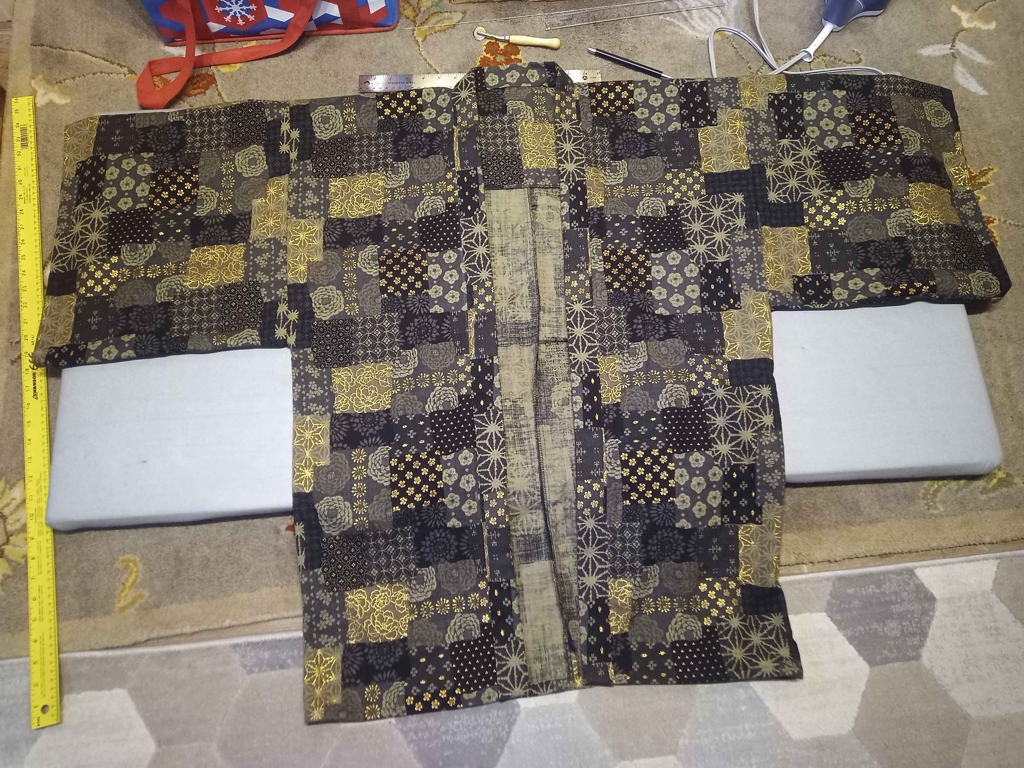
Sweetie and I were in a fabric store a few weeks ago, and they had a selection of faux boro fabric in several colorways. I really don’t need another happi coat, but they always come in handy and are a way to add another layer to a basic outfit as the evening cools off at Pennsic. Plus, one of the colorways was “black and gold”, which fits into the aesthetic we have here in the Debatable Lands.
Happi from Black & Gold Faux-Boro Cotton
Happi were some of the first Japanese garments I ever made for SCA wear, and they are still fun to make. They have a partial lining that helps to make them very durable. They are a good use for a a few yards of fabric that would be uncomfortable or distracting to wear as just about any other garment. The pattern I use is based on Folkwear 129, “Japanese Hapi & Haori“, but I no longer really need to refer to the pattern, I can just make one mostly from memory.
I’m going to save this one probably until January, then wear it at our Baronial 12th Night event, which is the SCA’s version of a Winter Holiday party.
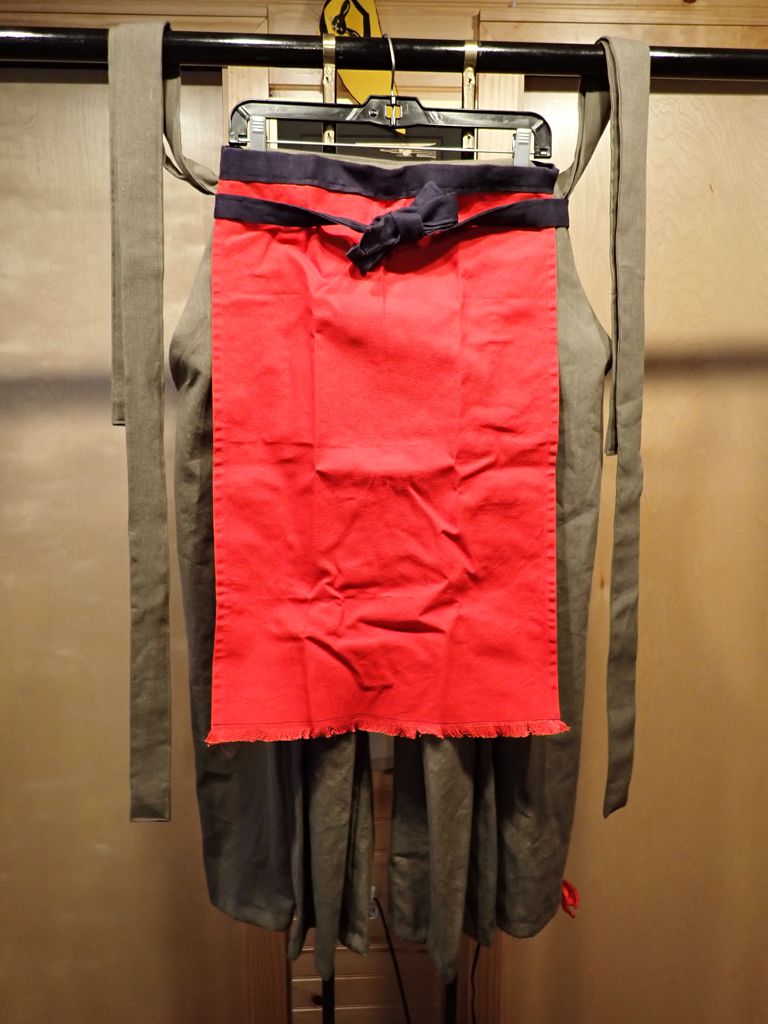
Back when I was making the Mizuoke based on this inspiration image from Spirited Away, my attention turned to the blue apron-type garment that Lin wears in the film.
There are better shots of it in the movie. There are even some scenes where she wears it tied around her neck as a kind of halter top. It turns out that this kind of apron is called a maekake, and it is basically just a length of indigo-dyed fabric with a waistband. These are common even today in Japan, where they are sometimes seen as a kind of folk art. They will often be printed with the name or logo of the business where the wearer works, so older ones will even be sold as antiques for that authentic decor accent. Modern ones often have art or promotional designs.
I went through my fabric stash, but I didn’t have a good piece of blue canvas or heavy linen. Instead, I picked some red and yellow canvas pieces. I had enough blue linen for the waist ties, though.
I hemmed the edges to simulate selvedges. The bottom edge would have just been left raw to make the fringe, but I decided to stitch across just above the fringe to keep it from fraying too much.
Red Maekake Apron, Flat
Yellow Maekake Apron, Flat
You can see that I did my standard 4-layer waistband. I made the ties about 3 yards long so that they can go around the waist twice and tie in front. The ones you can get today in Japan appear to have special fabric woven for the waist ties that is just doubled over instead of 4-layer. Hard to tell for sure.
Red Maekake Apron, Detail of Waistband
Yellow Maekake Apron, Detail of Fringe
I might eventually paint or stamp designs on these. An escarbuncle on the red one and a comet on the gold one might be fun. I will have to figure out a good placement.
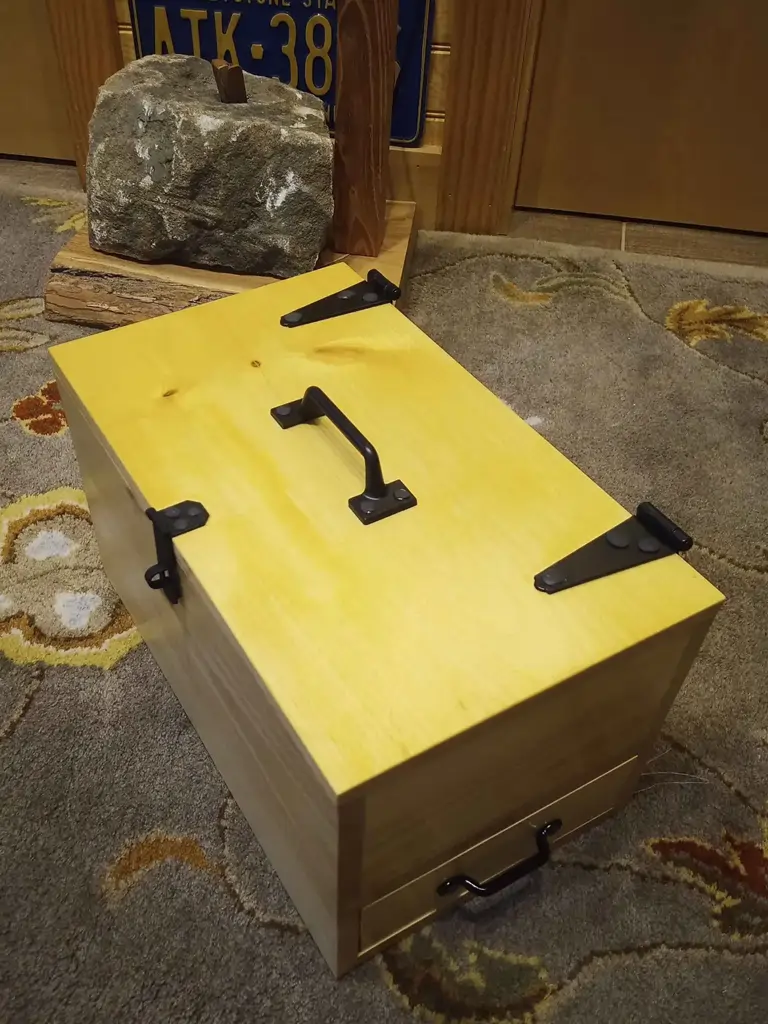
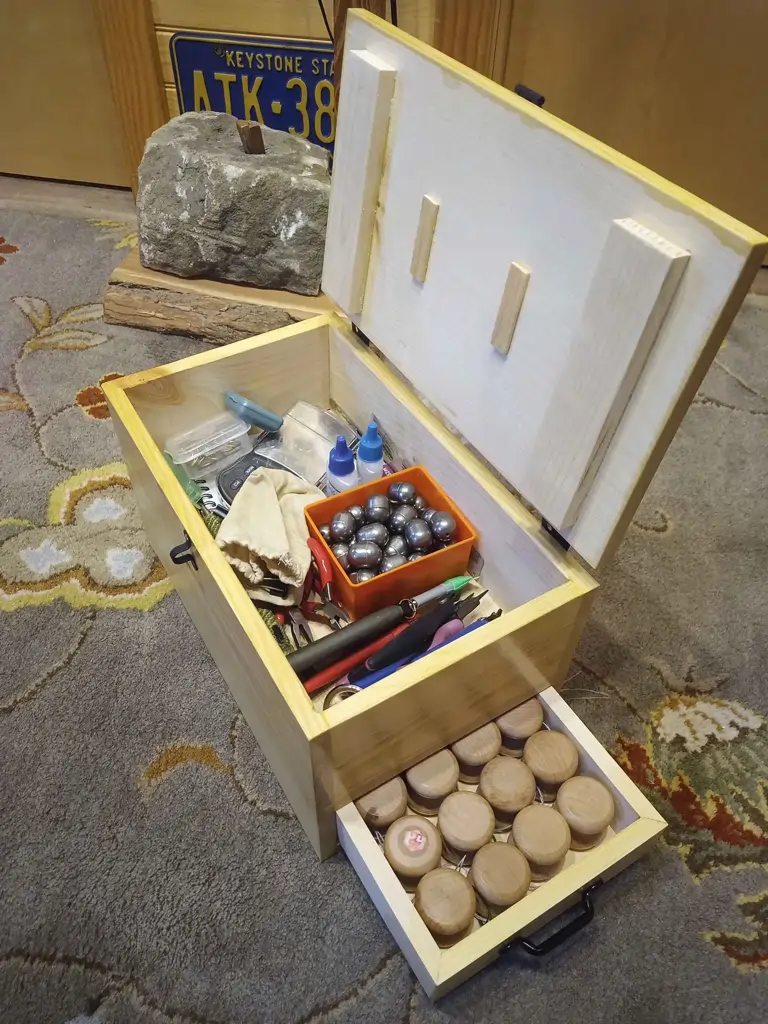
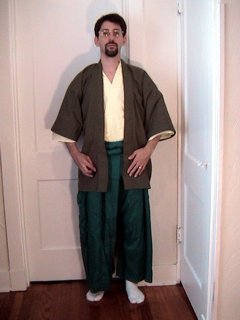
A while back, I made an early-medieval kyousoku from poplar. That one is more what comes to peoples’ minds when Japanese floor-seated armrests are considered. However, in Traditional Japanese Furniture Kazuko Koizumi mentions another kind of armrest. “A sturdier, box-shaped armrest featuring feather-stuffed pads on top and usually storage space underneath emerged,” during the Muromachi/Momoyama period.
Koizumi, page 166
During Pennsic this year, I went over to the Alben sawmill and bought some excellent maple. Ray had already run it through the planer so it was pretty smooth, but it was still almost an inch thick. I knew that because of that thickness and because of the hardness of the maple, that my ability to make things out of this maple using the small selection of hand tools I had brought to Pennsic was going to be somewhat limited. I decided I would make a siple box, and this idea quickly developed into making a box-shaped armrest. I was able to get all the pieces cut, and and most of the joinery.
Once I got home, and had access to more tools and a sewing machine, I was able to finish shaping the pieces and assemble the armrest. I made a custom cushion out of cotton canvas and polyfill, and used to to upholster the lid of the box. I used copper nails to secure the joinery so it should be quite sturdy. given the density of the wood and its thickness, this completed box weighs more than ten pounds.
The inside of the box is roughly twelve inches by six inches, and four inches deep below the inner lid. I think it’s a bit smaller than the one in the image, but it’s a comfortable armrest when seated on the floor next to it, and I can fit a bowl and cup inside it.
It is not a comfortable seat, although you could probably park a midsize car on it.
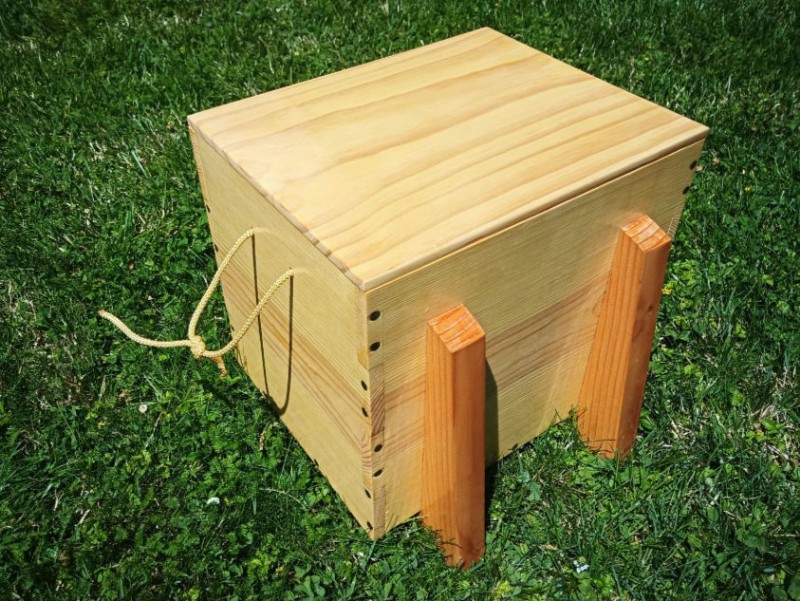
Sweetie ordered some frozen food from someplace, and it arrived packed in a small cooler. I had the bright idea to make a small karabitsu to hold/hide the cooler, and that was all she needed to hear. I grabbed some 1/2″ pine and some surplus 2×4 for legs, and got to work.
Small Coolerbitsu
The body of the karabitsu is 13″x10.5″x11″. I used traditional box joints at the corners. The legs are simply glued on, though they do hook under the body to support the floor. The floor is fully captive inside the walls, and nailed in place. The lid is a 3/4″-thick piece of “premium pine”, and it is rebated to fit the body of the box like a box lid.
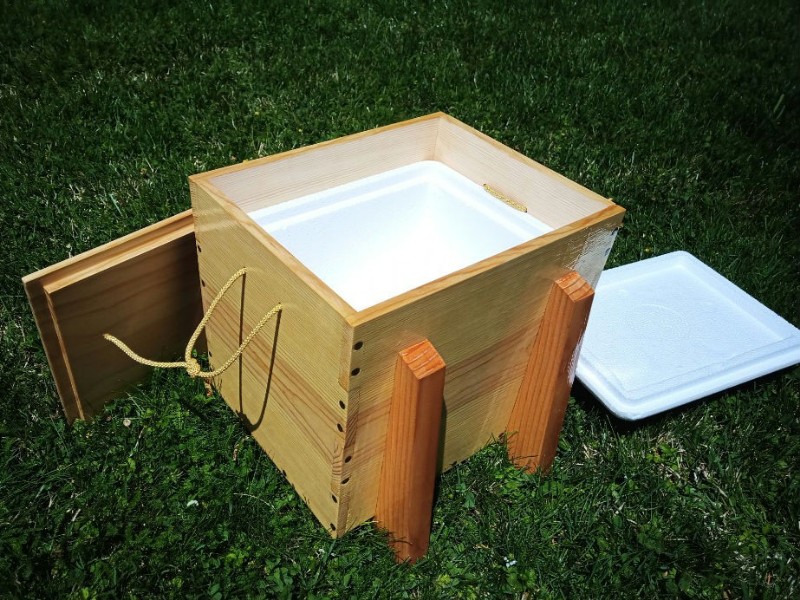
Open Coolerbitsu
Here you can see the rebated lid, and how nicely the little cooler fits inside the body. The handle ropes pass through holes in the ends of the body, and the rope does a good job of keeping the cooler in place. The exterior of the karabitsu is finished with clear polyurethane, so if it gets rained on or otherwise splashed with water it should be OK.
This is a nice little cooler that should be good for chilling beverages for an afternoon, or for packing lunch to an event.
As you know, I have made quite a few Japanese style tool chests over the years, in several different styles. In addition to being useful for toting woodworking tools, they come in very handy when I need to take kumihimo supplies somewhere. If I have a a lot of supplies, a large or medium size chest is good, and if I only need a few small things I can use my little bamboo box. What I felt I was lacking was a box for somewhere in the middle. I had not yet made the Edo suzuribako, so I made this small chest from some half-inch thick cedar.
Small Cedar Tool Chest
You can’t really tell the size of that without context, so here it is with a pair of fabric shears.
Small Cedar Toolchest Open
Overall, the chest is only 12.5″ long, 6.5″ wide, and 5″ tall. That is small enough to fit into the “double height” drawer slot of the small chest of drawers I have not documented because it is still kind of a work in progress.
I wanted a toolbox to hold my kumihimo (Japanese braiding) tools and supplies when I go traveling, so I made this one based on a Japanese suzuribako (scribal toolbox) from the Edo period. I had already made a bunch of pine trays custom-sized to hold 32 tama (weighted bobbins), so I made one more tray as the drawer, then designed the rest of the box around it. I didn’t want to spend the money to get an authentic set of hardware. I just bought hinges, handle, and hasp from the orange store. I might still add some corner braces to the outside if I can find some for a good price. The completed toolbox is 13″ long x 8″ wide x 7″ tall.
I bought two 6-foot 1x10s from the orange store and then planed them both down to 1/2-inch thick. even after trimming off the planer snipe this was plenty of lumber for the whole thing. All the joinery was cut on the table saw with a regular all-purpose blade. The corners of the drawer are miter cut and glued. Also, the two full-height corners of the box body have mitered corners. The floor of the tray is joined to the sides with 1/4″ x 1/4″ rabbets into matching dadoes. The two floors of the body are similarly joined, though the “front” of the box is flush and flat.
Battens on the underside of the lib will hopefully keep the lid from warping, and they provide solid anchoring for the hinge screws. The drawer pull is actually a “footman’s loop” from strapworks.com. I mostly used brass screws to attach the hardware. I did not like how the contrasting metal and philips heads looked, so I covered over all of the screw heads with “steel stick” epoxy putty. I could have done a better job with that, but it still looks better than screw heads.
Plenty of room inside stuff. Even though I planned the whole thing around the drawer, I had to sand quite a bit off the sides and bottom before it would fit in the body. As I have noted previously, sashimono (close fitting joinery) is really difficult.
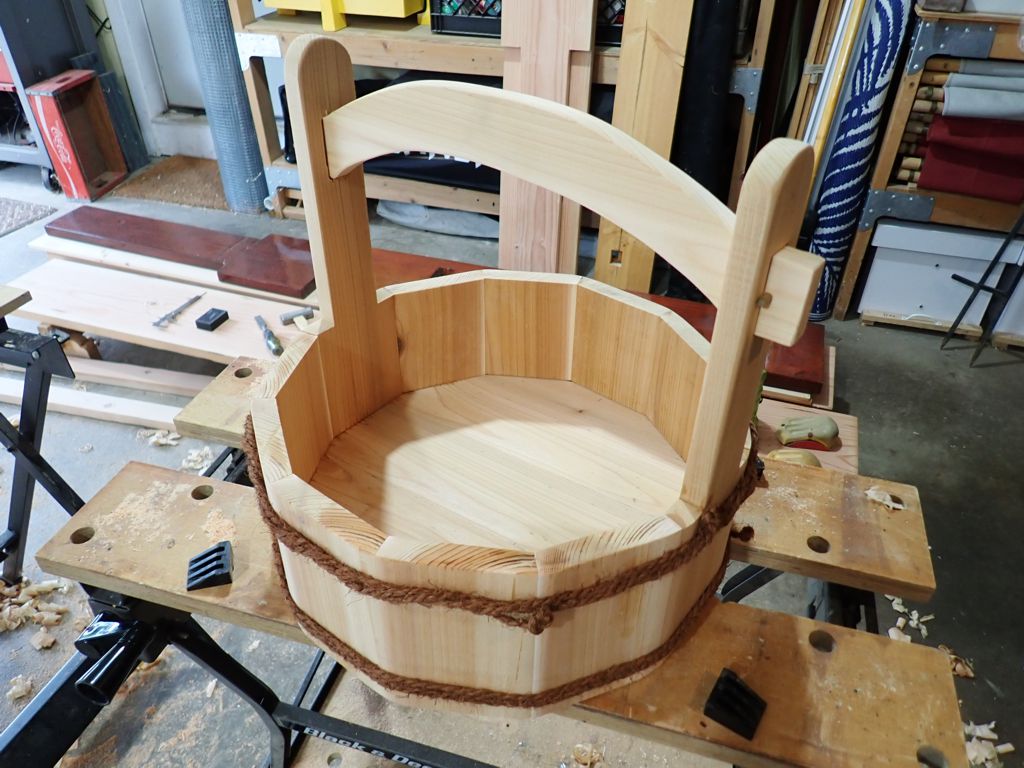
Sometimes I do woodworking demos at SCA events, and I have been wanting a less modern water source for sharpening than my plastic container. I was watching the animated film “Spirited Away” and I was like, “I need that bucket.”
I think that in Japan, this low and wide type of bucket was basically used as a basket. In the movie, she has it full of candy (konpeito, basically little bumpy sugar balls) that she’s feeding to the soot sprites. I’ve seen large ones in other movies used to transport cooked rice.
I bought about twelve feet of cedar 1by6 (sold as 4/4 S3S) and planed it down to 3/4″. Then I cut 10 6″ long bits for the staves and 2 15″ long pieces for the handle staves. I tilted the table saw blade to 15 degrees and beveled one edge, then spun each piece around to both bevel the other edge and narrow each piece down to 3+7/8″ wide (on the wider side). Switching the table saw over to a dado stack, I cut a 3/4″ wide by 3/8″ deep dado on the interior of each piece, to accept the floor of the bucket.
I used the band saw to shape the handle staves, then cut the through-mortises on the drill press and chiseled them square.
The floor of the bucket is cut from three pieces of cedar that I edge-glued together and then shaped using a circle jig on the band saw. I cut that as a 14″ circle, but I wish I had gone up at least a quarter inch more.
I dry fit all the pieces using blue tape, so I could figure out how long the handle needed to be. Once I had that length, I sketched out the curve of the handle and cut the shape on the band saw. A bit of sanding smoothed away the blade marks.
Since I already had the pieces taped up, I could apply plenty of glue, roll the bucket up around the floor (inserting the handle at the right moment), and clamp it together with elastic bands. I should have used ratchet strapspn as that would have let me get them really tight. Since I knew cleaning dry glue off the inside would be a pain, I washed the squeeze-out off the interior before it could cure. I left the whole thing to dry overnight.
The next morning I removed the elastic and tape. I scraped the squeeze-out off the exterior, then sanded the angled edges of the exterior to round it up a bit. I drilled some holes in the handle tenons so I could secure them with pegs. To finish up, I tied some palm rope around the bucket with constrictor knots.
Mizuoke from Cedar
It leaked almost as fast as the hose could fill it, so I guess it’s not the best bucket anybody ever made, but it looks good, and I learned some lessons that will help me when (if) I make another one.
Cut and shape the staves, then measure the dry fit to figure out how big the floor should be.
Cut the dado to be a tight fit for the floor.
Use ratchet clamps for a tight fit while the glue cures.
In Japan, they take pride that the joinery in their coopering (and boatmaking) is tight enough to be leakproof before it gets wet. The swelling makes it even tighter! I knew ahead of time that my joinery would not be up to Japanese level. Traditional buckets (and barrels) also have good quality hoops that keep the joinery tight as the wood swells. In Japan, making hoops by braiding strips of bamboo is a craft all on its own. I knew my rope hoops would be a little loose, and that I am not capable of metalworking at this level either, so glue it was.
I did not put any glue holding the bottom in place, because I knew that had to be free to swell. In my future tries to learn this craft, I will make the staves first, then measure to determine what size I need the floor to be. I’ll also leave the boards for the floor a little bit thicker, to match what is apparently a slightly over-width dado stack.
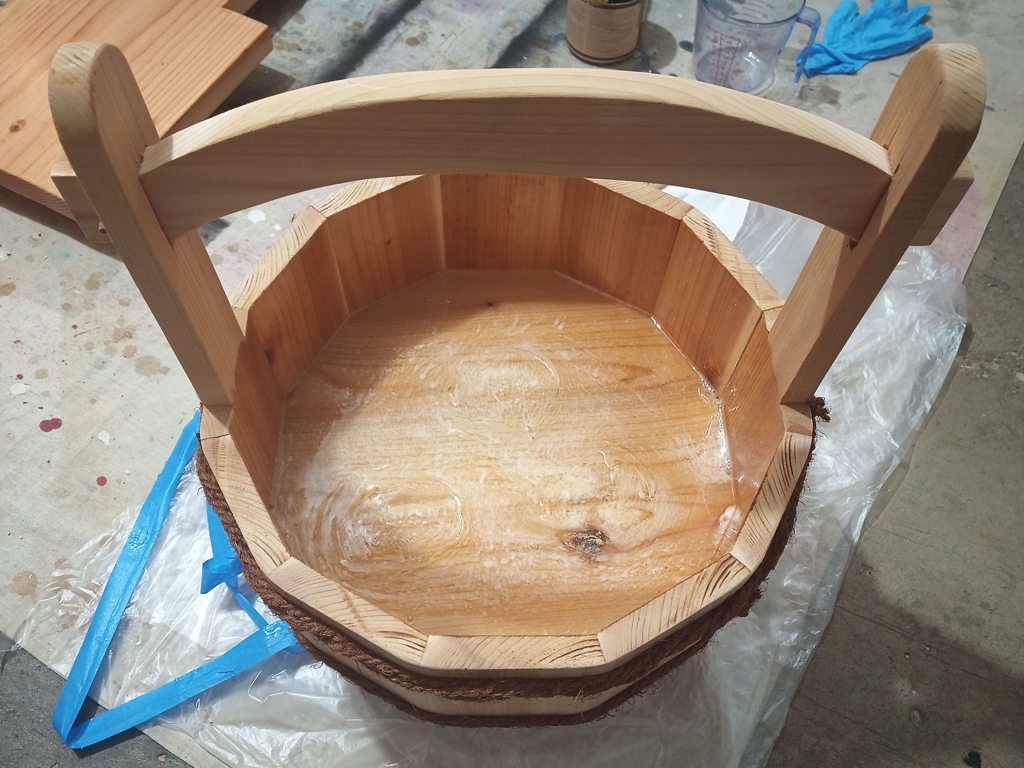
After a few days, I decided to seal the bottom of the bucket with clear finishing resin so that I could use it for its intended purpose. I sealed up the outside of the floor as best as I could with blue tape, then I poured in about 2 cups of mixed resin. I probably could have gotten away with only a cup of resin, since the hardened resin is pretty thick in the bucket now.
When it started to thicken, I brushed the resin up the sides of the bucket, sort of to make a plastic bucket inside. I knew the wood was porous, and I was hoping enough resign would soak in that the wood bucket and the plastic surface would be fully bonded together. One thing I did not take into account was that these pores are all full of air. Since the resin heats up as it cures, the air expanded and bubbled up through the resin. I did not get a perfectly clear layer of plastic in the bottom of the bucket, but it did seal everything up as hoped.
Cedar Bucket Sealed with Resin
It looks good overall though, and I am happy with it. Once you get some water in it, you can’t really tell the difference between bubbly resin and bubbly water. I have my bucket and it really does look like the inspiration. One commentator suggested that I make two more. The theory is that by the time I make the third one, I’ll have all the problems worked out and the third one will be perfect. That will have to wait for Spring, but I just might do it.


