

bookmark_borderPittsburgh Can Be Beautiful


Last night, we went to see a brilliant film by an oft-maligned but cult favorite director about a person who is sometimes viewed as some kind of monster by the public. A person who has been put on display by a heartless manipulator, and made to feel like a freak by an uncaring media.
That’s right, we went to see The Elephant Man (1980), directed by David Lynch and starring Anthony Hopkins and John Hurt. What movie did you think I was talking about?
Anyway, this film is absolutely amazing. It is not just a sensitive portrayal of a sometimes mysterious figure, but a detailed portrayal of life in Victorian England. The realities of the economics and class structure are displayed, and the dehumanization of everyday people by the advance of mechanization is always a factor. The film even addresses its own morality by having the morality of its characters openly debated.
Brilliant work by Anthony Hopkins, John Hurt, and Freddie Jones of course, with notable appearances by Anne Bancroft, John Gielgud, and a quite young Dexter Fletcher. Even minor roles are played with considerable emotion and skill by such luminaries as Kenny Baker, Wendy Hiller, and Michael Elphick.
In some ways, this is maybe the most mainstream of Lynch’s films, but in others it is pure Lynchian obesession. Mysterious and loud machinery punctuates contemplative sections. Deformities and bloody injuries are everywhere. There are so many photographic portraits of women that they should have been collected and published as a book. Even the controversial use of black and white is straight out of David’s artistic playbook.
If you haven’t seen this film in decades, or you haven’t seen it at all, pay tribute to the legacy of David Lynch by watching this film if you can. Many thanks to the Harris Theater for shoing this on the big screen where it really belongs.
A very good friend of ours was elevated to the Order of the Mark yesterday for his years of excellence with thrown weapons and related service. Hara and I made this hitatare sugata for him to wear for his elevation. Hara found the wonderful silk brocade online, and she made the hakama. I made the hitatare and the braided embellishments.

I also made the white tekkou bracers from some excellent white silk, and lined them with white linen.
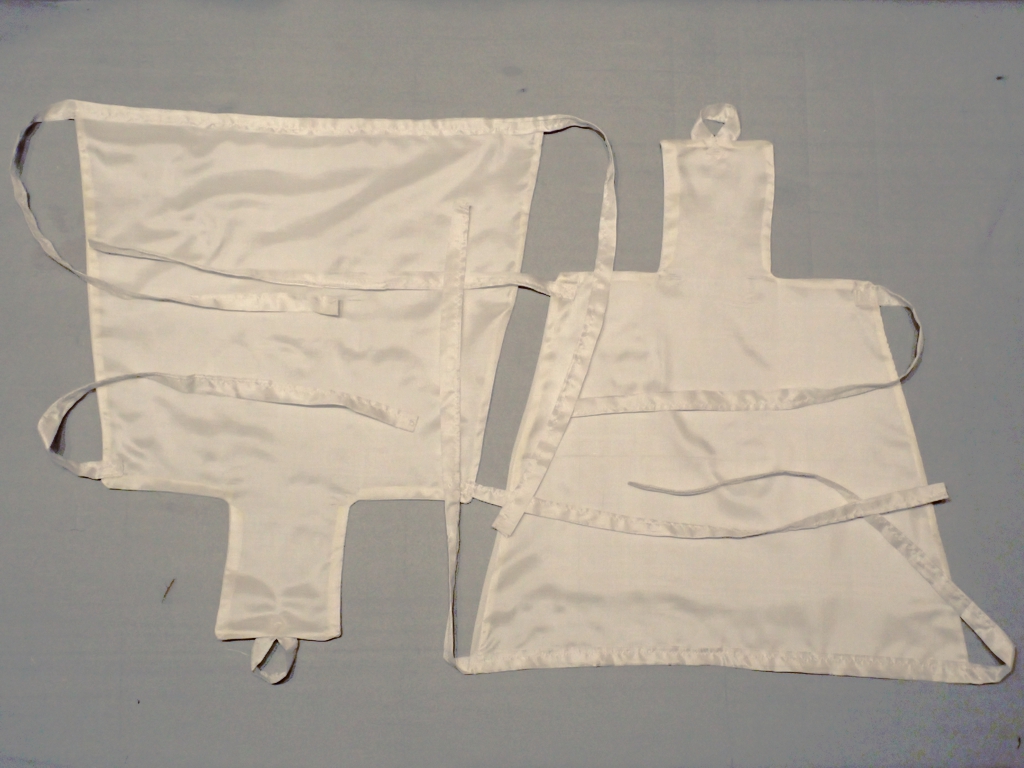
I also made the jinbaori arming jacket. Hara bought the lining, and Alime bint Yorgi found the shell fabric. We might later replace the buttons with new buttons shaped like the Mark badge.
On the back, I embroidered a Mark badge onto some of the extra lining fabric, then turned the edges under and sewed the square down to the center of the back.

This is some of the shiniest, most extravagant garb I have ever made. It was my special pleasure to make these garments for Kuma because I was otherwise prevented from attending his elevation.
       January               February                 March
Su Mo Tu We Th Fr Sa   Su Mo Tu We Th Fr Sa   Su Mo Tu We Th Fr Sa
             1  2  3    1  2  3  4  5  6  7    1  2  3  4  5  6  7
 4  5  6  7  8  9 10    8  9 10 11 12 13 14    8  9 10 11 12 13 14
11 12 13 14 15 16 17   15 16 17 18 19 20 21   15 16 17 18 19 20 21
18 19 20 21 22 23 24   22 23 24 25 26 27 28   22 23 24 25 26 27 28
25 26 27 28 29 30 31                          29 30 31

        April                   May                   June
Su Mo Tu We Th Fr Sa   Su Mo Tu We Th Fr Sa   Su Mo Tu We Th Fr Sa
          1  2  3  4                   1  2       1  2  3  4  5  6
 5  6  7  8  9 10 11    3  4  5  6  7  8  9    7  8  9 10 11 12 13
12 13 14 15 16 17 18   10 11 12 13 14 15 16   14 15 16 17 18 19 20
19 20 21 22 23 24 25   17 18 19 20 21 22 23   21 22 23 24 25 26 27
26 27 28 29 30         24 25 26 27 28 29 30   28 29 30
                       31
        July                  August                September
Su Mo Tu We Th Fr Sa   Su Mo Tu We Th Fr Sa   Su Mo Tu We Th Fr Sa
          1  2  3  4                      1          1  2  3  4  5
 5  6  7  8  9 10 11    2  3  4  5  6  7  8    6  7  8  9 10 11 12
12 13 14 15 16 17 18    9 10 11 12 13 14 15   13 14 15 16 17 18 19
19 20 21 22 23 24 25   16 17 18 19 20 21 22   20 21 22 23 24 25 26
26 27 28 29 30 31      23 24 25 26 27 28 29   27 28 29 30
                       30 31
       October               November               December
Su Mo Tu We Th Fr Sa   Su Mo Tu We Th Fr Sa   Su Mo Tu We Th Fr Sa
             1  2  3    1  2  3  4  5  6  7          1  2  3  4  5
 4  5  6  7  8  9 10    8  9 10 11 12 13 14    6  7  8  9 10 11 12
11 12 13 14 15 16 17   15 16 17 18 19 20 21   13 14 15 16 17 18 19
18 19 20 21 22 23 24   22 23 24 25 26 27 28   20 21 22 23 24 25 26
25 26 27 28 29 30 31   29 30                  27 28 29 30 31
The Dune soundtrack is a perfectly fine extension of the Part 1 soundtrack. Amelia is an album-length presentation of the acts around the last flight of Amelia Earhart. It’s interesting but maybe not “entertaining”. The Bad Fire is very interesting because it came with a bonus CD of the demo versions of each of the tracks on the album. These demos are much more raw and a lot closer to the less “produced” sound of Mogwai’s earlier albums, and I think I actually like them better than the final versions. I found the Rendez-vous and Powaqqatsi in a discount bin someplace and could not pass them up. Michael Riesman is the conductor for the performance, but of course Philip Glass composed all of the music. Audio Vertigo is a heavy-hitting album, and an excellent showing from Elbow. I was leafing through the bin at the Goodwill, and found this whole stack of Ottmar Liebert albums. These are all great, and if you have not heard Ottmar Liebert’s German take on Spanish guitar music, you should look him up. I spent like $10 for five hours of music. We already had a copy of Chariots of Fire, but who knows if I’ll ever see another one. The Yo-Yo Ma album was a gift from Sweetie, and it’s a fascinating take on these traditional tunes. A Chinese guy playing Japanese music on a European instrument is a great expression of cosmopolitan art and performance.
I actually served myself lunch in the dish bento the other day. Here’s what it looks like:

Starting in the upper left, I had:
Lots of food, to be sure, but mostly vegetables, fruits, and grains. I don’t always have this much variety, but sometimes I go a little overboard when I’m grocery shopping. Such hardship, I know.
A while back, probably a year or two ago, I bought six small-ish (4 inches across) “Black/Red” melamine dishes from one of the Asian markets here in Pittsburgh. See, the problem with most bento is that the tray inside is so big that you can’t actually fit it in the dishwasher. I figured that if I got a few small dishes, then made a box to hold them, I could use the collection as a bento box. Once I’d used the dishes to hold lunch “courses”, I could pull them out and line them up in the dishwasher rack.

Here is what the box and lid look like with the dishes inside. You can see that the lid has a little lip around it, but it is basically the same construction as the body, only slightly larger. The corners are mitered, and the surfaces (lid surface, body floor) are rabetted to fit into dadoes in the lip/sides. There are no fasteners in the box, just glue and finish. I did most of the cutting and mitering on the band saw, and did the rabbets and dadoes on the router table.

The body interior is just a little bit larger and deeper than the bowls themselves. The interior is about 12.125″ by 8.125″ and 2 inches deep. The maple is 0.375″ thick, so it is sturdy enough to hold the densest of lunches.

The panels that make up the floor and lid surface are actually “book matched”. I started with a 7/8″-thick rough board, then re-sawed it into two thinner boards using my band saw. Then, a few passes through the planer to smooth it out. That’s why the grain doesn’t match up exactly, because my wavy resaw cuts meant more grain was lost to the planer.

The entire box is finished with “General Finishes” brand ‘Wood Bowl Finish‘, which used to be marketed as ‘Salad Bowl Finish’. This is an oil-based urethane finish intended for food contact. They have taken care with the solvents so that once the finish is cured it is non-toxic and as safe as they can manage. It is much less stinky than the polyurethanes I tend to use, and it dries very hard like lacquer. Due to the (intentional) loose fit of the panels in the edges/walls, the box is not water-tight, but the wood is thoroughly sealed.
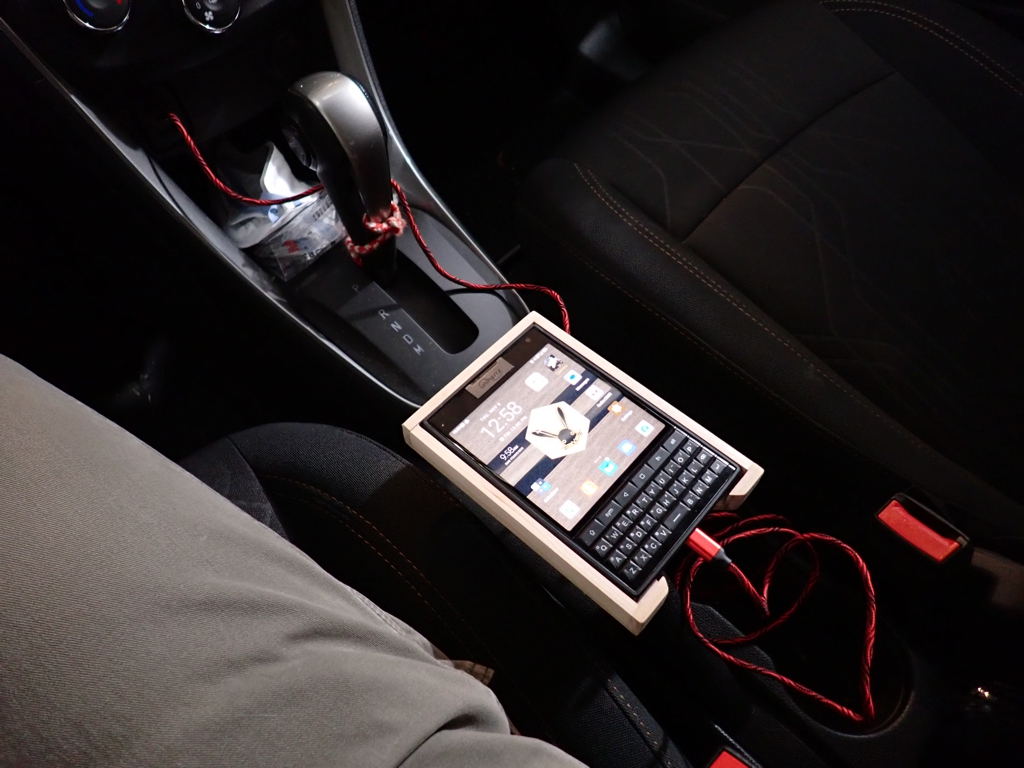
Following up on the discovery that the IKEA Skogsviken tray was the perfect size to hold the new Titan 2 phone, I was finally able to make something I have been thinking about for some time: a tripod mount for my phone. I could have made one out of wood, but I only had square tuits around. Also, in my experience, small wooden boxes and trays are far more fragile than similar plastic objects. The opportunity to give this idea a try with only a $3 plastic tray at risk was too good to pass up.

First, I cut a hole in the tray at the location of the subscreen, cameras (there are two cameras on the back), and LED flash. The best way I found to do this was to drill several holes through the plastic to create the opening, then use wood chisels to straighten up the edges. This also meant removing one of the “feet” from the back, this tray can no longer be placed securely on the Skogsviken towel bar.

Next, I made a mounting plate by cutting a square of 3/8″-thick wood, drilling a hole in it, and inserting a 1/4″x20tpi tee nut. Then, I attached the plate to the back of the tray using a couple of 3M Command strips. These removable adhesive strips should come in handy for whatever object holds the next phone.

That’s it! Just screw the tripod to the mounting plate and slip the phone into the tray for stabilized, repeatable shots. I can use either the front camera or back cameras. I can also use the tray with some smaller “pocket” tripods I have to make a fancy desk stand. These kind of tripod mounts for phones can cost quite a bit of money, and they normally need to “grip” your phone at the sides in some kind of clamp. I much prefer this easy tray arrangement.
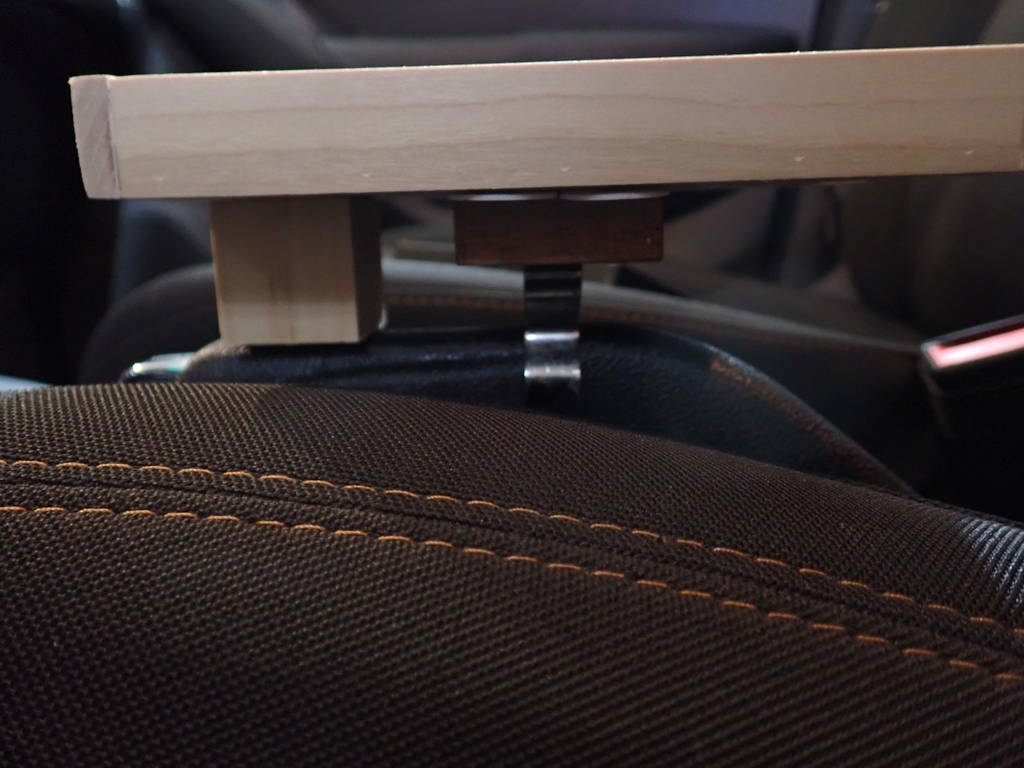
Since I have a new phone, and it is not the same size as the old phone, I needed to make a new phone tray.
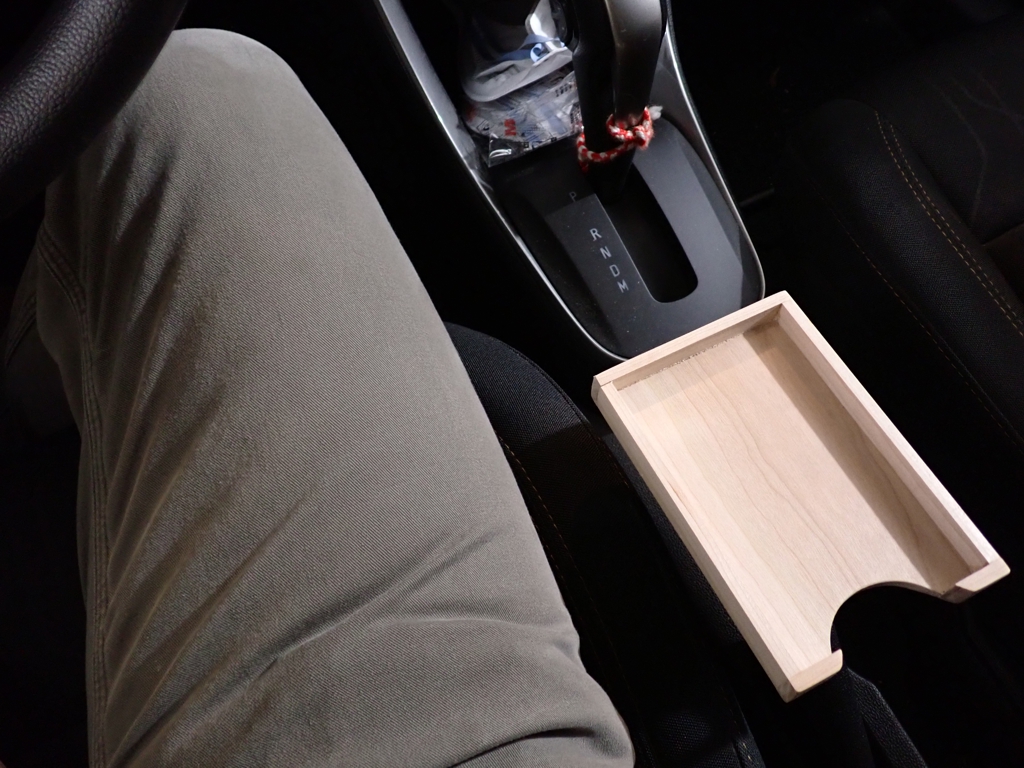
I made this from some 1/4″ cherry I had around after doing some re-saw work on a thicker cherry board from the Alben Sawmill. The sides are just tall enough to hold the phone, and the assembly is glued and pinned together with no fancy joinery. I left it all unfinished so it can age naturally in the sun. The cut-out at the bottom enables me to plug in a USB cord if I need to charge the phone or connect it to the Android Auto system. It also makes it possible to grab the phone and lift it out of the tray when needed. Can’t press the side buttons, but maybe that’s a good thing?
Underneath the tray is a metal clip that attaches the tray to the parking brake lever. The clip is screwed to a wooden block that is attached to the tray with removable adhesive strips. The other wood block keeps the tray level, which was a problem with the old tray that I fixed this time.
If you need a tray for your Unihertz Titan 2, but you don’t have the time or ability to do woodworking, you can get this perfect fit plastic tray at IKEA for $3. You will have to figure out a mounting system yourself, however.
