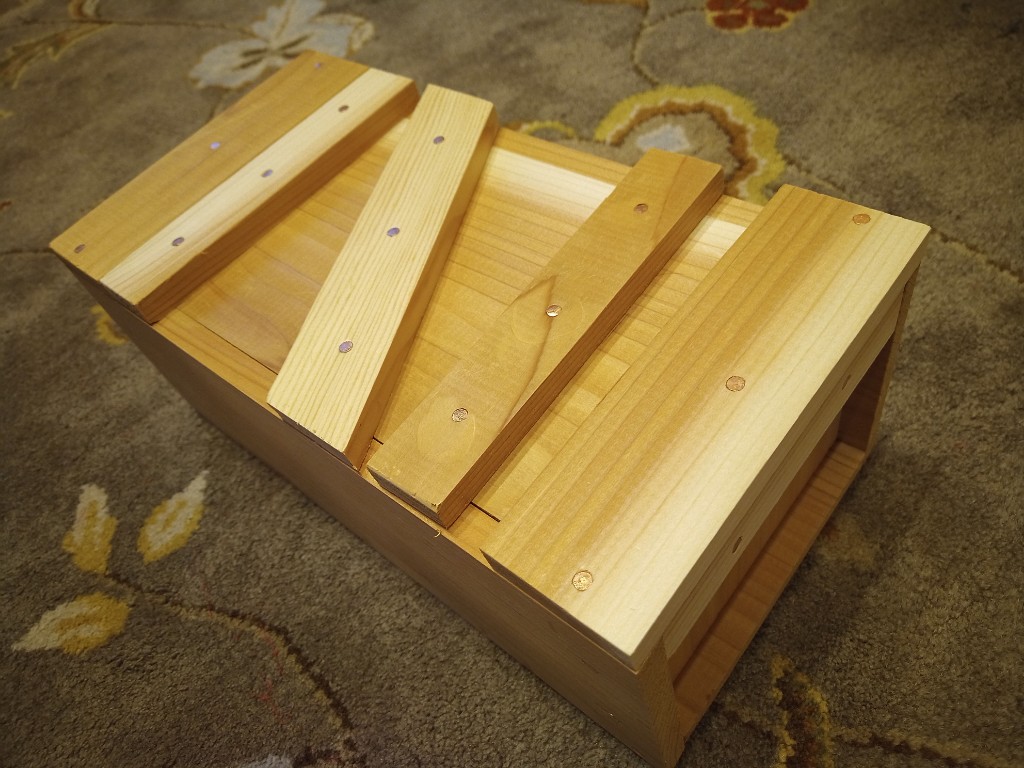
As you know, I have made quite a few Japanese style tool chests over the years, in several different styles. In addition to being useful for toting woodworking tools, they come in very handy when I need to take kumihimo supplies somewhere. If I have a a lot of supplies, a large or medium size chest is good, and if I only need a few small things I can use my little bamboo box. What I felt I was lacking was a box for somewhere in the middle. I had not yet made the Edo suzuribako, so I made this small chest from some half-inch thick cedar.
Small Cedar Tool Chest
You can’t really tell the size of that without context, so here it is with a pair of fabric shears.
Small Cedar Toolchest Open
Overall, the chest is only 12.5″ long, 6.5″ wide, and 5″ tall. That is small enough to fit into the “double height” drawer slot of the small chest of drawers I have not documented because it is still kind of a work in progress.
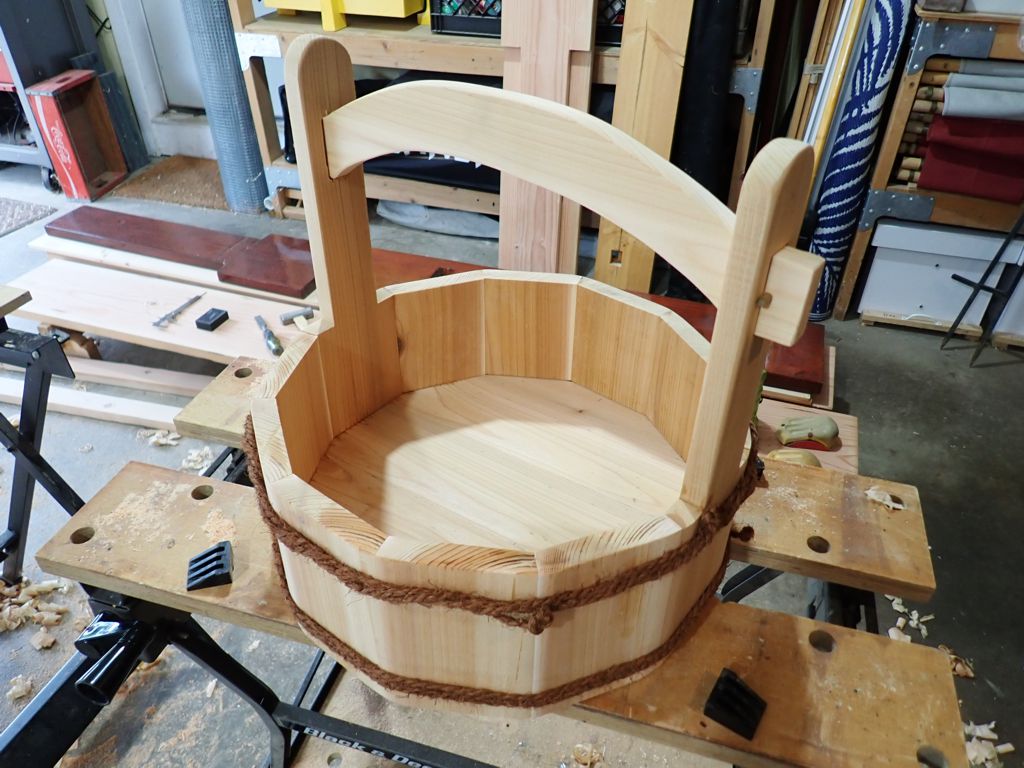
Sometimes I do woodworking demos at SCA events, and I have been wanting a less modern water source for sharpening than my plastic container. I was watching the animated film “Spirited Away” and I was like, “I need that bucket.”
I think that in Japan, this low and wide type of bucket was basically used as a basket. In the movie, she has it full of candy (konpeito, basically little bumpy sugar balls) that she’s feeding to the soot sprites. I’ve seen large ones in other movies used to transport cooked rice.
I bought about twelve feet of cedar 1by6 (sold as 4/4 S3S) and planed it down to 3/4″. Then I cut 10 6″ long bits for the staves and 2 15″ long pieces for the handle staves. I tilted the table saw blade to 15 degrees and beveled one edge, then spun each piece around to both bevel the other edge and narrow each piece down to 3+7/8″ wide (on the wider side). Switching the table saw over to a dado stack, I cut a 3/4″ wide by 3/8″ deep dado on the interior of each piece, to accept the floor of the bucket.
I used the band saw to shape the handle staves, then cut the through-mortises on the drill press and chiseled them square.
The floor of the bucket is cut from three pieces of cedar that I edge-glued together and then shaped using a circle jig on the band saw. I cut that as a 14″ circle, but I wish I had gone up at least a quarter inch more.
I dry fit all the pieces using blue tape, so I could figure out how long the handle needed to be. Once I had that length, I sketched out the curve of the handle and cut the shape on the band saw. A bit of sanding smoothed away the blade marks.
Since I already had the pieces taped up, I could apply plenty of glue, roll the bucket up around the floor (inserting the handle at the right moment), and clamp it together with elastic bands. I should have used ratchet strapspn as that would have let me get them really tight. Since I knew cleaning dry glue off the inside would be a pain, I washed the squeeze-out off the interior before it could cure. I left the whole thing to dry overnight.
The next morning I removed the elastic and tape. I scraped the squeeze-out off the exterior, then sanded the angled edges of the exterior to round it up a bit. I drilled some holes in the handle tenons so I could secure them with pegs. To finish up, I tied some palm rope around the bucket with constrictor knots.
Mizuoke from Cedar
It leaked almost as fast as the hose could fill it, so I guess it’s not the best bucket anybody ever made, but it looks good, and I learned some lessons that will help me when (if) I make another one.
Cut and shape the staves, then measure the dry fit to figure out how big the floor should be.
Cut the dado to be a tight fit for the floor.
Use ratchet clamps for a tight fit while the glue cures.
In Japan, they take pride that the joinery in their coopering (and boatmaking) is tight enough to be leakproof before it gets wet. The swelling makes it even tighter! I knew ahead of time that my joinery would not be up to Japanese level. Traditional buckets (and barrels) also have good quality hoops that keep the joinery tight as the wood swells. In Japan, making hoops by braiding strips of bamboo is a craft all on its own. I knew my rope hoops would be a little loose, and that I am not capable of metalworking at this level either, so glue it was.
I did not put any glue holding the bottom in place, because I knew that had to be free to swell. In my future tries to learn this craft, I will make the staves first, then measure to determine what size I need the floor to be. I’ll also leave the boards for the floor a little bit thicker, to match what is apparently a slightly over-width dado stack.
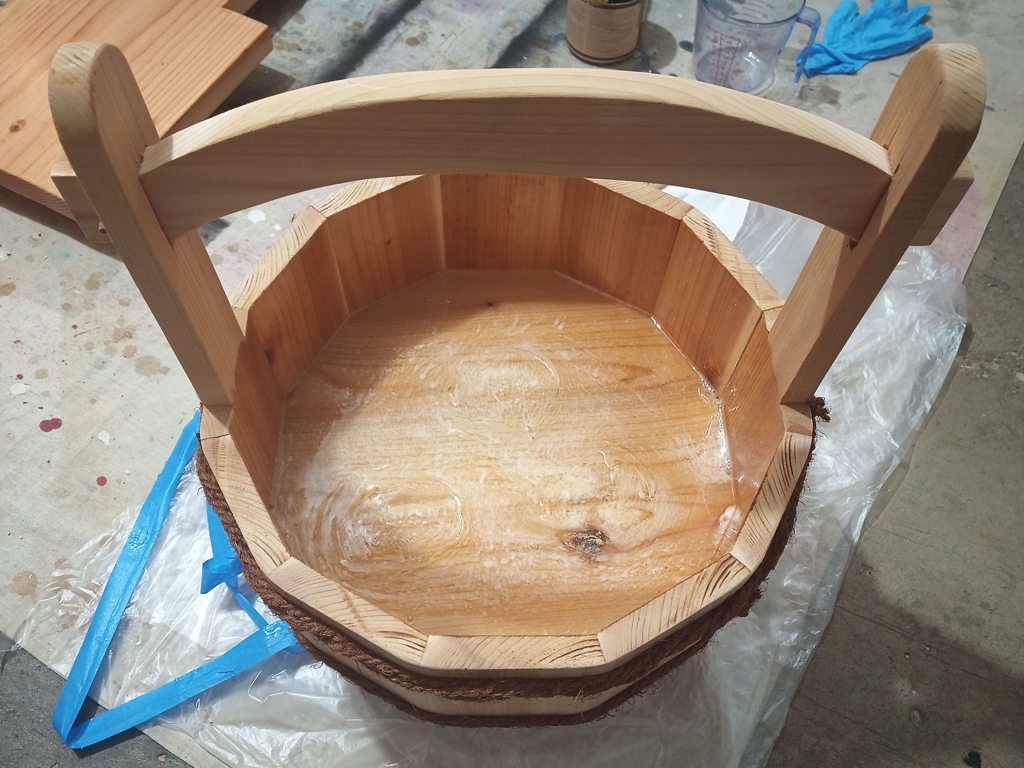
After a few days, I decided to seal the bottom of the bucket with clear finishing resin so that I could use it for its intended purpose. I sealed up the outside of the floor as best as I could with blue tape, then I poured in about 2 cups of mixed resin. I probably could have gotten away with only a cup of resin, since the hardened resin is pretty thick in the bucket now.
When it started to thicken, I brushed the resin up the sides of the bucket, sort of to make a plastic bucket inside. I knew the wood was porous, and I was hoping enough resign would soak in that the wood bucket and the plastic surface would be fully bonded together. One thing I did not take into account was that these pores are all full of air. Since the resin heats up as it cures, the air expanded and bubbled up through the resin. I did not get a perfectly clear layer of plastic in the bottom of the bucket, but it did seal everything up as hoped.
Cedar Bucket Sealed with Resin
It looks good overall though, and I am happy with it. Once you get some water in it, you can’t really tell the difference between bubbly resin and bubbly water. I have my bucket and it really does look like the inspiration. One commentator suggested that I make two more. The theory is that by the time I make the third one, I’ll have all the problems worked out and the third one will be perfect. That will have to wait for Spring, but I just might do it.
Like many people, this winter was pretty bad for me. The isolation at home, the chaotic election, the violent attempt to overthrow a democratically elected government… I realize things were even worse for people who actually got sick, but the rest of us still had a lot to deal with. To help fight the depression, I bought one of those full spectrum lamps to at least help combat the winter blahs that are caused by lack of sunlight during the Winter. I think it helped, even if it was just the feeling that I was trying something new.
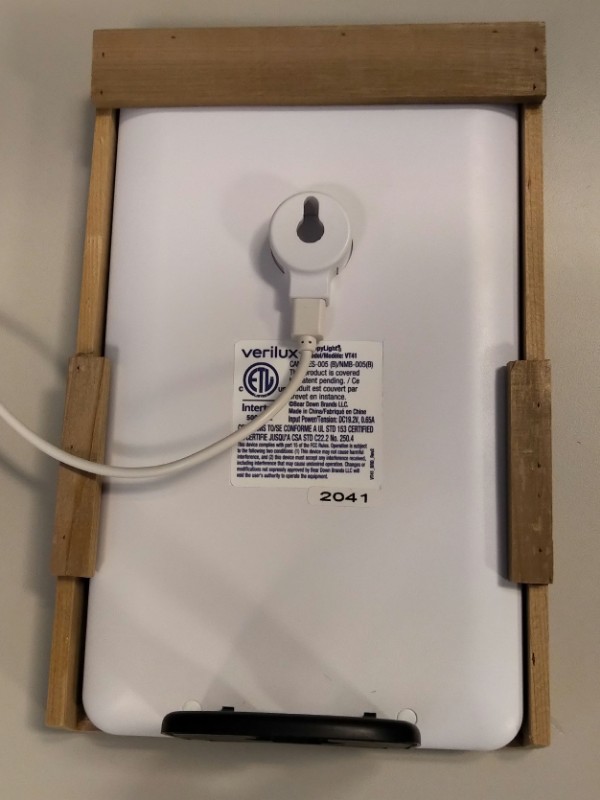
I bought a small-ish, flat-panel light that I could mount on the wall over my desk, or place off to the side on a table. It works great, and has a timer function so that I can chunk out my work day. The only problem is that its modern aesthetic clashes with my rustic Japanese decor preferences. So, I made a cedar “shoji” frame to disguise the lamp.
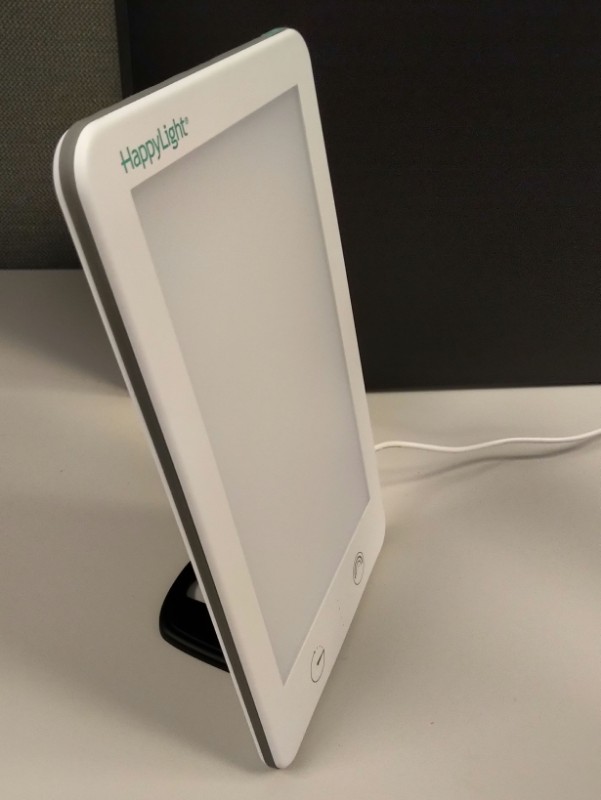
This is the lamp, a HappyLight from Verilux
The cedar frame slides down over the lamp
The frame does not interfere with the wall hook, table stand, or power jack
From the front
I can’t show you what it looks like with the light on, because the lamp is so bright that you wouldn’t be able to see anything else in the photo besides the glowing rectangle. I am thinking of adding some kumiko lattice-work to the frame opening, but kumiko are so trendy right now that I don’t know if I can bring myself to do that. Honestly, if one more person responds to me saying “I do some Japanese-style woodworking.” with “Have you tried kumiko?” I may stop discussing woodworking entirely.
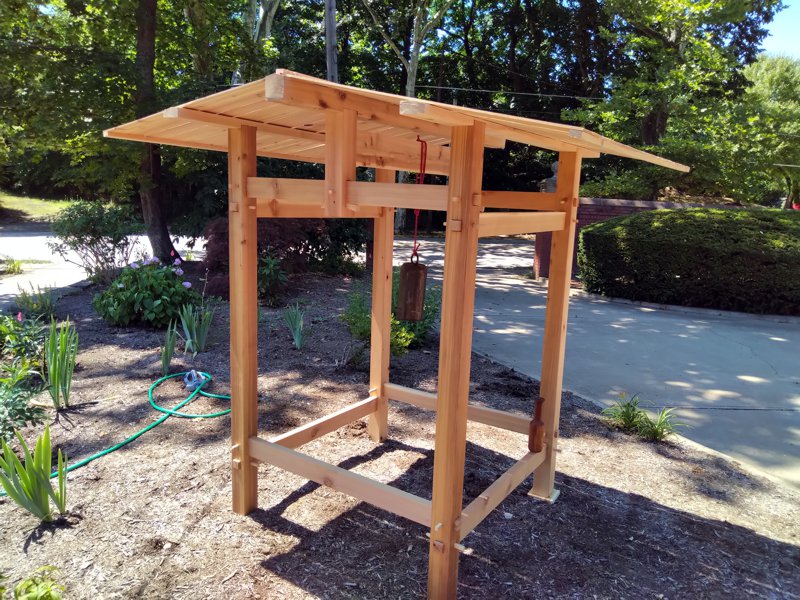
Sharon bought this bell maybe ten years ago up at Pennsic. It was in the basement at the old house, then it was in the garage here at the new house. I have planned, for all this time, to build an enclosure in which to hang this bell, to give Sharon’s garden a Japanese accent piece. Well here it is.
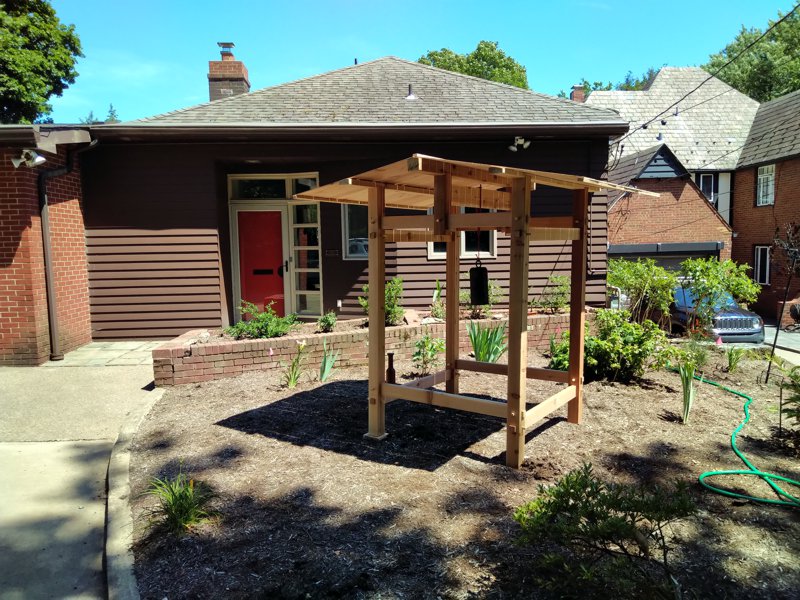
Bell Tower
This belfry, or shourou, is made entirely of cedar, except for the pegs and wedges, which are cypress. The vertical posts are 4-by-4. Cutting all those through-mortises in 4×4 was no picnic, let me tell you. The cross-braces are all 2-by-4. Cutting the large tenons and small securing mortises on those was fun by comparison. The roof is all quarter-inch by 4, which I made by re-sawing 1×4 on the band saw, and then planing it down to remove the saw marks. In spite of the power tools, this was ten 1x4s, and quite a bit of work.
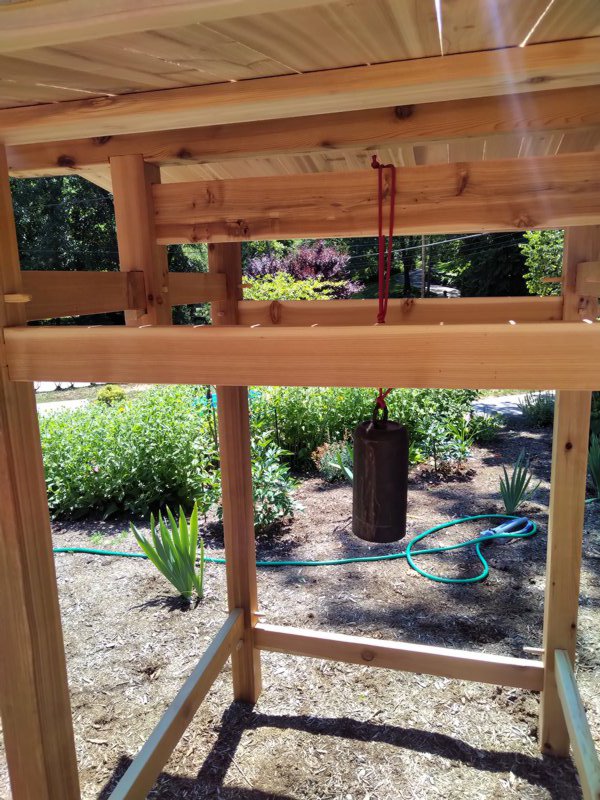
The corner posts are six feet tall, so this is a human-scale project. There’s a ranma panel between the center roof supports that’s made from a single panel of 1-by-6. The bell hangs from this.You can see a cherry-wood mallet sitting on one of the lower cross beams, for striking the bell. The bell is made from a an old SCUBA tank. It has a pleasing sound.
I put about six days of work into this, if you don’t count the trip up to Mars Lumber to buy the cedar. I could pretty much only cut one of the vertical posts per day. I drilled out the mortise holes, the chiselled the corners out of the holes to make square mortises. To keep them square with the faces, I marked both ends of the mortises and went in from both sides to the center. This means that cutting the four large mortises and four small mortises was like cutting 16 mortises on every post. So, one per day. I would only re-saw a few of the 1x4s and cut a few 2x4s each day, too. Spreading out the work made for more variety each day, which was necessary given that I was working out in the garage in 90 degree heat.
When enough pieces were ready, I started assembling the structure. The tenons on the end of the 2x4s were pretty tight in the mortises, and the pegs to secure them had to be hammered in to tighten the joints. once I had the frame assembled, I set it up in the garden and cut the three roof beams. These have notches cut in them to hold them on the posts, and there are hidden construction screws to secure them. I could have gotten fancier with the joinery here, but I did not.
Once all the roof pieces were sawn, planed, and cut to length, it was time to make a roof. The roof pieces are all nailed in place with brads from a nail gun. Strips under the edges of the roof keep the ends of the pieces together, and a cap rail on top secures the top ends of the roof pieces. It’s not waterproof, but it does not need to be.
I’m really happy with the way this project came out. It’s big, but not too big, and very solid. The thin roof provides shade, but doesn’t make the structure too top-heavy. The bell looks great hanging there, and sounds terrific when you strike it. Lamost all of the project went according to plan, so if I need a similar structure someplace else, I know that I can make all the pieces and then construct it on-site with minimal fuss. My ultimate goal is to build a small Japanese-style house on a trailer for camping at Pennsic. This is a good step in that direction.
Two of the 16 pegged corner joints
The center support is pegged to secure it, then wedged to keep it tight and square.
The ranma panel is just inserted into mortises in the center supports.
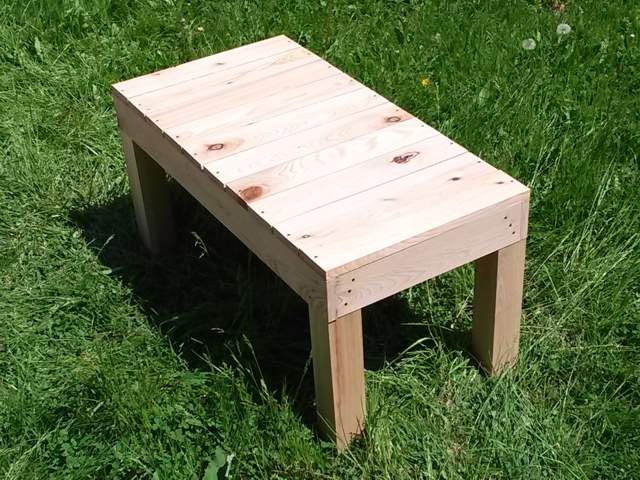
Long-time fans of my work my remember the nine endai benches (one, two, three through five, and six through nine) that I’ve made in the past. These are great, but they are 18 inches tall. As the endai is a half-step between the ground and the en of a Japanese dwelling, I wanted to make something that was a half-step between the ground and an endai. Even though there’s no Pennsic this year, I wanted to tackle this little project and get it off my list. I recently sorted through all of the surplus wood I have, so I knew I had enough lumber on hand to tackle this project without having to go and buy anything.
Endai Stepstool
It’s entirely red cedar, and much of a style with endai six through nine, but roughly half-scale. Instead of being 36″ long, 18″ deep, and 18″ tall; this one is 18″ long, 9″ deep, and 9″ tall. The legs are 2×2 instead of 4×4. It’s a mini-bench.
I’m a bit disappointed about the external fasteners on the legs. I wasn’t able to do the joinery I usually do on the legs, and there isn’t a lot of room inside the apron for screws. Even with four screws on the interior of each leg it was a still a little rickety, so I gave in and put some screws in from the outside.
I put a bit of boiled linseed oil on it, to enhance the color and keep the wood from drying out. I’m pretty happy with it.


