A while back, I bought myself a pair of overalls. Sometimes, especially when it’s hot, wearing pants with a waistband is uncomfortable, and I usually have to wear a belt with pants, which makes it even more uncomfortable. These overalls had a couple of narrow tool slots on the thigh, and several more on the front bib. I took to carrying around markers, pencils, etcetera in these slots, then started acquiring more tools that were narrow enough to fit in them. Pen-knife! Penlight! Scissors! Soon I had more tools than I had slots, and some of my overalls (by now I was up to three pairs) had fewer slots. I needed a way to organize these tools in my dresser and maybe even pack them for travel. Time to make another tool roll. I went into my fabric stash and found a suitable piece of canvas left over from the Natural Shop Coat project, and got to work.
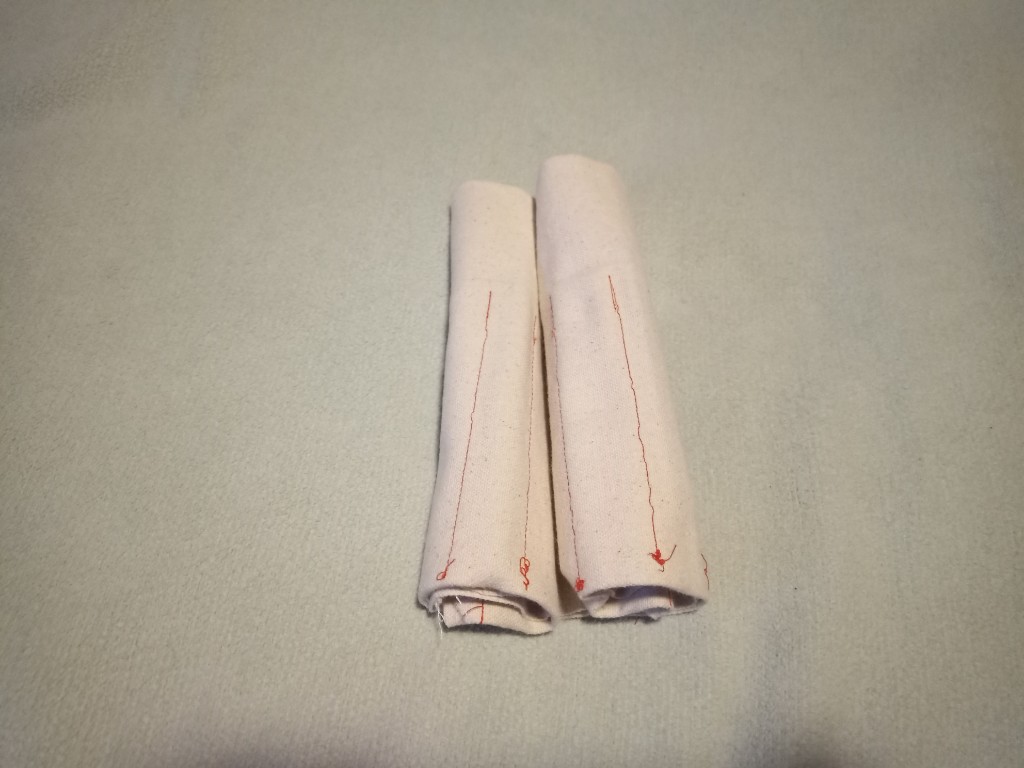
Tool Roll Closed
Here’s what it looks like all rolled up. You can see that I did not make any effort at all to hide the stitching. I don’t see why I would bother.
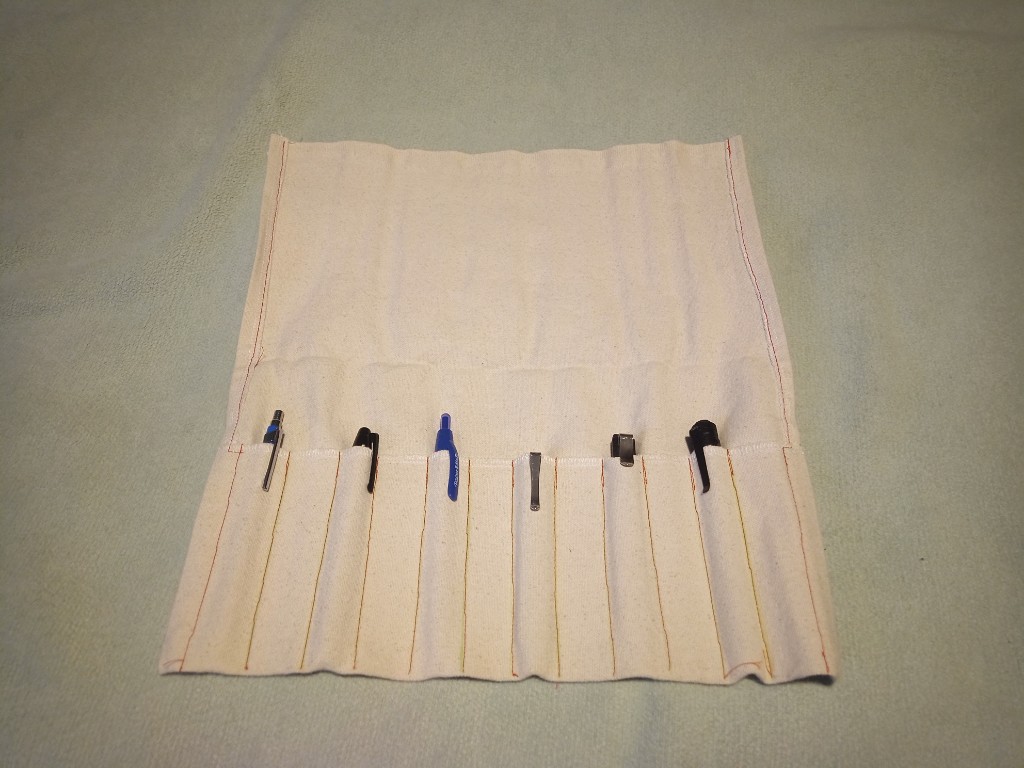
Tool Roll Open
Unroll it and lift the flap, and you can see six tools filling half of the twelve slots of the roll. I could also put a craft knife, metal ruler, screw driver, and some other things in there if I want. There’s even room if I acquire more tools. I think the rule is that the tool has to have a pocket clip. I had to add a pocket clip to the scissors so they would qualify.
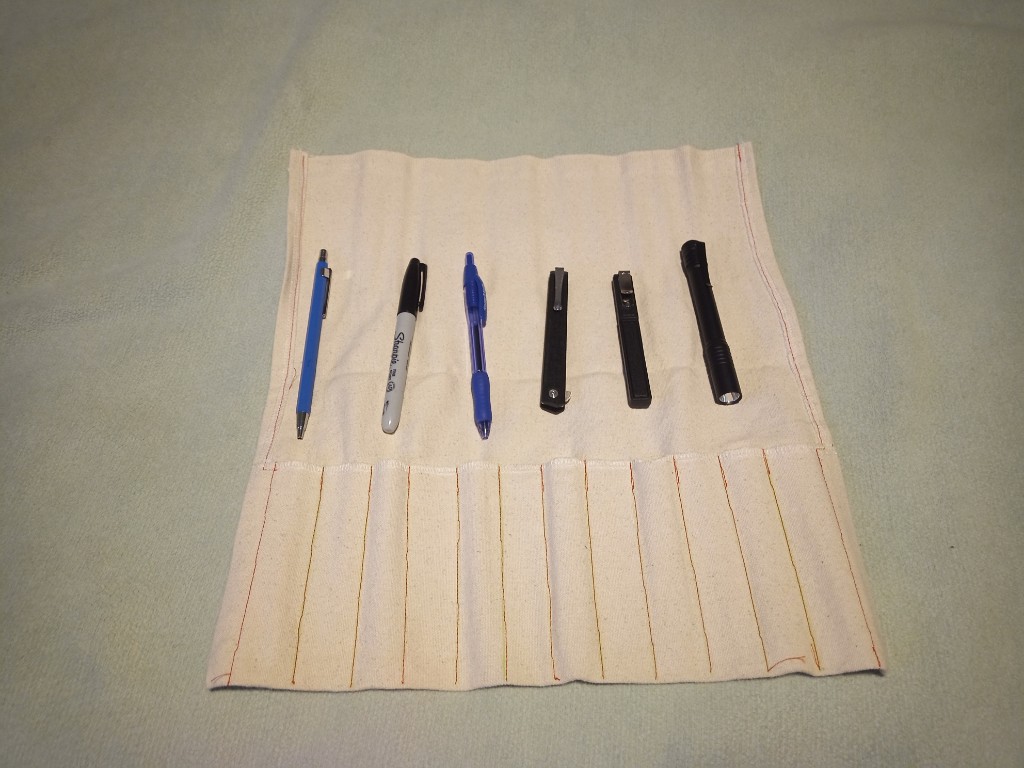
Tool Roll with Tools Shown
Here are all the tools I have in there right now: drafting pencil, marker, regular pen, folding knife, scissors. flashlight. See how handy this kit is?
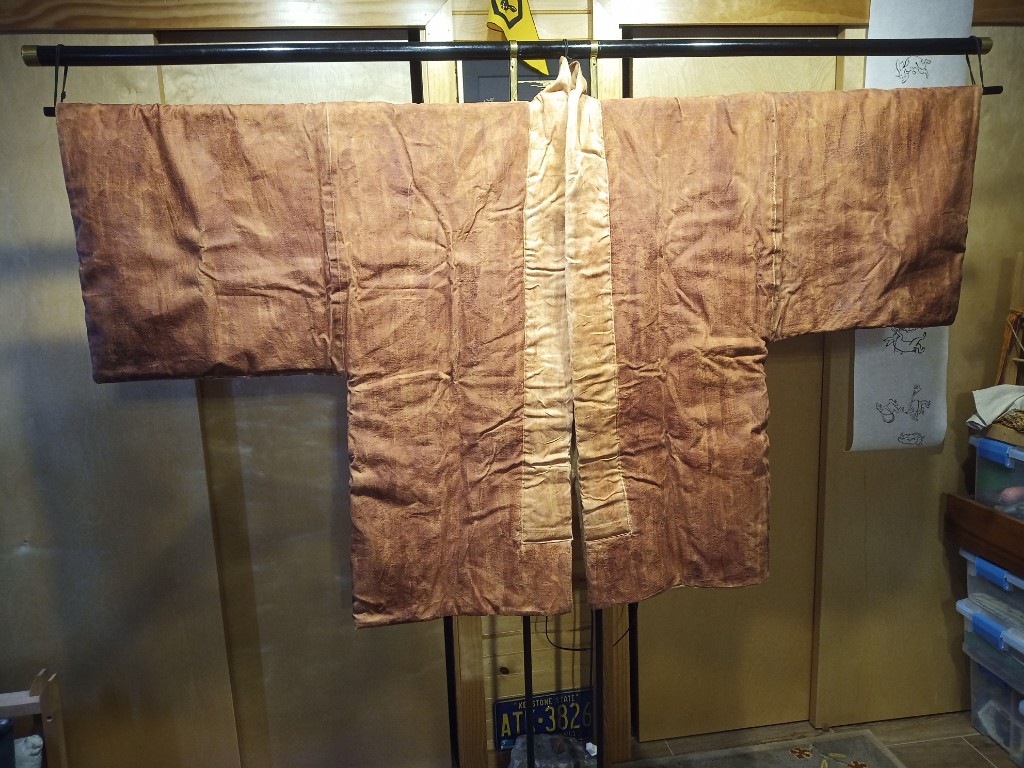
Back when I was making the Mizuoke based on this inspiration image from Spirited Away, my attention turned to the blue apron-type garment that Lin wears in the film.
There are better shots of it in the movie. There are even some scenes where she wears it tied around her neck as a kind of halter top. It turns out that this kind of apron is called a maekake, and it is basically just a length of indigo-dyed fabric with a waistband. These are common even today in Japan, where they are sometimes seen as a kind of folk art. They will often be printed with the name or logo of the business where the wearer works, so older ones will even be sold as antiques for that authentic decor accent. Modern ones often have art or promotional designs.
I went through my fabric stash, but I didn’t have a good piece of blue canvas or heavy linen. Instead, I picked some red and yellow canvas pieces. I had enough blue linen for the waist ties, though.
I hemmed the edges to simulate selvedges. The bottom edge would have just been left raw to make the fringe, but I decided to stitch across just above the fringe to keep it from fraying too much.
Red Maekake Apron, Flat
Yellow Maekake Apron, Flat
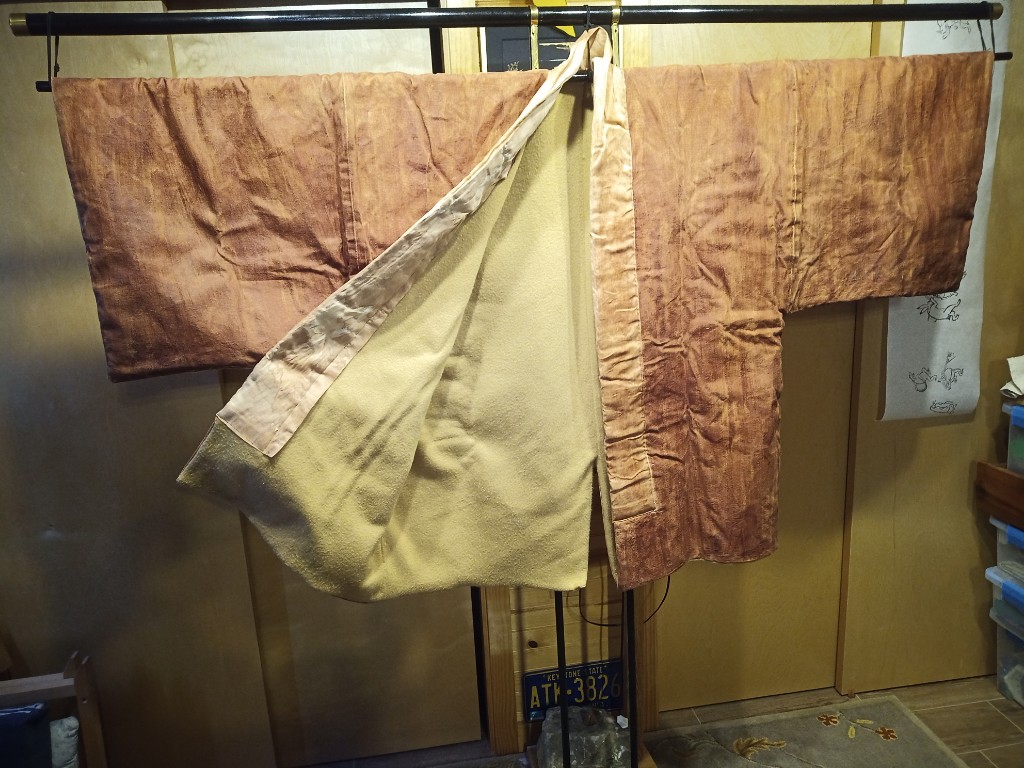
You can see that I did my standard 4-layer waistband. I made the ties about 3 yards long so that they can go around the waist twice and tie in front. The ones you can get today in Japan appear to have special fabric woven for the waist ties that is just doubled over instead of 4-layer. Hard to tell for sure.
Red Maekake Apron, Detail of Waistband
Yellow Maekake Apron, Detail of Fringe
I might eventually paint or stamp designs on these. An escarbuncle on the red one and a comet on the gold one might be fun. I will have to figure out a good placement.
A while back, I made an early-medieval kyousoku from poplar. That one is more what comes to peoples’ minds when Japanese floor-seated armrests are considered. However, in Traditional Japanese Furniture Kazuko Koizumi mentions another kind of armrest. “A sturdier, box-shaped armrest featuring feather-stuffed pads on top and usually storage space underneath emerged,” during the Muromachi/Momoyama period.
Koizumi, page 166
During Pennsic this year, I went over to the Alben sawmill and bought some excellent maple. Ray had already run it through the planer so it was pretty smooth, but it was still almost an inch thick. I knew that because of that thickness and because of the hardness of the maple, that my ability to make things out of this maple using the small selection of hand tools I had brought to Pennsic was going to be somewhat limited. I decided I would make a siple box, and this idea quickly developed into making a box-shaped armrest. I was able to get all the pieces cut, and and most of the joinery.
Once I got home, and had access to more tools and a sewing machine, I was able to finish shaping the pieces and assemble the armrest. I made a custom cushion out of cotton canvas and polyfill, and used to to upholster the lid of the box. I used copper nails to secure the joinery so it should be quite sturdy. given the density of the wood and its thickness, this completed box weighs more than ten pounds.
The inside of the box is roughly twelve inches by six inches, and four inches deep below the inner lid. I think it’s a bit smaller than the one in the image, but it’s a comfortable armrest when seated on the floor next to it, and I can fit a bowl and cup inside it.
It is not a comfortable seat, although you could probably park a midsize car on it.
I was watching the thoroughly inappropriate cut of the 2010 ridiculously entertaining Japanese action movie, “13 Assassins“, and while on the road, everybody had these great travel outfits. We go to a fair percentage of events where the event is primarily outdoors, and the weather turns out to be terrible. I figured that something like what they were wearing, only made to be waterproof and super-warm would be about the right thing to have in my wardrobe. Hence, the travel coat.
Travel Coat from Canvas
I made mine out of cotton canvas. It’s huge, with 18″-wide panels so it will fit over just about anything else I am likely to wear. I tried treating the canvas with kakishibu (fermented persimmon juice) to waterproof it, but it turns out you need many many coats of kakishibu to waterproof fabric, so I eventually sprayed it with a couple cans of waterproofing spray.
I lined the coat with poly-fleece fabric. Combined with the water resistant and windproof shell fabric, this is basically a bedspread with sleeves. I have not tried it in a driving snowstorm or downpour, but there was one damp, chilly night at Pennsic where I was awfully glad to have this with me.
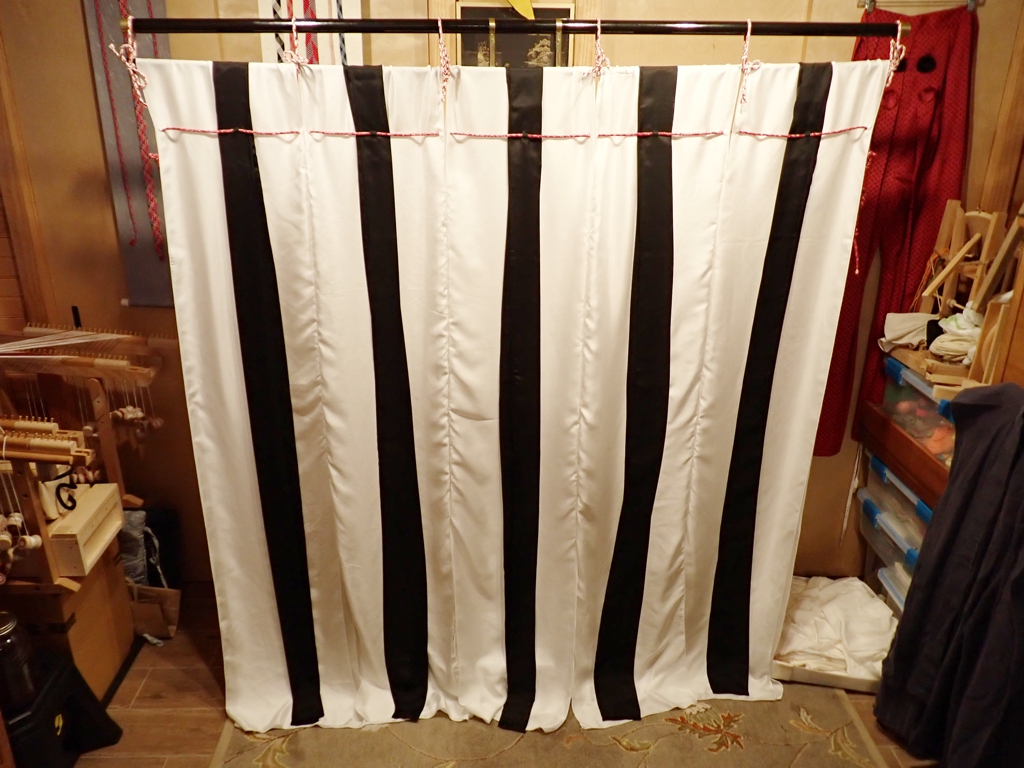
Kichō are curtains that ancient and medieval Japanese nobles used inside rooms as movable partitions. The curtains hang from a stand, so they can be moved around as needed. You can think of them as the ancient version of “pipe and drape” dividers that you often see as trade show booths, but slightly more decorative, and for the home. They differ from other kinds of Japanese curtains in that the stand makes them freestanding and more portable. You will frequently see them in illustrated scrolls as backdrops, or screens to block a figure from view. They largely fell out of favor by the end of the Momoyama period (1573) and were replaced by the more solid shoji and more decorative byobu. Wikipedia actually has a whole List of partitions of traditional Japanese architecture, and you can learn more about differences there.
Anyway, I’ve had kichō on my to-do list for a while. I assembled a working stand a few years ago, and used it todisplaysomeprojects in the interim, but only got around to constructing the curtains themselves until recently. There is a little more to it than you might imagine. Here’s what I wound up with:
Kicho from the front
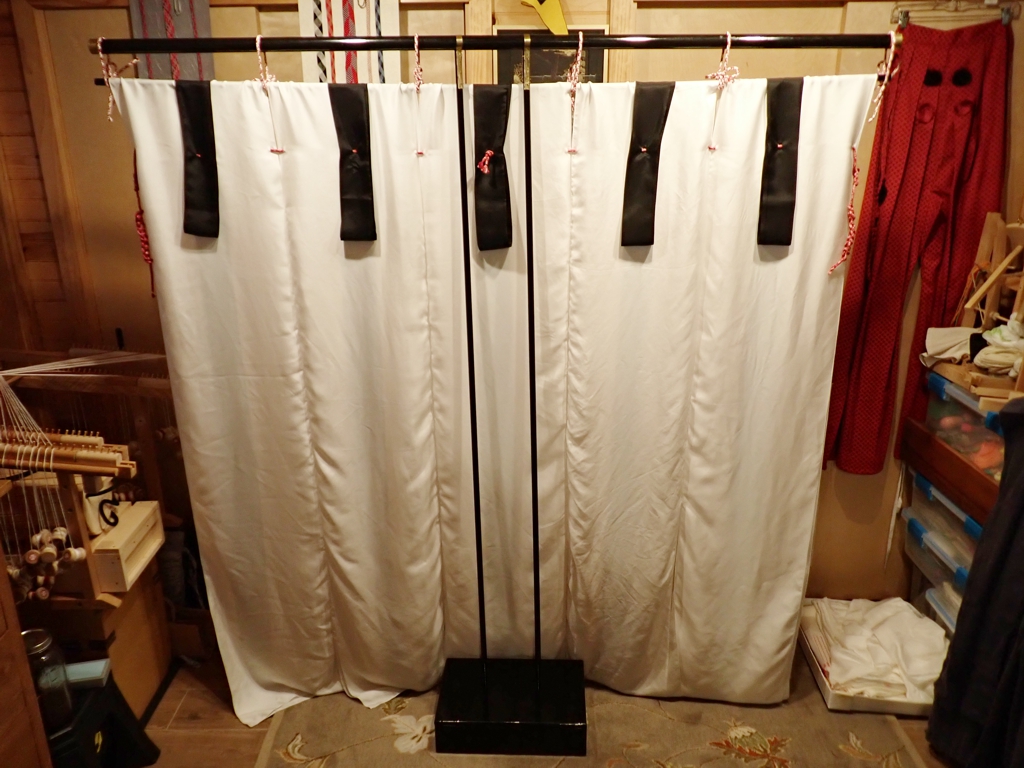
Kicho from the back
The white curtain bodies are twill weave silk from Dharma Trading, and the black “streamers” are black lightweight habotai also from Dharma. The curtains (or “katabira“) are double layer. Very often, the katabira would be decorated on the front panel, and plain on the back. I decided to skip the weeks that it would have taken me to decorate the fronts and skip directly to construction. Maybe I will get back to the decoration later. I made each panel by cutting 12-foot long 15-inch wide panels from the 45-inch wide fabric. I gave all of the panels a rolled-edge on the serger to simulate the selvedge that would be present on narrow-loom fabric.
The streamers (or “ribbons” according to Wikipedia) are half panels 15-feet long and 7.5-inches wide. I sewed the half-panels into tubes, turned the tubes inside out, and ironed them flat with the seams down one edge. I tucked in the loose ends and sewed them shut. The streamers needed to be longer because they are supposed to drape over the top and come a bit down the back. The slits for the lacing go all the way through both parts of the ribbons, and both layers of the katabira. I did not want to sew the dozens of buttonholes this would have required, so the slits are just cuts in the fabric that I made with my Clover Button Hole Cutter.
The lacing is basic edo yatsubraid that I made with some cotton yarn that I dyed as part of a group fiber activity back in the Autumn. I twisted up the hanks of yarn so that more dye got to some parts of the yarn than to others. The yarn itself is not super interesting, but I think it makes great pebbled-texture braids. Two lengths of braid lace the panels together, and shorter pieces of braid tie the rod that suspends the curtains (or “curtain rod”, if you will) to the crosspiece (or “te“) of the stand.
The stand itself is made of wood, as you might imagine. The base (or “tsuchii“) is a box with enough room inside to hold 20 to 30 pounds of iron weights. There are holes in the lid and a brace in the bottom to hold the two legs (or “ashi“) upright. The te rests on the tops of the ashi. The te and ashi are made of 6-foot long poplar dowels from the hardware store. The te is secured to the ashi using some custom made brass brackets that secure with brass cotter pins. The ends of the te are also embellished with a little brass. Everything wood is finished in black polyurethane to simulate lacquer.
I’m pretty happy with the way this all worked out. I may or may not make the curtains more interesting. I’d like to add more metalwork to the stand, and there are some problems with stability. A number of people have been talking about these lately, and I’m glad I went ahead and just made them. They should come in handy for defining smaller spaces in larger rooms, and they are much more portable than shoji.
Some members of the Fiber Arts Guild of the Debatable Lands have been practicing their fabric dyeing lately, but it is to big a production to make up large dye pots just to try some new things out. For that purpose we had a dyeing day at Mistress Tsvee’a’s House this past Sunday. We had a vat of indigo, a tub of dark red fiber-reactive dye, and a couple of burbling vats of natural dye.
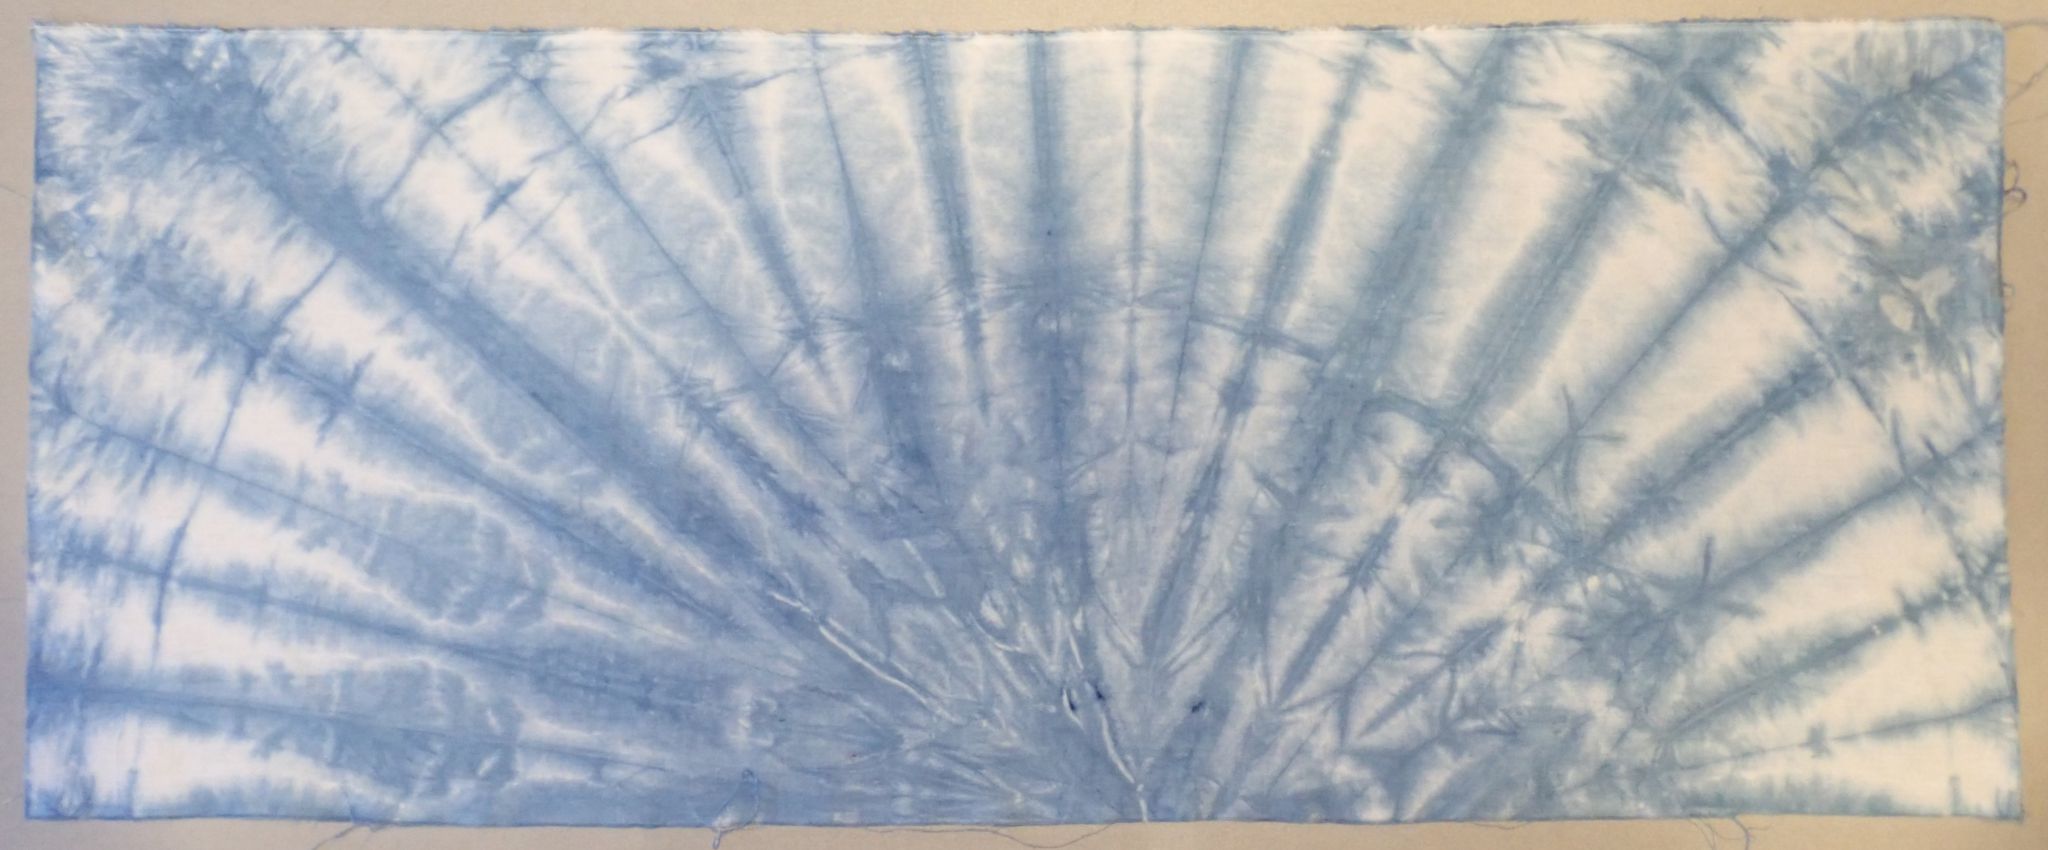
I put one carefully prepared ball of fabric into the indigo. I had fan-folded a rectangle of cotton around a point in the middle of one long edge. Then I rolled the folded fabric into a ball and tied the edge with yarn.
Indigo-dyed Folded Shibori
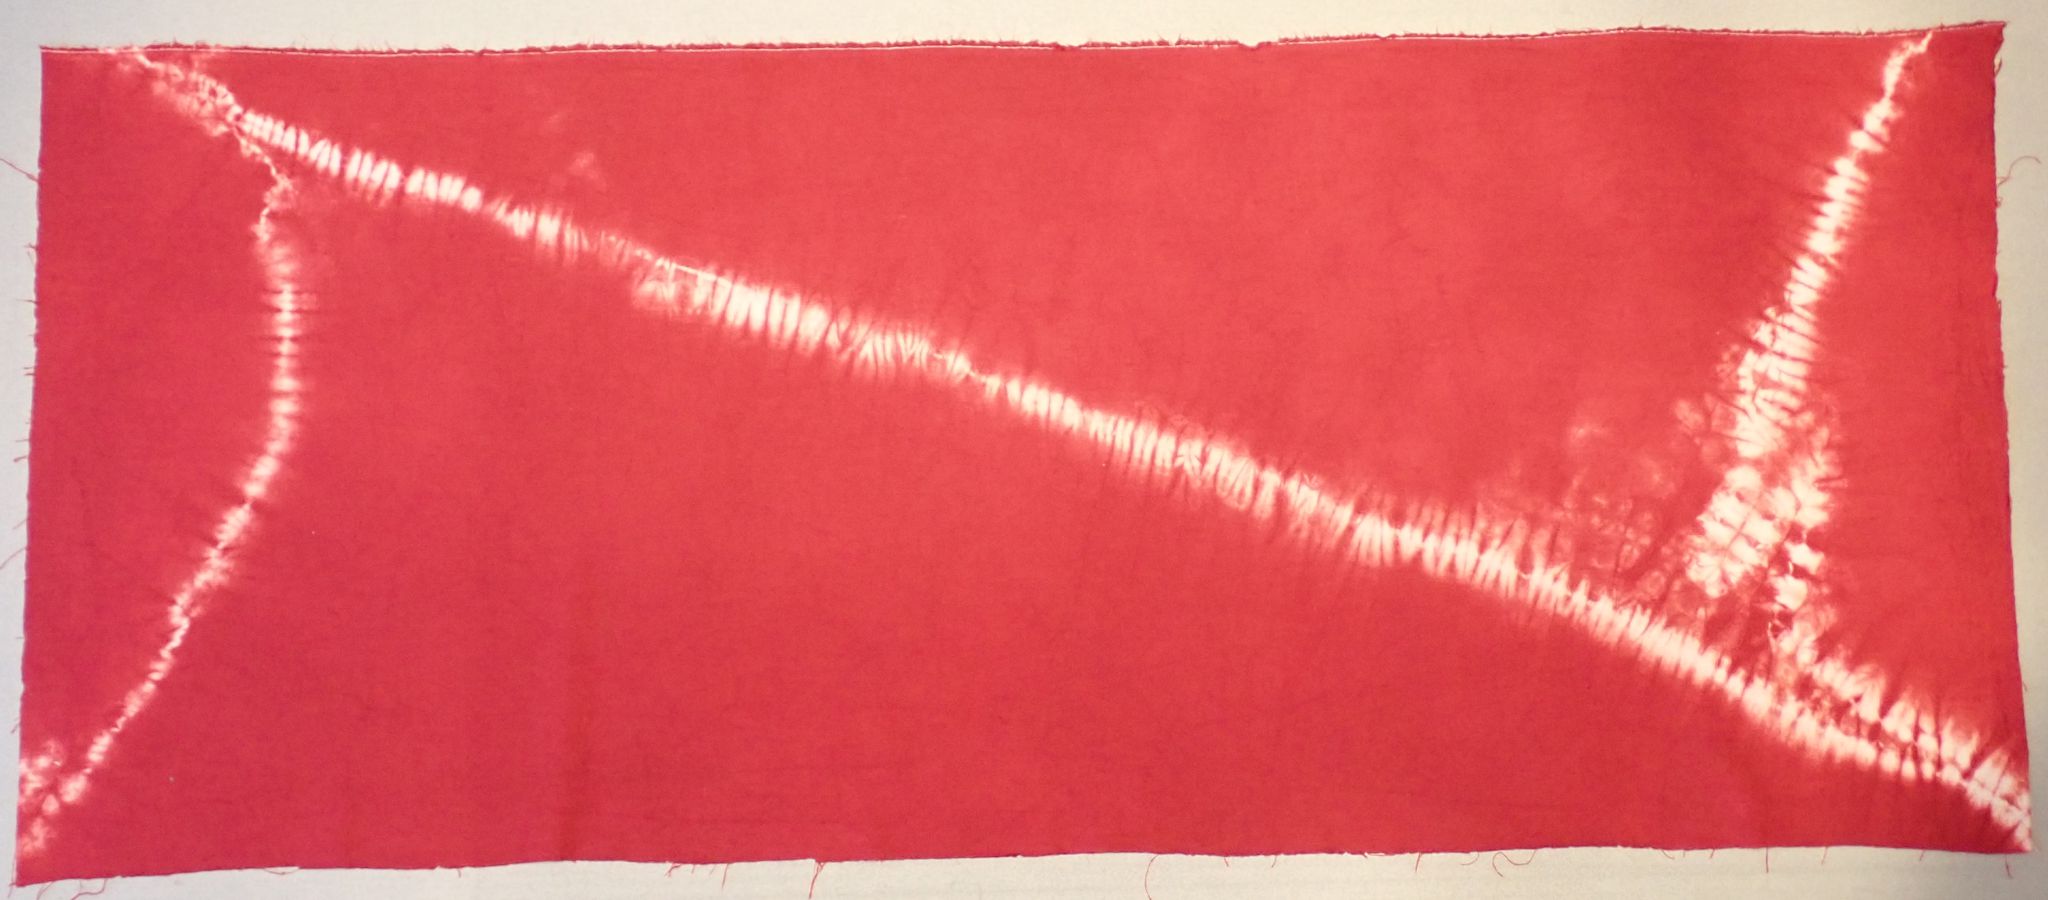
I put another carefully prepared bll of fabric into the Turkey Red Procion dye. I had twisted it up around two separate points until the whorls met in the middle, then again tied them with yarn. I should have twisted tighter and tied a little lighter. Still, it’s interesting.
Procion-dyed Twisted Shibori
I also dyed some twisted up cotton yarn, but that description will have to wait until the braid is finished.
I had been doing a lot of sankakudai braiding recently, and had an event coming up where I had very little to do except watch tournaments, talk to artisans, and wait for things to happen. So, I decided to experiment with interesting patterns on the shigeuchidai, using some heavy cotton to make 9-strand shigeuchi braids.
6 ends of cotton crochet thread per strand 3 red and 6 white, RWRWR and WWWW
8 ends of cotton crochet thread per strand 3 white and 6 red, RRWRR and WRRW
I had fun just sitting and braiding, plus people walking by would ask questions about the shigeuchidai and kumihimo, so I could tells stories and explain explain the different braids and equipment.
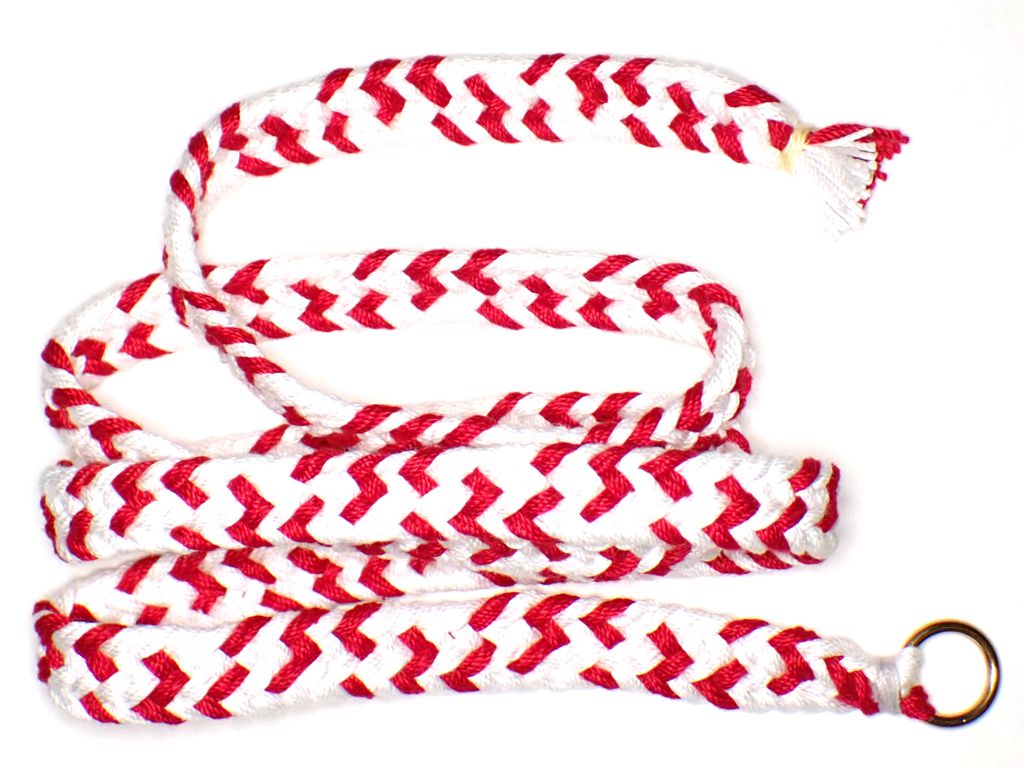
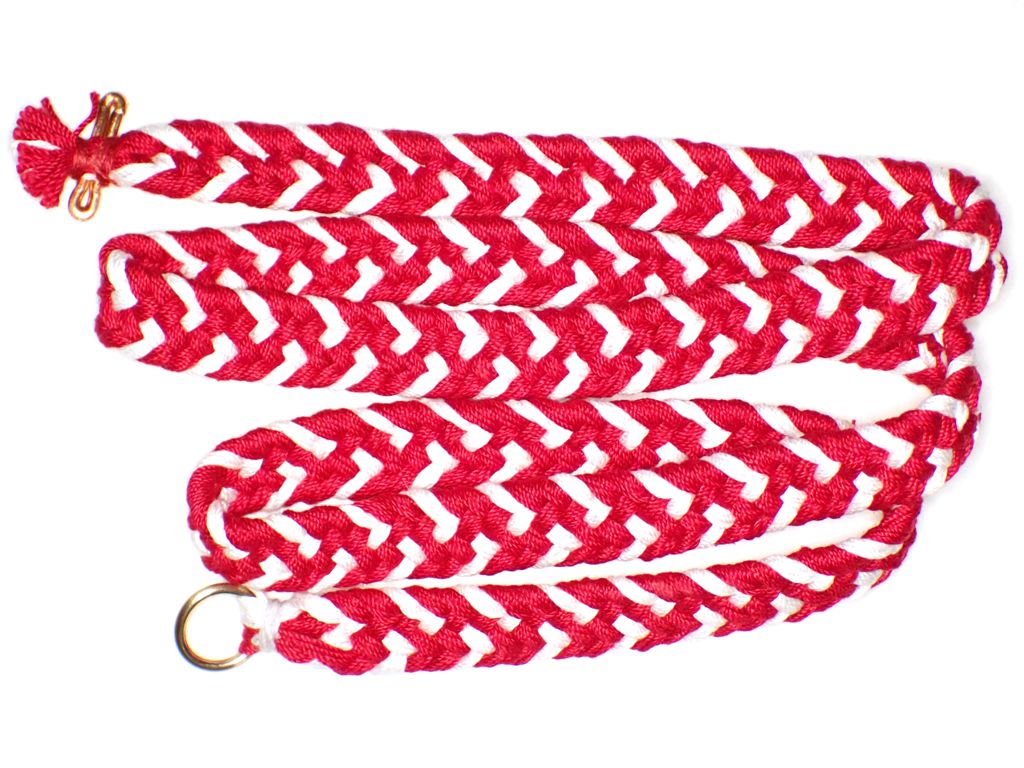
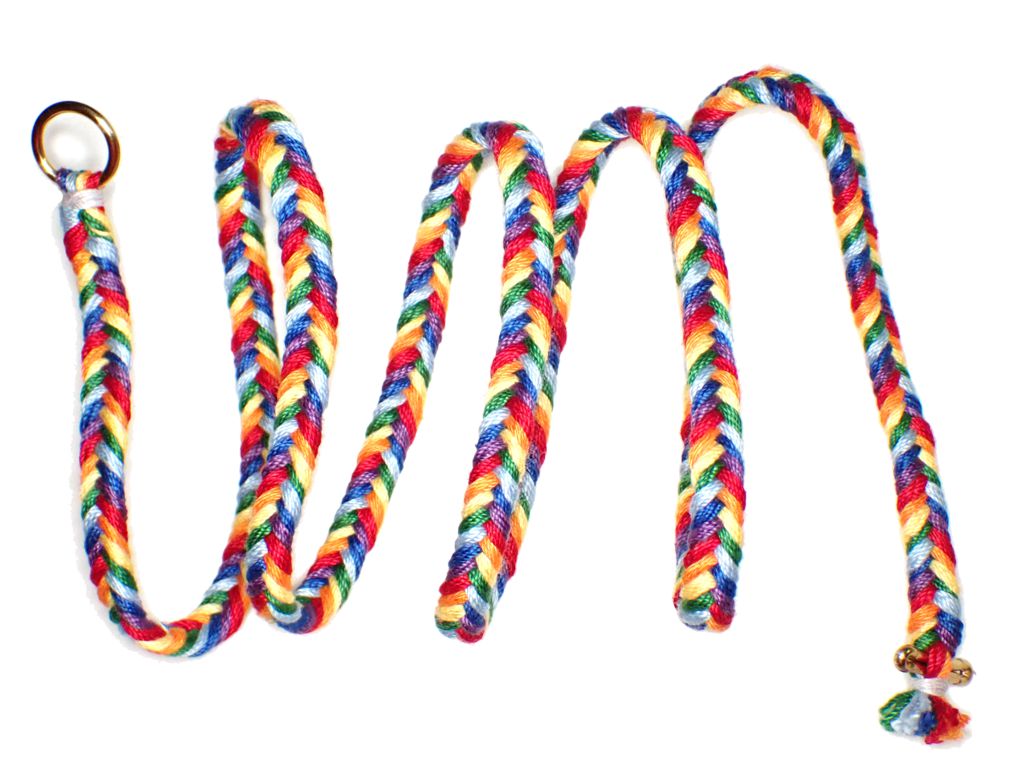
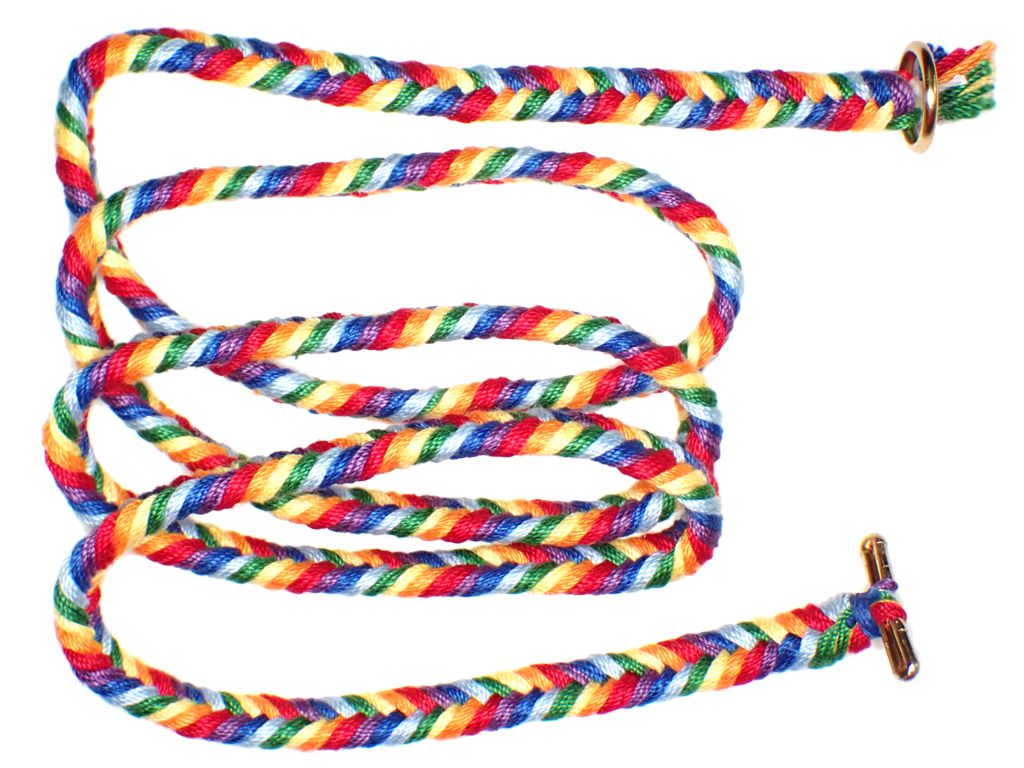
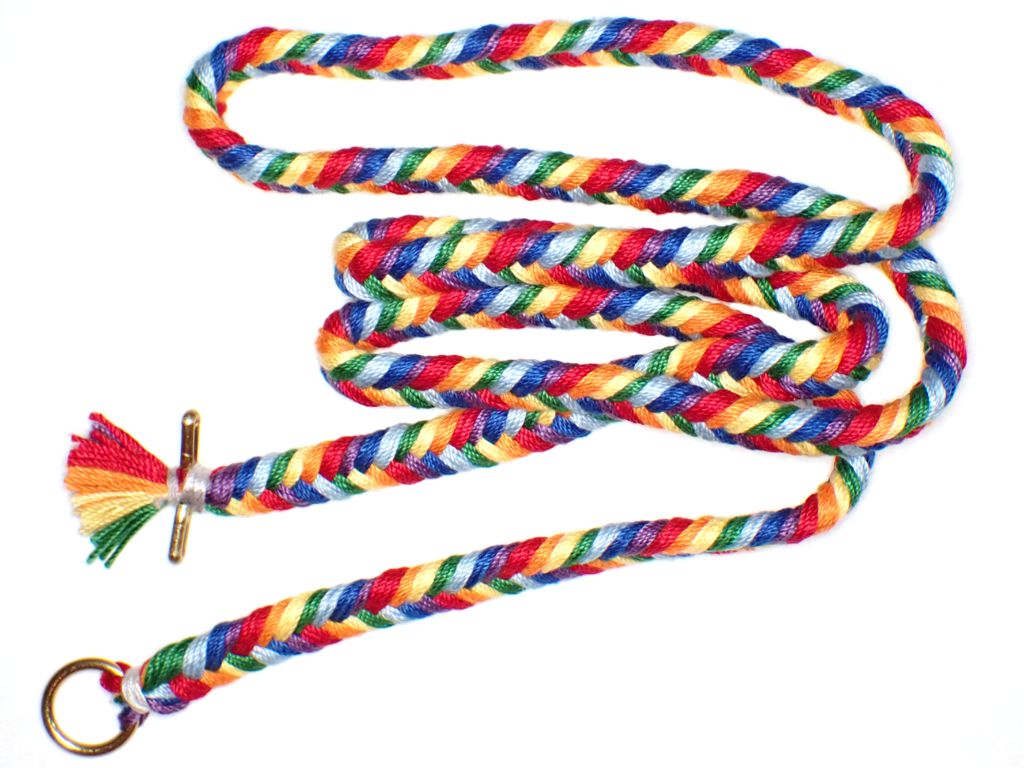
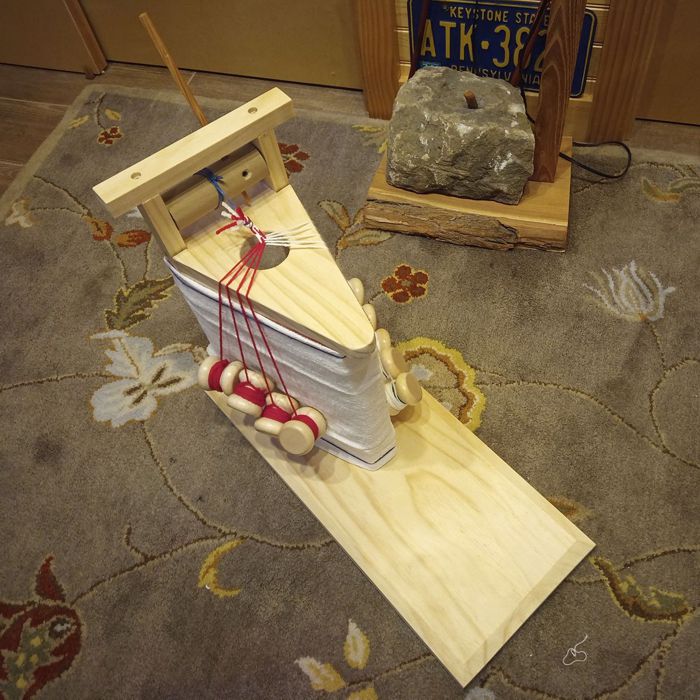
When the call went out before Pennsic for largesse items to be gifted to the East Kingdom, one of the suggestions was “rainbow” color schemes. I did all my braids in purple and gold to match East colors, but the rainbow idea stuck in the back of my mind. I later realized that as possibly the only person in North America to own a traditional Japanese sankaku-dai, I was maybe the only person in the SCA who could create braids in the classic 7-color “Roy G. Biv” (red, orange, yellow, green, blue, indigo, violet) rainbow pattern. Seven-strand braids are possible on other braiding stands, but they are fast and smooth on the sankakudai.
Sankaku-dai set up for 7-strand rainbow braid
To work a 7-set braid on the sankakudai, you lift the top strand on left, and move it over the other left-hand threads to become the bottom strand on the right. Then you do the same from right to left. When the point of braiding gets too close to the tip, use the roller to pull it back towards the torii. When the tama get too close to the mirror of the dai, extend them as you would on a marudai. You can add twist to the strands or not, as you please. I have found very little difference in the resulting braid, but that may be because of the material I am using.
Here are the 3 rainbow braids I made in one evening on my sankakudai:
Sankakudai 7-set rainbow braid, 8 ends of crochet cotton per strand (twist applied)
Sankakudai 7-set rainbow braid, 8 ends of crochet cotton per strand (no twist)
Sankakudai 7-set rainbow braid, 10 ends of crochet cotton per strand (no twist)
Adding more ends per strand make a braid that is only a little wider, but much softer. I am really glad I tried this braid, and happy to add it to my repertoire. These braids are cheerful and friendly, and I know that people will enjoy receiving them.
A few of us did some shibori dyeing in the garage recently. The last time we hosted this, one of our friends brought a bunch of white cotton clothing she had found at the store. After that, I made some shirts from cotton muslin so I’d be ready for the next time we did dyeing. That was like two years ago, but better late than never. Here is the ensemble of both shirts.
The brown shirt kind of looks like an accident in a bleach factory, but the pattern is much more interesting in person. I used my famous pajama pattern, and even rememebered to do the top stitching in cotton thread so it would pick up the dye, After laundering, I opened the button holes and sewed on some buttons.
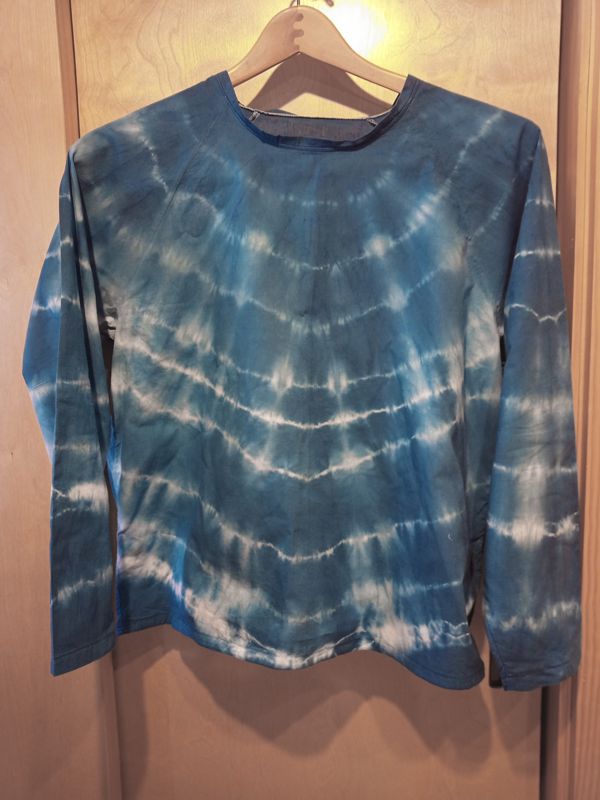
The blue long-sleeve tee shirt looks a little more tie-dye traditional. I basically scrunched the shirt up sideways and then put a bunch of rubber bands down it to hold it together. I like that it came out symmetrical and smiley. There were actually two different kinds of blue in the dye bath, but I think the “peacock” blue really took precedence.
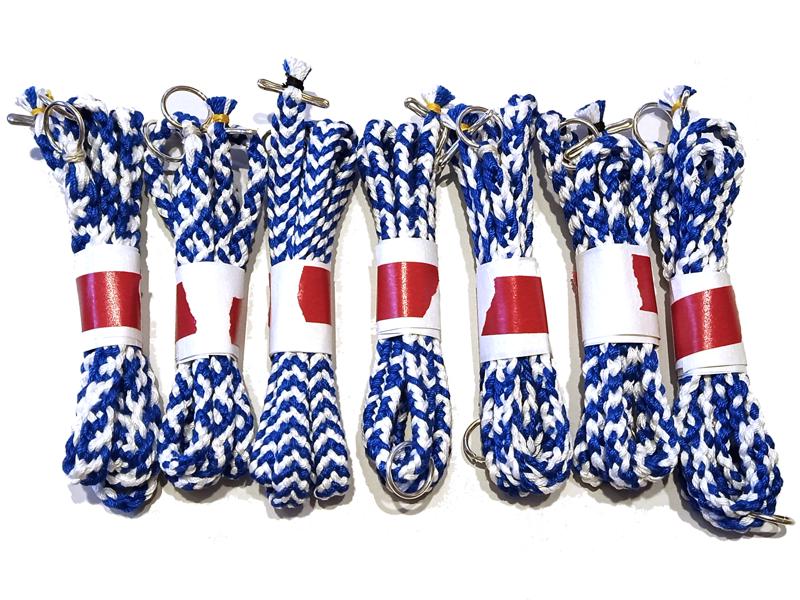
All seven of these braids were made on the marudai using cotton crochet thread. I used four plies of thread per strand, four strands of blue and four strands of white. The braids are a variety pack of 7 different braid shapes. All have ring and toggle closures and come with an extra jump ring so that they can be used as medallion cords. They are all approximately 30 inches long.


