bookmark_borderLantern Storage Box

I’ve only made three of these lanterns so far, but I intend to make six, so eventually I will need something to transport and store them all in, or they are going to get pretty beat up. So, another box.

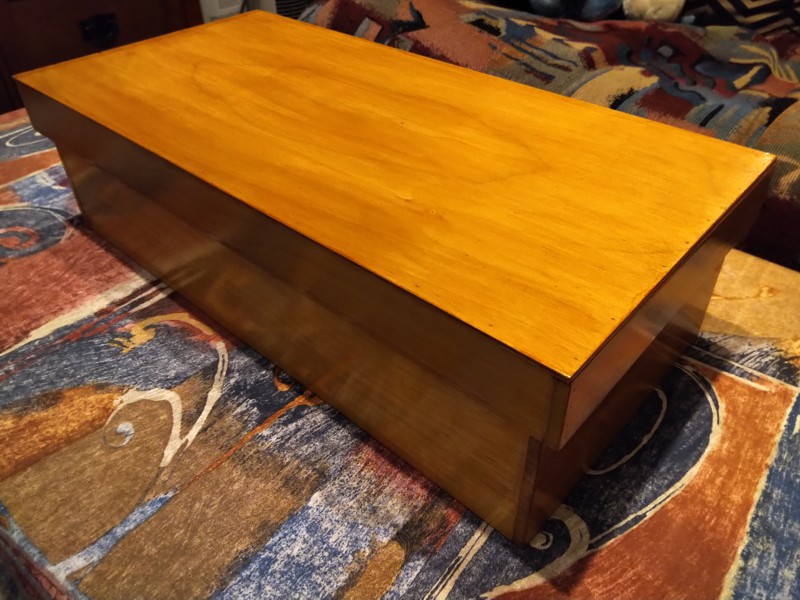
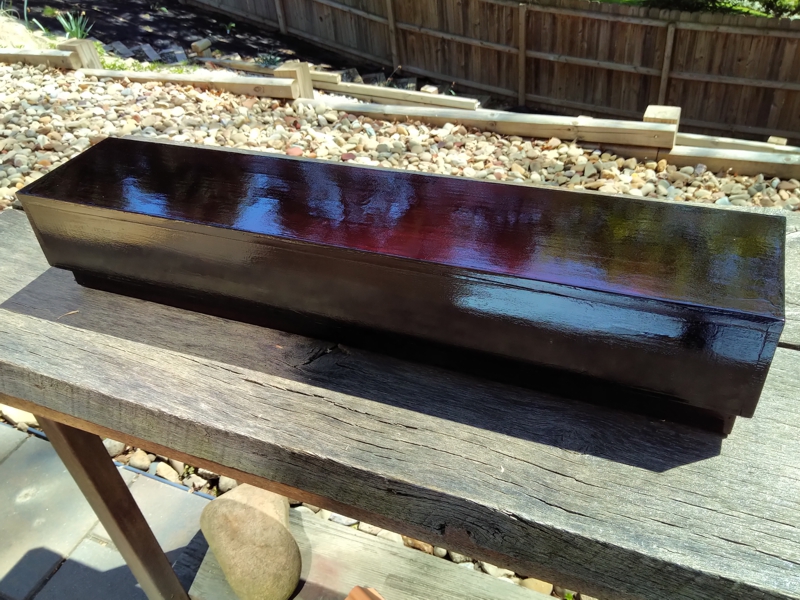
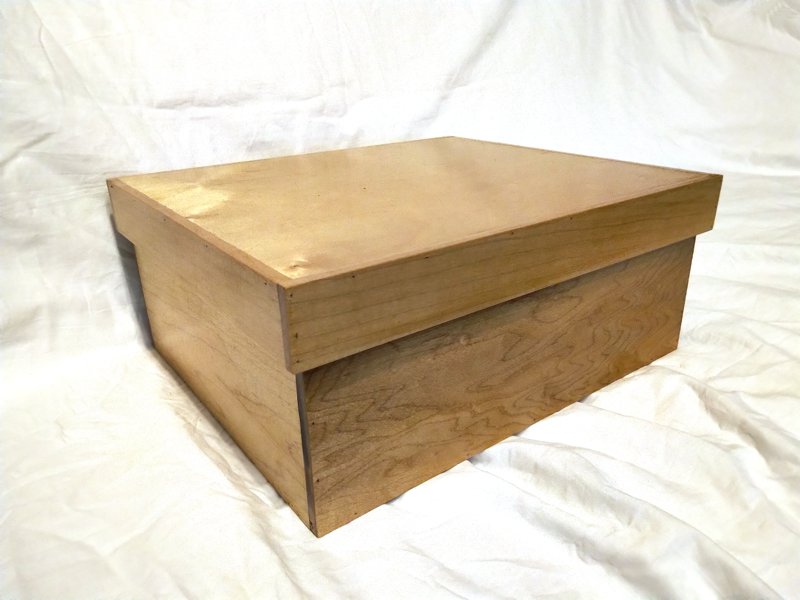
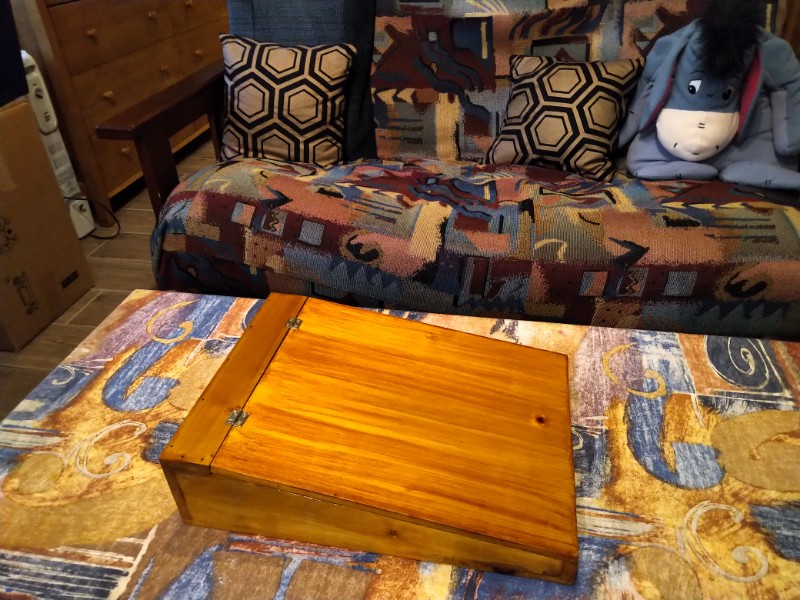
Lantern Box, Closed

This was also yet another exercise in using up surplus materials from other projects. I wound up having to use a piece of MDF for the lid, because that was the biggest piece of anything I had left. The edges are off-cut from 2-by-4 lumber from when I was making pole by cutting square pieces from 2-by-4. It awfully satisfying to use up some of that stuff.

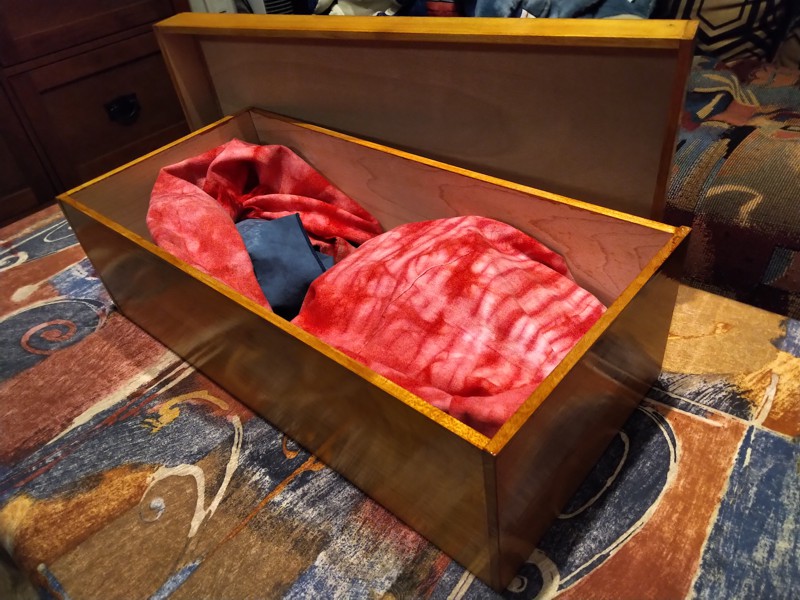
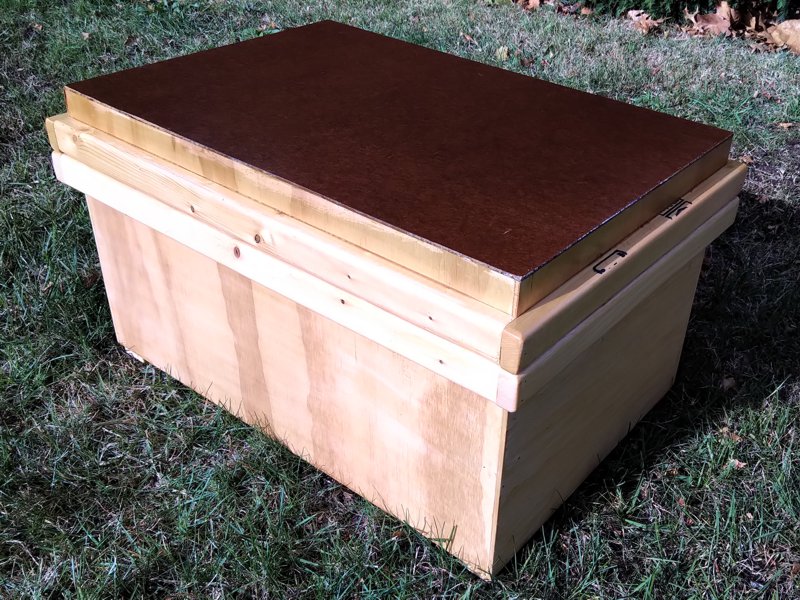
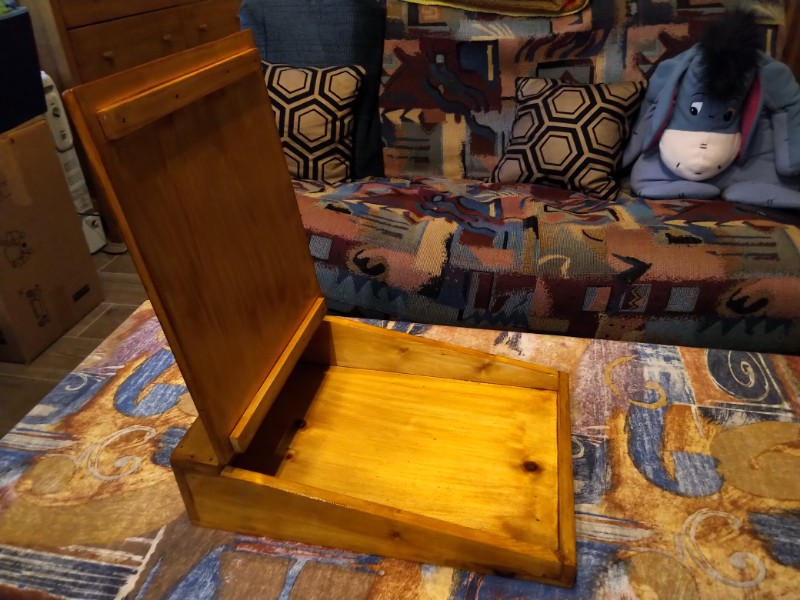
Lantern Box, Open

You can see that the extra height of the lid makes it easy to get the lanterns in and out of the box. There’s an extra half inch in each direction, so the lanterns fit snugly but not tightly.

The whole thing is finished on the outside with spar polyurethane, especially the MDF on the lid, to give it a little more water resistance than a cardboard box. I glued some blocks of wood to the bottom to serve as feet, so it won’t be resting entirely in any puddles.

Basically, the whole thing is constructed with glue and nails form the nail gun. The bottom is thicker plywood to make it bottom-heavy, and the rim on the body both supports the lid and reinforces the corners of the box. This is a design and method I’ve used before with some success.

A lot of the sizing of pieces can be done while you’re building. For instance, I make the body of the box, then I measure the outside of the top before cutting the pieces for the lid. That way the lid is sized to fit the actual box, and not just my best hope.

The whole thing is kind of rough, because it’s not supposed to be anything special. You can see in the photos that I didn’t even sand off the mill markings.

bookmark_borderHexagonal Propane Box

We have a small propane-fueled grill that spends all summer out on the patio. Eventually, we decided that it wasn’t super cool to have a tank of propane just sitting out in the rain and sun, so I decided to build a storage box.

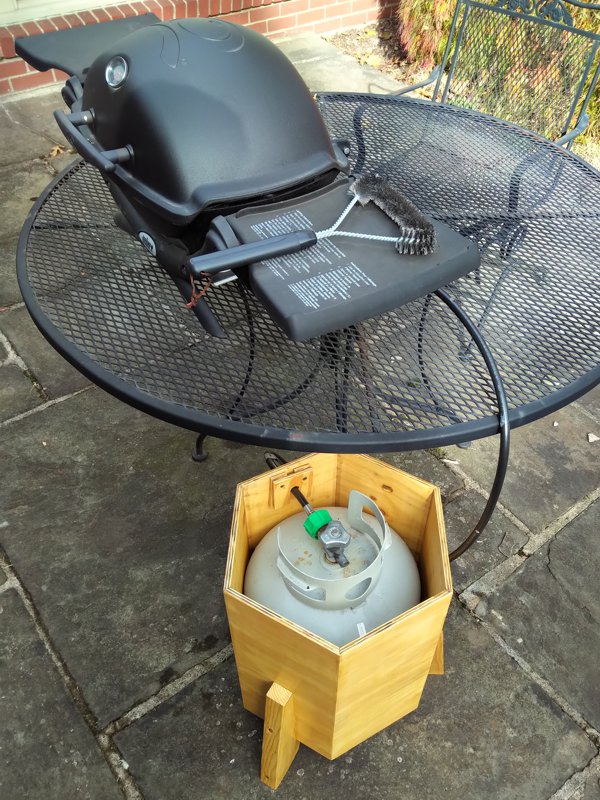
6-sided 3-leggad Storage Box for a Propane Tank

The box is mostly made from exterior-grade 3/8″ plywood. It’s hexagonal, which is more work, but actually uses less wood. I’m especially happy that I was able to keep track of all the pieces and their orientation, so the face grain of the plywood flows around the corners nicely.

The floor and lid of the box are 3/4″ plywood for durability. The edges of the lid are made from pine 1-by-4. Once you have the blade angled over to cut the 30 degree angle for the sides, you can use that angle for the lid edges, too. The 3 legs are pieces of 2-by-4 cut into my standard karabitsu leg shape on the band saw.

There is a large hole cut in one side of the box for the propane hose to pass through. A couple of smaller pieces inside block most of the hole and secure it once the tank is in place.

Open box showing the hose arrrangement

There are also some hols drilled in the bottom to allow any leaked propane to escape. I glued some nylon mesh over the holes to keep bugs from crawling inside.

The whole thing is finished in heavy-duty oil-based polyurethane. I had though about painting the box, but after I saw how interesting the grain was, clear satin it was.

A little closer up

It will also come in handy in the winter. We can clean up the grill itself and store it in the garage, but you really should not bring propane tanks inside like that. With the polyurethane I used, this thing can probably just sit outside on the patio all winter.

bookmark_borderStorage Box for the Stuff of my Sweetie

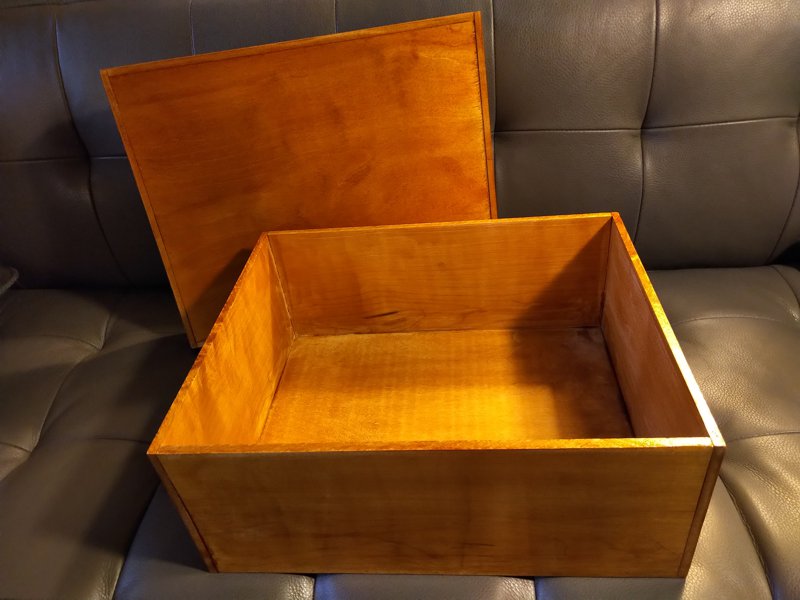
Just another lidded storage box made from birch-face plywood and maple (it turns out they are maple, not birch) scants. This one is custom sized so that it fits in the storage cabinet over Sharon’s desk.

A useful box to put things in

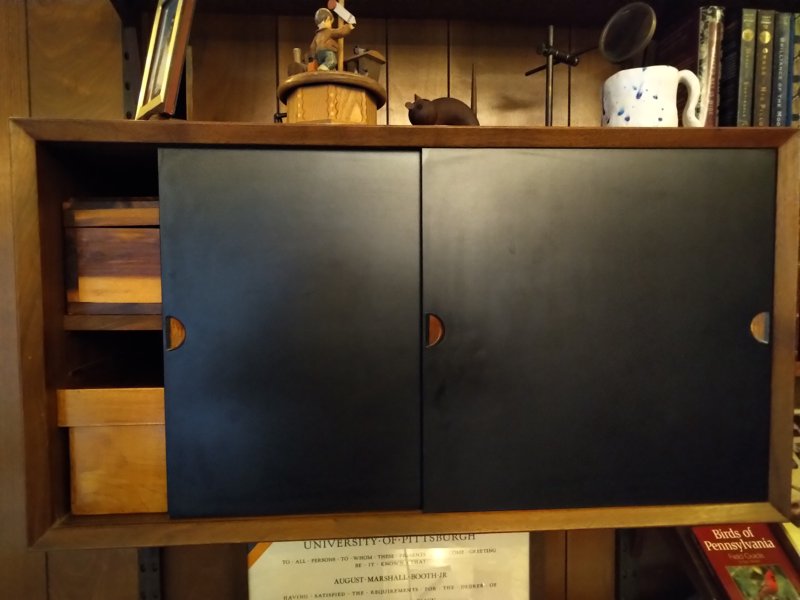
The cabinet has sliding doors, and the box she was using was too bit to fit nicely. If she put the box in long-ways, the door couldn’t slide shut. If she put the box in sideways, there was all this wasted room in the cabinet.

Old box, boo!

This box is a little shorter, and a little wider, so it fits in longways. Even the inner sliding door can shut, although the clearance is about 1/16th of an inch.

New box, yay!

the only real difference (besides size) between this one and the Storage Box for the Coronet of a Duchess is that I finished this one with “Garnet” shellac instead of “Blonde” shellac, so the color is deeper.

Storage box, open

bookmark_borderStorage Box for the Coronet of a Duchess

Some of you may remember that, earlier this summer, after inventorying the large selection of surplus plywood in the shop, I went on a bit of a storage box kick. Starting to feel like I was getting pretty good at making these simple boxes, I offered to make boxes for anything for which my friends might need a storage box. The only person (so far) to take me up on the offer is a friend of ours who is a Duchess in the SCA.

The title of Duchess is typically given to those who have been Queen two or more times. Those who hold Royal titles in the SCA (from Baron on up) are entitled to wear coronets that signify their rank. Sometimes, but not always, these come with a box. Sometimes, this box is too nice to be carted around, even though you want to take the Coronet itself to the event so that you can wear it to court.

Anyway, she sent me the rough dimensions of her coronet, and I added an inch to each of those dimensions to allow for a half-inch of padding all around. I did not feel that my standard lauan plywood box was sufficiently nice for this use, so I dug into the supply of birch-face plywood and birch scants that my wife bought for a project long ago.

The Duchess’ Coronet Storage Box, in Birch

It’s just a simple lidded box. The interior is roughly 10″x12″x5″ It is assembled using butt-joinery, glue, and 23-gauge pins from the nailer. Inside and out, the box is finished in blonde shellac. The table saw blade left some scorch marks on the ends of some of the boards, but other than that I am pretty happy with it.

Birch Storage Box, Open

It should be pretty useful for the coronet, or whatever else she might choose to store in there.

bookmark_borderPrototype Scribal Box

When I was getting the Debatable Lands Woodworking Guild started, I polled the people who were attending planning meetings to see what projects we could work on as a group to produce things for the Barony. One of the ideas was to produce “portable desk” type scribal boxes that the Baron and Baroness could gift to scribes. It’s taken me some time to get around to it, but I was finally able to plan out what such a thing might look like, and use up some surplus wood from the garage to make a prototype.

Closed Scribal Box

This simple, hinged-lid box is made entirely from pine, and finished with amber shellac. The walls of the box are half-inch thick, and the larger surfaces are 3/8″ thick. both thicknesses are the result of planing down some 3/4″ lumber to remove severe cupping warpage. The top and bottom were made from some 1×12 shelving, so I was able to make the full width of the box from a single piece without resorting to plywood.

The work surface is 11 inches wide and about 12.75″ tall, a fine size to accommodate 8.5″x11″ or 9″x12″ paper with some room to spare. A slight slope should make work a little easier on the wrists.

I have no historical examples for this kind of box, I am merely imitating other scribal boxes I have seen in use around the SCA.

Open Scribal Box

The interior of the box is about 10 inches by 14 inches, able to hold supplies slightly larger than average to a depth of about 1 inch at the front and 3 inches at the back. It’s slightly less than that because I decided to add the two battens underneath the lid to support the thin wood during use and keep it from warping.

The box is assembled using modern wood glue and wire nails, and finished with three coats of amber shellac. I’m not sure why my shellac came out so streaky this time. It could be that the shellac needs more alcohol in the mix, or that it was very hot in the shop yesterday causing the finish to dry more quickly than it could even out.

Because I had suitable material on hand, shaping and assembly of the box took less than a day. I did some hand sawing, but a lot of the sawing was done on the band saw. Assembly was entirely by hand, even to the level of hammering in the nails by hand to avoid blowing out the thin wood sides with the nail gun.

bookmark_borderKanmuri-bako

About two years ago, when I was preparing to be elevated to the Order of the Laurel, I was searching everywhere to try to buy a Kanmuri. The Kanmuri (which translates as “crown”) is the correct piece of headgear to wear with the Bunkan Sokutai that was to be my elevation garb. I eventually found an antique store in Japan that was willing to sell me one, however, theirs was in Thailand and would need to ship directly from there. I wound up picking it up at the post office the day before we went up to Pennsic. Since then, it has lived in a cardboard box, which was not the best place for this antique hat. Finally, I was able to make a couple of boxes to store and protect the pieces of the kanmuri.

Closed

That’s what they look like closed. They’re just simple lidded boxes made from plywood and finished with shellac. I have a stack of smallish plywood scraps from the last 20 years of larger projects, so this project was also an opportunity to use up some of that.

Open

Here they are with the lids off, so you can see the kanmuri pieces nestled cozily inside. On the left is the “pillbox” portion with its upright and pin (All three pieces are attached on this kanmuri.), and on the right is the tail. There’s a lot of empty space inside the tail’s box, but I wanted the box to help maintain the proper shape of the tail, and I wasn’t up for trying to make a proper bentwood box.

Assembled

In case you’re unfamiliar with the kanmuri as an object, here’s what it looks like when all the pieces are assembled. The cord drapes over the pin and ties under your chin to keep the hat in place. You can see that this kanmuri is not in the best shape. I’ll embark on a restoration project eventually,

bookmark_borderPine Boxes with Rabbet Joinery

A “rabbet” or “rebate” is a slot cut right at the edge of a piece of wood, as opposed to a “dado” which is a slot cut somewhere in the middle. Last Spring, when I was trying to get the BMDL woodworking guild going, one of the workshops I put together was about how to make these simple wooden boxes. The rabbet joinery is much stronger than butt joinery. Glue along two axes is stronger than glue along one, the rabbet around the bottom keep the whole thing square if you do it right, and the rabbet around the lid lets the lid fit snugly. I wound up making three boxes myself. Two were prototypes to test my process, and one was the “follow along” version made during the workshop. These sat around for about a year, but then I decided to practice finishing with shellac. I declared them “done” just recently.

Three pine boxes with rabbet joinery

I used some ancient Zinser-brand amber shalleac on two of them, in a futile attempt to get rid of the last of that stuff. On the third, I used a blonde shellac that I mixed myself from flake shellac and denatured alcohol. Some people don’t like the the color of the amber shellac. I think it’s OK. The blonde shellac looks a lot more natural,though. Here they are with the lids off:

The thickness of the walls i kind of overkill for a box this size, but planing the wood down just wastes it. If things ever get back to near normal, I should run a finishing workshop. A lot of people hate finishing, because nobody ever taught them how to do it well. I’ve learned so much through trial and error that I don’t mind it, even though it takes up a lot of time and delays the completion of projects.

bookmark_borderCherry Surplus Box Project

Just in case you are under the impression that everything I do is always perfect, here’s a little project I had to make because I messed up my first try on the Sake Cup Box project. Sometimes I kind of “wing it” on projects, making decisions based on dimensions that are are penciled on cardboard boxes or post-it notes instead of sitting down to draw up formal plans and doing calculations. As you might expect, sometimes this bites me in the butt.

I made this box bottom, then when I tried it out with the dividers to check for size, I realized it was too small. I set it aside while I started over on a new box bottom, kept it aside while I made a lid for the Sake Cup Box, then I made a lid to fit this “surplus” box bottom instead of smashing it to bits in frustration.

Surplus Box Bottom

This time, the top of the lid is made from more strips of cherry, edge-glued together. I am getting tired of seeing this big stack of cherry scants in the shop, so this was a good way to use up a handful of them. The walls are also cherry strips, but I was able to get better glue joints this time, so there is no metal hardware. Hopefully, the whole thing doesn’t wind up smashed to pieces at some point.

Cherry Surplus Box

The floor is maple, resawn and bookmatched, but as this was my first try it is much more uneven than the floor of the Sake Cup Box. In a way, it’s a good thing this one was unusably small because the bottom it’s definitely not as nice.

The whole thing got the same walnut oil finish as the Sake Cup Box, because why not, so it also spent the last month in the drying closet. I’m no entirely sure what I’ll use this box for, but I am sure that I will use it for something. It’s big enough to hold 16 tama and some braiding supplies, and since it obviously matches the Cherry Marudai, maybe that’s what I will use it for.

bookmark_borderSake Cup Box Project

It spent a month in the furo, and now it’s ready to show off. This was one of my big projects last month, and it has been on my to-do list for a while.

Back at the SCA 50-year anniversary event, we purchased a dozen sake cups for a very good price from a merchant. Since a dozen is one box of cups, the merchant threw in the box so we could safely transport the cups home. This was just a cardboard box, so we have been keeping the cups in a plastic bento box ever since. The cardboard dividers between the cups got destroyed at Pennsic last year, so I made some new dividers from cherry, but still sized to fit in the plastic bento. Now, I have made the final box.

The Sake Cup Box

The top of the lid is made from some rough-sawn lumber I salvaged from Mr. Arimoto’s workshop during the restaurant furniture project. The walls of both the lid and the box body are made from off-cut cherry strips from making maurdai. I was having some trouble gluing the strips to the lid and floor pieces, so all the joinery is secured with brass escutcheon pins. This should also make it a little more durable. It’s finished with food-grade walnut oil, which is why it had to spend a month in the drying cabinet. That oil takes a really long time to cure.

Here’s what it looks like with the lid off:

Sake Cups in Box, with Dividers

The dividers are neither glued together, nor are they glued in. If I need this box for something else later, they will lift right out. The floor of the box is some resawn and book-matched maple that I had in the shop. I didn’t have enough or thick enough cherry left over. It started as 4/4 (roughly 1-inch thick) maple, so I resawed it to roughly half-inch thickness, then sanded it smooth and even.

Empty Sake Cup Box

I am really super-happy with the way this came out. It is significantly larger and heavier than the old plastic box, but it is also significantly classier.

bookmark_borderIn the Furo

A furo is a “drying cabinet”. It’s where you put urushi lacquered objects to keep them warm and humidified until the lacquer has fully cured. Depending on the type of lacquer, this could take a number of weeks. In my case “furo” is actually short for “furnace room”, which is a nice warm room in the house that also contains the hot water heater.

I’ve been working on a couple of wooden box projects, and I decided to finish them with walnut oil. Walnut oil is a drying oil (like boiled linseed oil), but it contains no chemical drying agents like BLO does and is food safe. The down side is that it takes about a month to cure, so I can’t show these boxes as finished projects for some time.

Boxes in the furo

Both boxes are constructed primarily of 1/4″ cherry scants. These are off-cuts from trimming down the legs of the two cherry marudai I made. The floors of both boxes are bookmatched resawn maple. The floor of the smaller box is the result of trying to make the larger box and having it come out a little small due to lack of planning. The lid of the smaller box is more 1/4″ cherry that has been edge-glued into a single panel. The lid of the larger box is 3/4″ rough-sawn cherry salvaged from the scrap pile at Mr. Arimoto’s shop. Once the oil went on the raw surface of the cherry, the whole thing went deep and beautiful.

I’m going to try to resist the urge to peek in on them constantly. We’ll see how they look in a month.