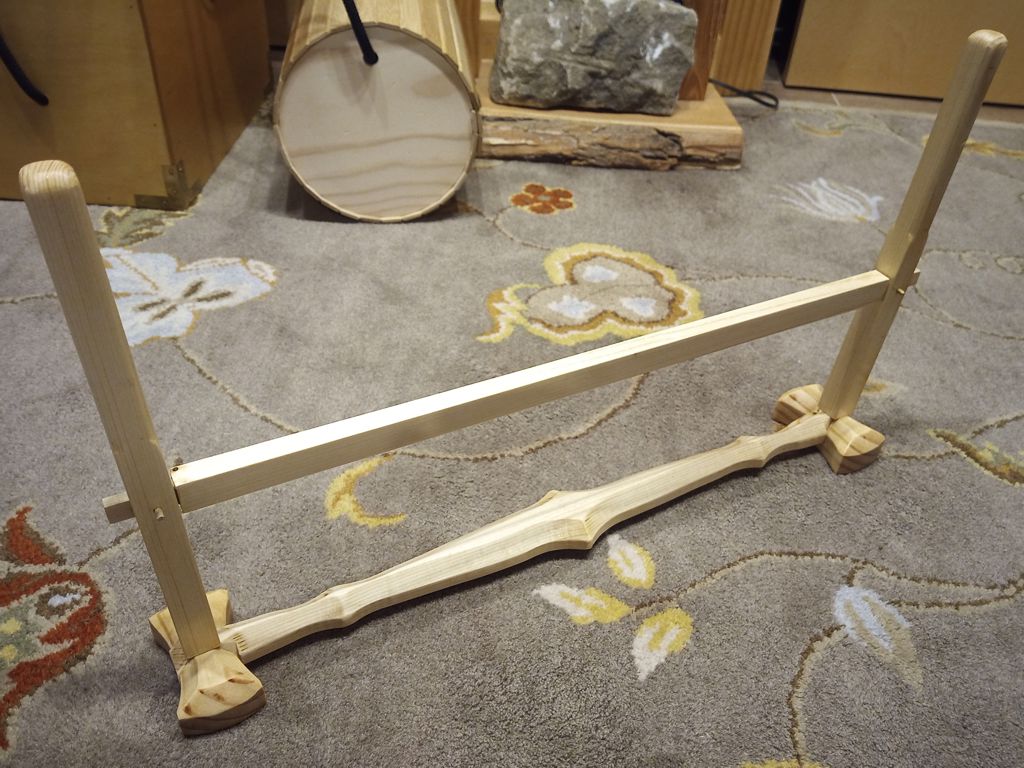
bookmark_borderMini Oseberg Loom

A while back, a friend and fellow fiber artist asked me if I could make a tabletop-sized “Oseberg Loom” that she could use in displays and demonstrations. An Oseberg Loom is a medieval style of loom for weaving narrow bands, and it is often used for tablet weaving (aka: card weaving). My friend is an experienced and enthusiastic tablet weaver who often displays work at SCA events.

I started looking around on the Internet, and found that a “real” Oseberg loom is about 2 meters long and about a meter tall. (Thanks, Ulf!) Now I understood why my friend wanted a “mini” version. Drawings enabled me to scale the pieces down, and get to work in wood.

Mini Oseberg Loom in Pine

My completed mini-loom is about 21 inches long and 12 inches tall. It is made of pine, with a blonde shellac finish. The feet join to the horizontal beam with dovetails, the stretcher bar joins to the verticals with a pinned through-mortise, and the verticals attach to the base with long screws. I thought about using more joinery, but I realized that screws would be more rigid, more durable, and much easier. The screws also make it possible to disassemble the loom if necessary for travel or repairs. There is no glue, though the shellac may of course make the pieces stick to each other..

I was able to do almost all of the cutting on the band saw, except for some of the detail work. The beveling on the base pieces (and the rounding on the verticals) was done using a router. I have a small router table that uses a handheld trim router, which is very handy for this kind of small project. The through mortises were drilled and then squared up with a chisel.

bookmark_borderKakejiku Storage Box

If I want to be able to take the Hitomaro Kakejiku with us when we go camping or whatnot, it is going to need a storage box to protect it in transit. Such things exist in the Japanese tradition, so I made one.

Kakejiku-bako, closed

It’s made mostly of poplar. I had an abundance of quart-inch poplar in my stock of surplus wood, so this was an easy choice. The top of the lid is actually 3/4″ poplar, to give the whole thing a little heft. I rabbeted the top so that it would fit inside the walls of the lid, and not appear thicker from outside.The inside is unfinished.

Kakejiku-bako, open

There are small blocks of cedar at either end of the box that cradle the ends of the scroll rod and keep it centered in the box. You can see the rabbet for the lid top and the interior blocks in this process photo.

Kakejiku-bako in progress

The outside is finished with several layers of garnet shellac with a black dye added. That’s what gives the final finish that deep mahogany color. I was hoping this mixture might be a good substitute for black lacquer. It is not, but as its own thing it is very nice.

bookmark_borderStorage Box for the Coronet of a Duchess

Some of you may remember that, earlier this summer, after inventorying the large selection of surplus plywood in the shop, I went on a bit of a storage box kick. Starting to feel like I was getting pretty good at making these simple boxes, I offered to make boxes for anything for which my friends might need a storage box. The only person (so far) to take me up on the offer is a friend of ours who is a Duchess in the SCA.

The title of Duchess is typically given to those who have been Queen two or more times. Those who hold Royal titles in the SCA (from Baron on up) are entitled to wear coronets that signify their rank. Sometimes, but not always, these come with a box. Sometimes, this box is too nice to be carted around, even though you want to take the Coronet itself to the event so that you can wear it to court.

Anyway, she sent me the rough dimensions of her coronet, and I added an inch to each of those dimensions to allow for a half-inch of padding all around. I did not feel that my standard lauan plywood box was sufficiently nice for this use, so I dug into the supply of birch-face plywood and birch scants that my wife bought for a project long ago.

The Duchess’ Coronet Storage Box, in Birch

It’s just a simple lidded box. The interior is roughly 10″x12″x5″ It is assembled using butt-joinery, glue, and 23-gauge pins from the nailer. Inside and out, the box is finished in blonde shellac. The table saw blade left some scorch marks on the ends of some of the boards, but other than that I am pretty happy with it.

Birch Storage Box, Open

It should be pretty useful for the coronet, or whatever else she might choose to store in there.

bookmark_borderKanmuri-bako

About two years ago, when I was preparing to be elevated to the Order of the Laurel, I was searching everywhere to try to buy a Kanmuri. The Kanmuri (which translates as “crown”) is the correct piece of headgear to wear with the Bunkan Sokutai that was to be my elevation garb. I eventually found an antique store in Japan that was willing to sell me one, however, theirs was in Thailand and would need to ship directly from there. I wound up picking it up at the post office the day before we went up to Pennsic. Since then, it has lived in a cardboard box, which was not the best place for this antique hat. Finally, I was able to make a couple of boxes to store and protect the pieces of the kanmuri.

Closed

That’s what they look like closed. They’re just simple lidded boxes made from plywood and finished with shellac. I have a stack of smallish plywood scraps from the last 20 years of larger projects, so this project was also an opportunity to use up some of that.

Open

Here they are with the lids off, so you can see the kanmuri pieces nestled cozily inside. On the left is the “pillbox” portion with its upright and pin (All three pieces are attached on this kanmuri.), and on the right is the tail. There’s a lot of empty space inside the tail’s box, but I wanted the box to help maintain the proper shape of the tail, and I wasn’t up for trying to make a proper bentwood box.

Assembled

In case you’re unfamiliar with the kanmuri as an object, here’s what it looks like when all the pieces are assembled. The cord drapes over the pin and ties under your chin to keep the hat in place. You can see that this kanmuri is not in the best shape. I’ll embark on a restoration project eventually,

bookmark_borderArts&Crafts End Table Project

Quite often, things sit on my project “to do” list for a season or a year until I’m absolutely sure I still want to make that thing. This project entered my list just two months ago, but it was such a motivating idea that I jumped right in on it after completing the smallest karabitsu. I bought all the lumber and other materials at Home Depot, and used almost all the power tools in my shop, so this is nothing that took great talent, uncommon materials, or specialty tools. Probably the only “talent” that made this project possible is the ability to plan, and the ability to follow plans.

Anyway, here it is. It’s an end table (or side table, whatever) in the “Arts & Crafts” (or maybe “Craftsman”) style. Made from red oak, stained a slightly darker brown, and finished with amber shellac.

Arts and Crafts End Table

The exact style is important because I wanted this table to go right at the end of my desk, and match the look of the desk as closely as possible. I have a file cabinet at the other end of the desk, and it came from the same furniture collection, and I though that having two match each other and a third not match would be visually jarring. They don’t even sell this desk any more, so buying an end table from this collection was not going to happen. What the heck, I’m a woodworker, right? Let’s just make one.

Table before finishing, next to desk

The only problem with that is that I have never made real furniture like this before. Years ago, I made the stereo cabinet, but I kind of winged it. I had to make a bunch of decisions about how such a thing even should be made, because the desk itself is mostly fakery. For instance, the ends of the “through tenons” that you can see on the desk are glued on. They are not even end grain! The “tenon ends” just under the surface of the desk are taller than the horizontal members of which they are supposed to be the ends. My tenon ends are really the ends of the horizontal members. My mortises are really full through-mortises. The ends of the vertical “ribs” really are tenons that fit into blind mortises in the horizontal members. The “inset molding” beneath the surface is not just routed onto the underside of a thick piece of wood, it’s a four-piece frame of 3/8″ wood that attaches the frame to the underside of the surface.

When you do this much planning on a project, though. You start to think about the project as a bunch of parts. It becomes very important that the pieces match the specification, and that each match the quality requirements of the project. However, it’s still just a bunch of pieces.

The pieces of an end table

Then, as the project progresses, things start getting more coherent. The first swipe of the staining pad and a stick of lumber starts to look more like a table leg. The pieces start getting assembled, and suddenly there is a piece of actual furniture. It’s almost magical. Suddenly it’s furniture!

The unfinished table after dry-fit assembly.

Then you add two coats of shellac (three on the top surface) and write a blog post, and suddenly the project is complete!

bookmark_borderPine Boxes with Rabbet Joinery

A “rabbet” or “rebate” is a slot cut right at the edge of a piece of wood, as opposed to a “dado” which is a slot cut somewhere in the middle. Last Spring, when I was trying to get the BMDL woodworking guild going, one of the workshops I put together was about how to make these simple wooden boxes. The rabbet joinery is much stronger than butt joinery. Glue along two axes is stronger than glue along one, the rabbet around the bottom keep the whole thing square if you do it right, and the rabbet around the lid lets the lid fit snugly. I wound up making three boxes myself. Two were prototypes to test my process, and one was the “follow along” version made during the workshop. These sat around for about a year, but then I decided to practice finishing with shellac. I declared them “done” just recently.

Three pine boxes with rabbet joinery

I used some ancient Zinser-brand amber shalleac on two of them, in a futile attempt to get rid of the last of that stuff. On the third, I used a blonde shellac that I mixed myself from flake shellac and denatured alcohol. Some people don’t like the the color of the amber shellac. I think it’s OK. The blonde shellac looks a lot more natural,though. Here they are with the lids off:

The thickness of the walls i kind of overkill for a box this size, but planing the wood down just wastes it. If things ever get back to near normal, I should run a finishing workshop. A lot of people hate finishing, because nobody ever taught them how to do it well. I’ve learned so much through trial and error that I don’t mind it, even though it takes up a lot of time and delays the completion of projects.