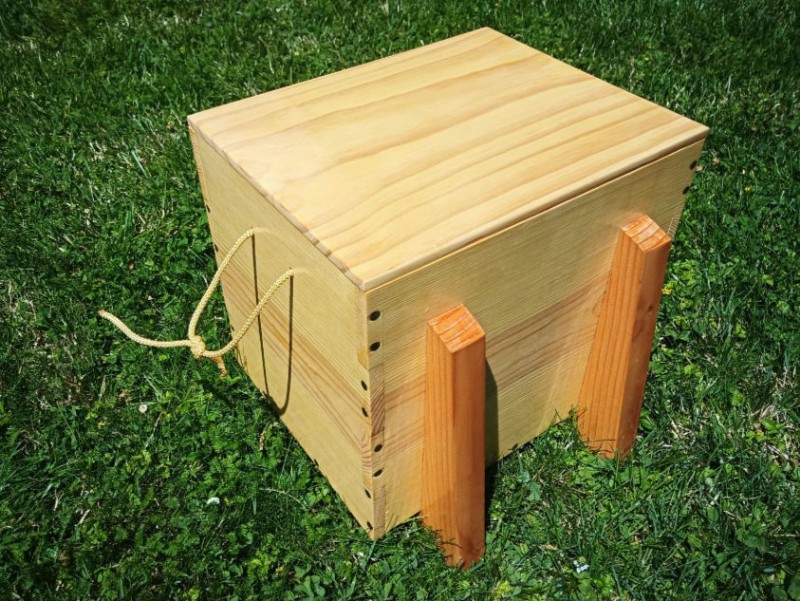
Sweetie ordered some frozen food from someplace, and it arrived packed in a small cooler. I had the bright idea to make a small karabitsu to hold/hide the cooler, and that was all she needed to hear. I grabbed some 1/2″ pine and some surplus 2×4 for legs, and got to work.
Small Coolerbitsu
The body of the karabitsu is 13″x10.5″x11″. I used traditional box joints at the corners. The legs are simply glued on, though they do hook under the body to support the floor. The floor is fully captive inside the walls, and nailed in place. The lid is a 3/4″-thick piece of “premium pine”, and it is rebated to fit the body of the box like a box lid.
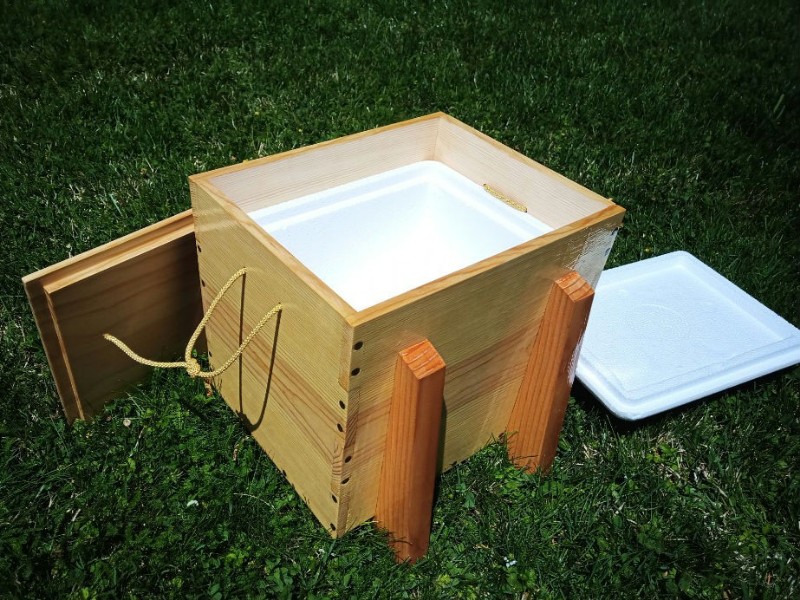
Open Coolerbitsu
Here you can see the rebated lid, and how nicely the little cooler fits inside the body. The handle ropes pass through holes in the ends of the body, and the rope does a good job of keeping the cooler in place. The exterior of the karabitsu is finished with clear polyurethane, so if it gets rained on or otherwise splashed with water it should be OK.
This is a nice little cooler that should be good for chilling beverages for an afternoon, or for packing lunch to an event.
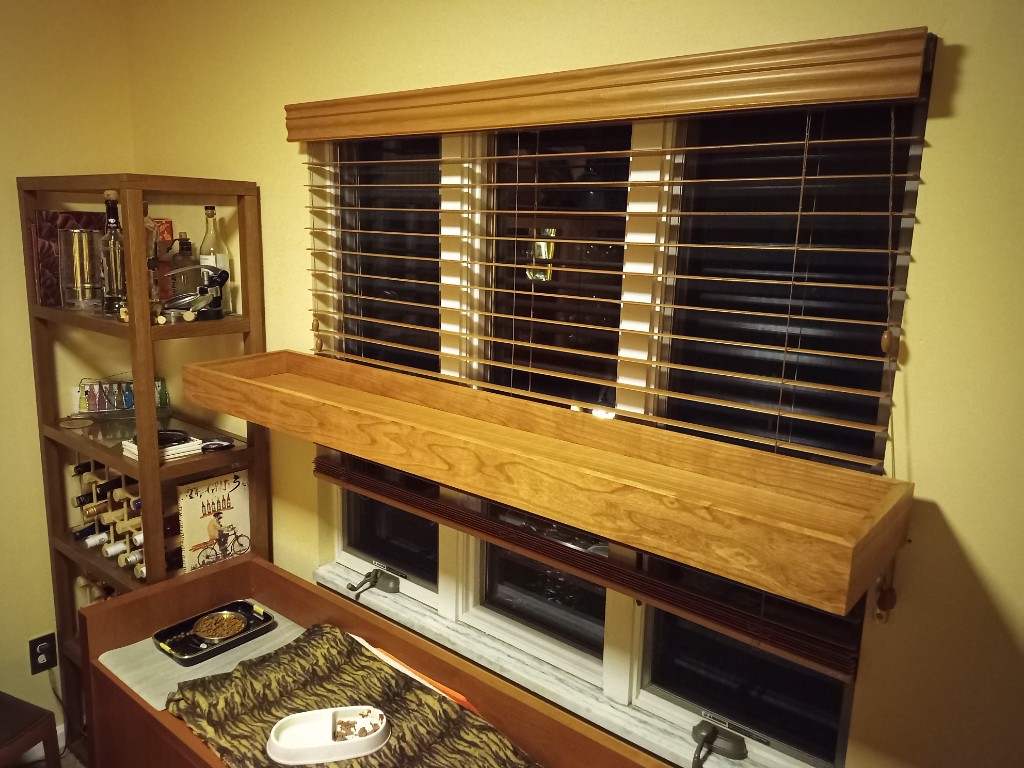
I made a few of these “plant shelves” at the old house, but we left most of them behind when we moved. A plant shelf is a shelf that goes in front of the window so that the plants get sunlight, and that has a raised edge of some kind so that the potted plants can’t fall off or get pushed off the shelf by cats.
Sweetie asked me if I’d build a plant shelf for the house we live in, you know, now. Most of the dining room furniture we have is made from cherry wood, so I went up to the Alben Sawmill to buy enough cherry to make this plant shelf. Ray Alben gave me a fantastic deal on a couple of stunning cherry boards, and he threw in a couple bonus boards to sweeten the deal.
After taking way too much time to plane the boards down to 3/4″ (Ray suggested new planer knives. Spoiler: He was right!) I cut the shelf part of the shelf down to size. Then, I cut the other board down into the “railing” pieces, mitered the ends for joining, and cut dadoes into them to hold the shelf part of the shelf. Tape, glue, and boiled linseed oil later, and we had a new plant shelf.
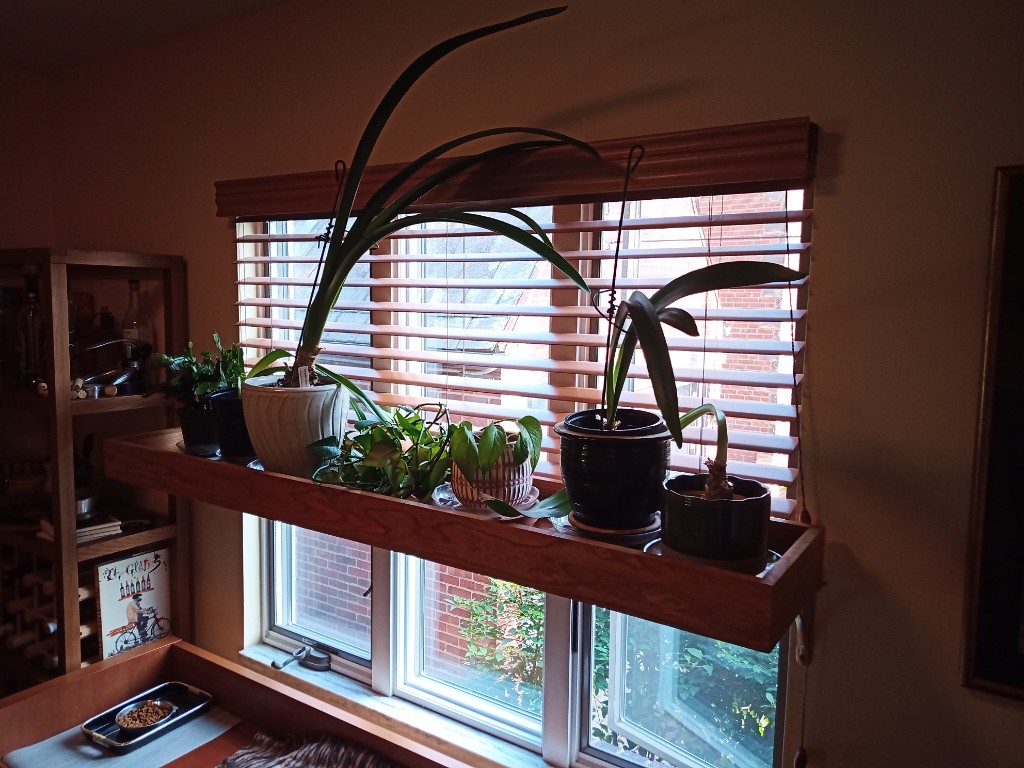
Plant Shelf Empty
The trick is mounting it to the brackets so that the shelf itself stays away from the venetian blinds. Anyway, I’m really happy with how this came out, and with how easy this project seemed while I was doing it. The first three plant shelves that I made, I guess like 15 years ago at least, were a huge pain and had a couple of problems that I never resolved. The fact that this went smoothly means that I’m actually getting somewhere with all this practice.
In our camp each year, there is always a pile of random stuff in one corner of our common pavilion. Things like empty storage boxes, bulk packages of paper towels, and random office supplies. Camp leadership asked me to noodle on the idea of shelves for that corner, so at least things would look a little more organized and not just piled up. I had some ideas, and luckily for me they already worked out!
The lumber I had was three 48″ long stair treads. Stair treads are usually a full inch thick, so they should sag a lot less than the 3/4″ pine I usually use. I drilled holes near the corners of each shelf for the hardware to pass through. The base is cut from 2-by-4, and I added hand-cut half-lap joinery. The uprights are also cut from 2-by-4, and they have lag screws and dowel screws running into their ends to join them through the holes in the shelves and the base. Each upright is 18″, so the total height is about 5 feet tall.
Here is what they look like without picturesque stuff decorating them:
Here is the historical design I was imitating:
The original joinery in the book is shown as a double-shouldered mortise and tenon joint. I was pretty sure that would exceed my current capabilities and definitely deteriorate over time. I figured the hardware route was faster and more solid. It all joins rigidly together. Given that the shelves were a gift, that I only bought about $20 in lumber and $15 in hardware, and that I had all of the finishing materials I needed already, this was a very affordable project.
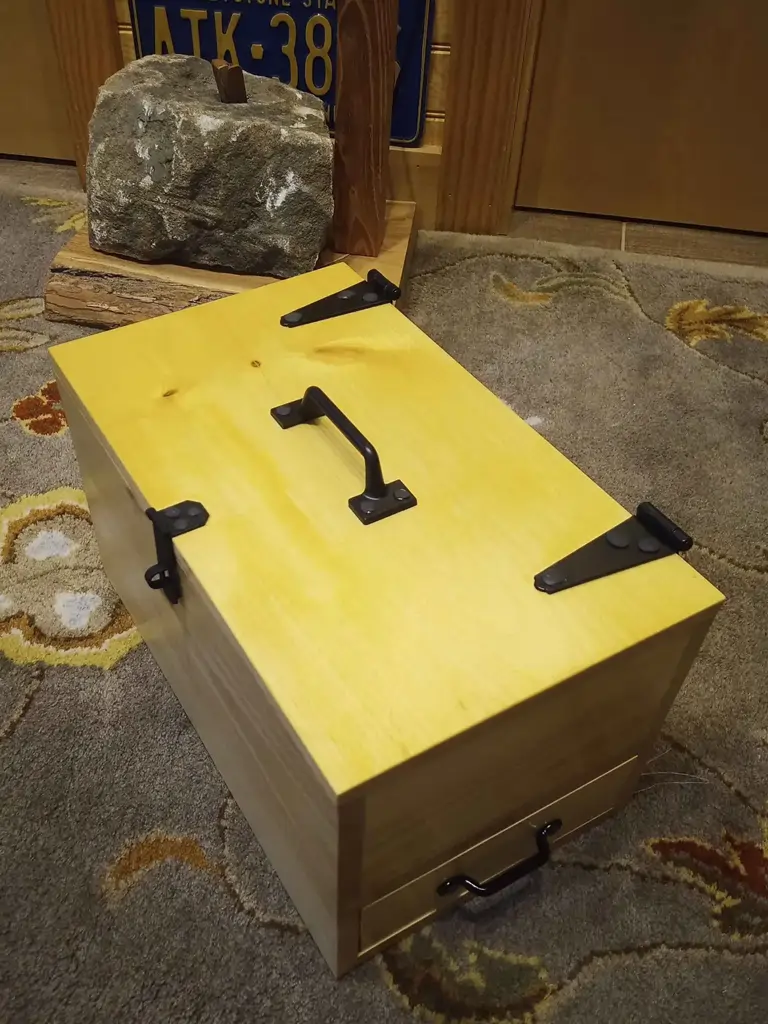
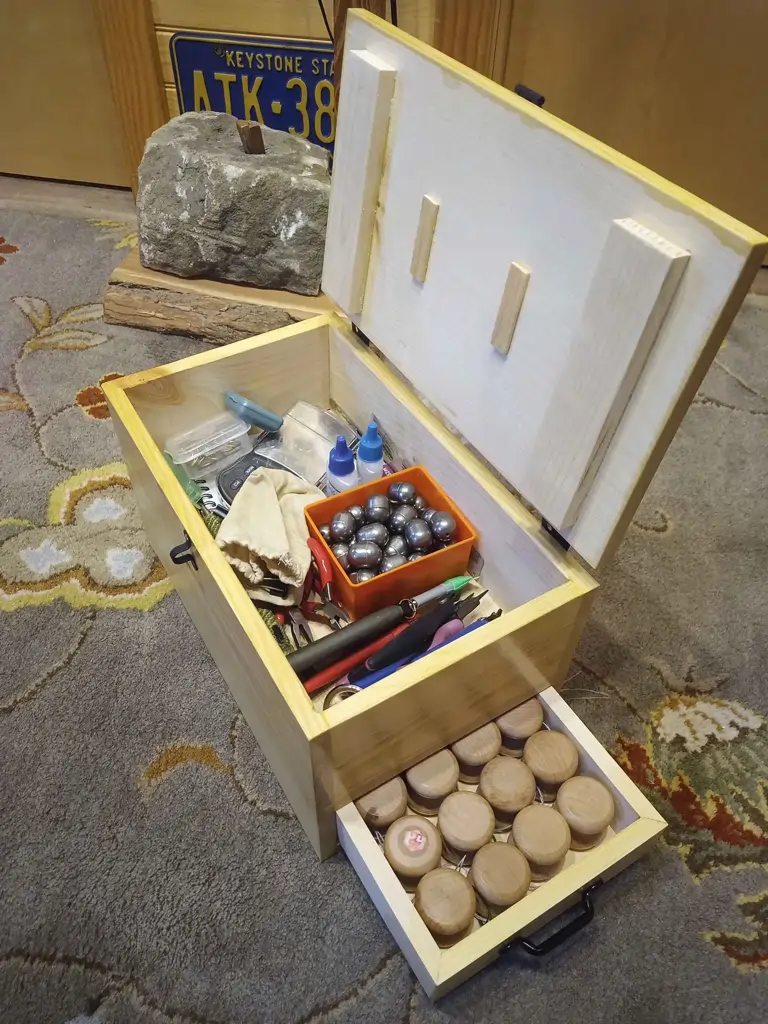
I wanted a toolbox to hold my kumihimo (Japanese braiding) tools and supplies when I go traveling, so I made this one based on a Japanese suzuribako (scribal toolbox) from the Edo period. I had already made a bunch of pine trays custom-sized to hold 32 tama (weighted bobbins), so I made one more tray as the drawer, then designed the rest of the box around it. I didn’t want to spend the money to get an authentic set of hardware. I just bought hinges, handle, and hasp from the orange store. I might still add some corner braces to the outside if I can find some for a good price. The completed toolbox is 13″ long x 8″ wide x 7″ tall.
I bought two 6-foot 1x10s from the orange store and then planed them both down to 1/2-inch thick. even after trimming off the planer snipe this was plenty of lumber for the whole thing. All the joinery was cut on the table saw with a regular all-purpose blade. The corners of the drawer are miter cut and glued. Also, the two full-height corners of the box body have mitered corners. The floor of the tray is joined to the sides with 1/4″ x 1/4″ rabbets into matching dadoes. The two floors of the body are similarly joined, though the “front” of the box is flush and flat.
Battens on the underside of the lib will hopefully keep the lid from warping, and they provide solid anchoring for the hinge screws. The drawer pull is actually a “footman’s loop” from strapworks.com. I mostly used brass screws to attach the hardware. I did not like how the contrasting metal and philips heads looked, so I covered over all of the screw heads with “steel stick” epoxy putty. I could have done a better job with that, but it still looks better than screw heads.
Plenty of room inside stuff. Even though I planned the whole thing around the drawer, I had to sand quite a bit off the sides and bottom before it would fit in the body. As I have noted previously, sashimono (close fitting joinery) is really difficult.
You know those old folding tables from about 25 years ago? The kind with a chipboard top, wood grain printed vinyl surface, and rubber edge banding? The kind that look like garbage if they ever get wet? Well ours got wet several times and saw some hard use over the last 25 years or so and it really looked like garbage. Also, the edge banding shrinks over time and starts to come loose.
I really like how light, portable, and durable the newer folding tables are with their blow-molded plastic tops, but I don’t like that much plastic in my life. I mean… bletch.
So anyway, I figured I could remove the hardware from my old 6-foot table, make a new top from some 1×10 pine common boards, slather it with outdoor-grade polyurethane, re-use the old hardware, and have a new-looking table. So that’s what I did!
I started by straightening up the edges of the boards with a hand plane to make joining easier. Then, I drilled dowel holes into the edges using a cordless drill and drilling guide. (I like the Kreg guide for this job, since it has a 3/4″ slot on the underside that clips right onto the edge of the board to keep the hole straight and centered.) Next, I put dowels in the holes to keep the boards aligned, and glued all three together into a single surface. Overnight in the clamps for the glue to cure, then scrape off the squeeze-out. (Kunz glue scraper, accept no substitutes.) Finally, trim the ends with a hand saw so they all match up.
Construction complete, it’s time for shaping. I trimmed off the corners with a hand saw, because they were likely to get all busted up anyway. Next, I rough sanded everything with the random orbit sander and some 100-grit to remove the last of the glue and smooth out any uneven joinery. I used a cordless trim router with a 45-degree chamfer bit all the way around the top and bottom to break the edges. I also filled any gaps, holes, etc. with wood filler I made by mixing sanding dust into water-based rice paste. Another round of power sanding with 150-grit and it’s starting to look like furniture.
For me, finishing always starts with sealing. I like to use (General Finishes) water-based sanding sealer because it soaks in and hardens without getting gummy. Then, a round of 220-grit power sanding to make things smooth and ready for polyurethane. I pay special attention to the end-grain at this step. The sealer enables me to get this as smooth as the edges!
Now, start with the underside and add a coat of poly. I brush this on by hand, which is a lot of work, but I have done this so many times that it is very satisfying and almost pleasurable. Make sure to wipe off anything that drips over the edges, then apply a super-thin coat of poly to the edges themselves. Once that was dry I flipped it over onto blocks and did the same to the top. This dried for maybe a week because I didn’t have much time in the evenings after work.
Yesterday morning, I hand sanded both surfaces with 320-grit to rough up the poly and remove bubbles and nibs. I have one of those sanding pads that take the same velcro discs as my sander, and I really recommend them. I applied a second coat of polyurethane to the underside (and a third light coat to the edges) and let that dry for most of the day. Then I attached all the metal leg and apron hardware. One thing I discovered when studying the old tabletop is that this is not a precision job. None of the hardware is straight or even to begin with, so don’t stress too much about measuring and aligning the legs and brackets. I drew a single center-line on the underside, perpendicular to the long edges, aligned the feet to that by eye, then drove screws through the brackets into the wood. Then, I lay the apron/frame down, centered it up by eye, and screwed it down. Now I could unfold tthe legs, flip the table over onto its own four feet, and apply a finish coat of polyurethane to the top.
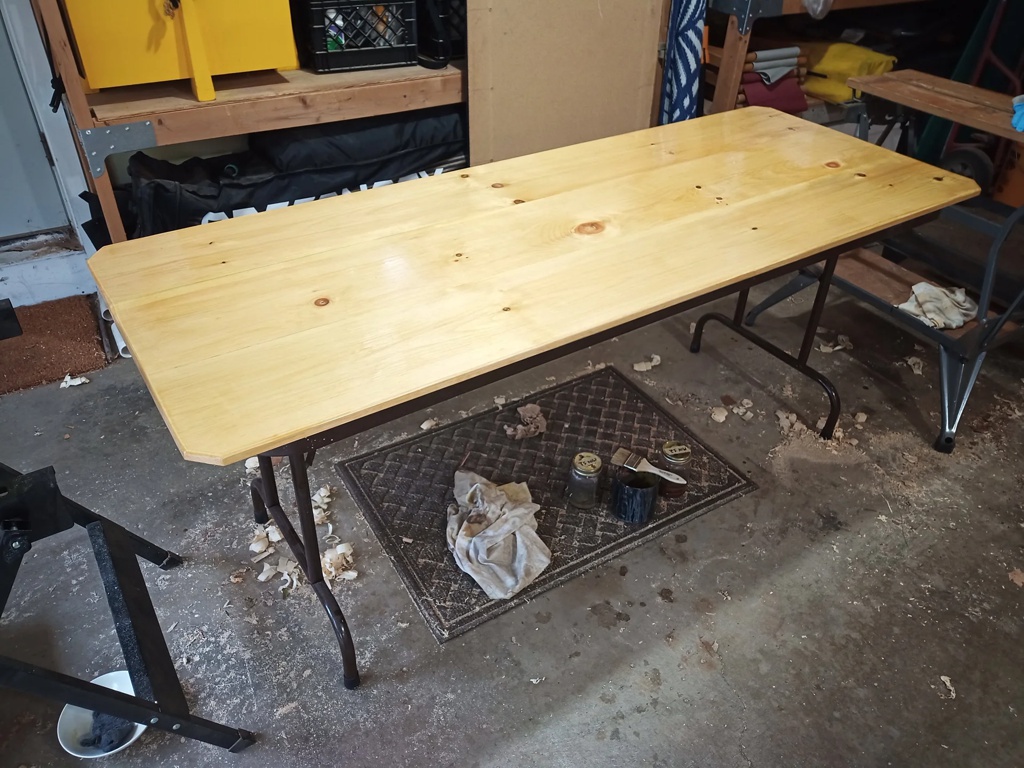
Now I have the nicest looking cheapass folding table in the neighborhood.
Folding Table with a Pine Board Top
I figure I will probably spend the next few years sanding the top and applying more polyurethane every Spring until a durable surface is formed. Any dings or scratches can be repaired instead of tolerated. I have saved the hardware from a $50 folding table using only $54 in lumber!
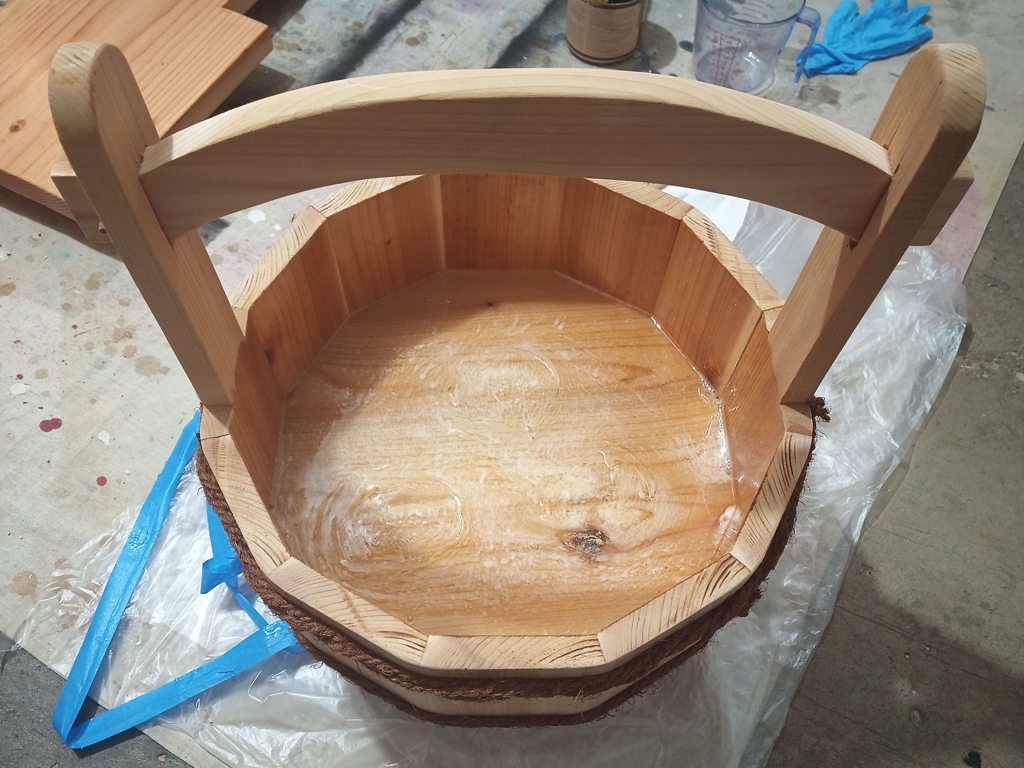
Sometimes I do woodworking demos at SCA events, and I have been wanting a less modern water source for sharpening than my plastic container. I was watching the animated film “Spirited Away” and I was like, “I need that bucket.”
I think that in Japan, this low and wide type of bucket was basically used as a basket. In the movie, she has it full of candy (konpeito, basically little bumpy sugar balls) that she’s feeding to the soot sprites. I’ve seen large ones in other movies used to transport cooked rice.
I bought about twelve feet of cedar 1by6 (sold as 4/4 S3S) and planed it down to 3/4″. Then I cut 10 6″ long bits for the staves and 2 15″ long pieces for the handle staves. I tilted the table saw blade to 15 degrees and beveled one edge, then spun each piece around to both bevel the other edge and narrow each piece down to 3+7/8″ wide (on the wider side). Switching the table saw over to a dado stack, I cut a 3/4″ wide by 3/8″ deep dado on the interior of each piece, to accept the floor of the bucket.
I used the band saw to shape the handle staves, then cut the through-mortises on the drill press and chiseled them square.
The floor of the bucket is cut from three pieces of cedar that I edge-glued together and then shaped using a circle jig on the band saw. I cut that as a 14″ circle, but I wish I had gone up at least a quarter inch more.
I dry fit all the pieces using blue tape, so I could figure out how long the handle needed to be. Once I had that length, I sketched out the curve of the handle and cut the shape on the band saw. A bit of sanding smoothed away the blade marks.
Since I already had the pieces taped up, I could apply plenty of glue, roll the bucket up around the floor (inserting the handle at the right moment), and clamp it together with elastic bands. I should have used ratchet strapspn as that would have let me get them really tight. Since I knew cleaning dry glue off the inside would be a pain, I washed the squeeze-out off the interior before it could cure. I left the whole thing to dry overnight.
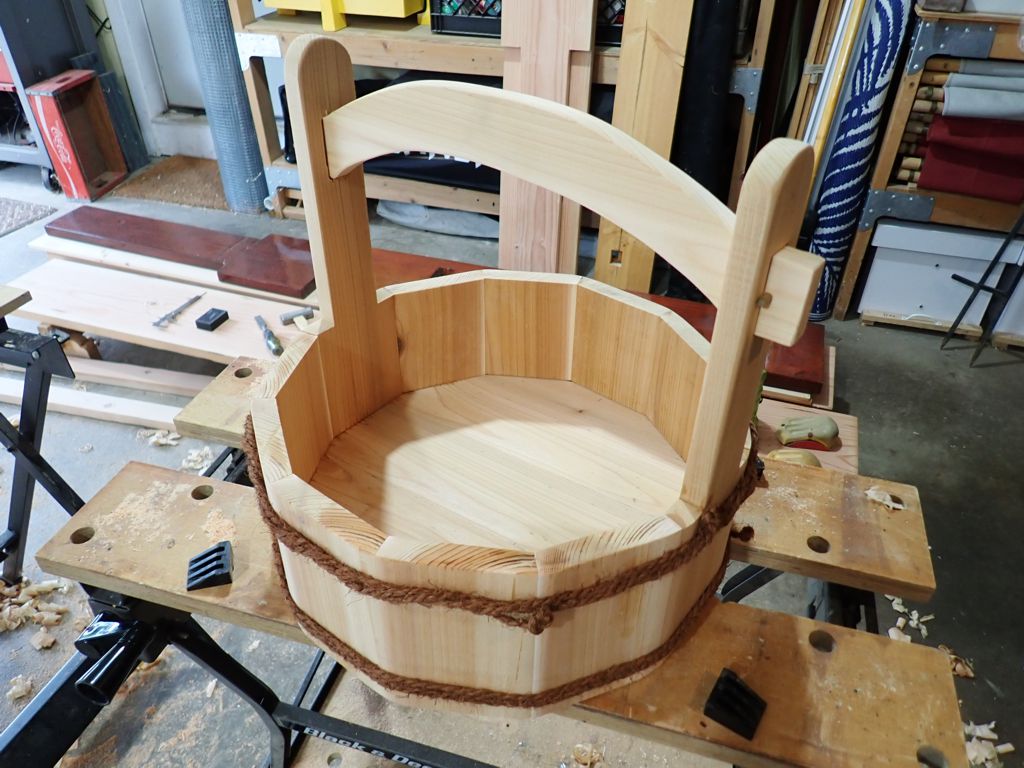
The next morning I removed the elastic and tape. I scraped the squeeze-out off the exterior, then sanded the angled edges of the exterior to round it up a bit. I drilled some holes in the handle tenons so I could secure them with pegs. To finish up, I tied some palm rope around the bucket with constrictor knots.
Mizuoke from Cedar
It leaked almost as fast as the hose could fill it, so I guess it’s not the best bucket anybody ever made, but it looks good, and I learned some lessons that will help me when (if) I make another one.
Cut and shape the staves, then measure the dry fit to figure out how big the floor should be.
Cut the dado to be a tight fit for the floor.
Use ratchet clamps for a tight fit while the glue cures.
In Japan, they take pride that the joinery in their coopering (and boatmaking) is tight enough to be leakproof before it gets wet. The swelling makes it even tighter! I knew ahead of time that my joinery would not be up to Japanese level. Traditional buckets (and barrels) also have good quality hoops that keep the joinery tight as the wood swells. In Japan, making hoops by braiding strips of bamboo is a craft all on its own. I knew my rope hoops would be a little loose, and that I am not capable of metalworking at this level either, so glue it was.
I did not put any glue holding the bottom in place, because I knew that had to be free to swell. In my future tries to learn this craft, I will make the staves first, then measure to determine what size I need the floor to be. I’ll also leave the boards for the floor a little bit thicker, to match what is apparently a slightly over-width dado stack.
After a few days, I decided to seal the bottom of the bucket with clear finishing resin so that I could use it for its intended purpose. I sealed up the outside of the floor as best as I could with blue tape, then I poured in about 2 cups of mixed resin. I probably could have gotten away with only a cup of resin, since the hardened resin is pretty thick in the bucket now.
When it started to thicken, I brushed the resin up the sides of the bucket, sort of to make a plastic bucket inside. I knew the wood was porous, and I was hoping enough resign would soak in that the wood bucket and the plastic surface would be fully bonded together. One thing I did not take into account was that these pores are all full of air. Since the resin heats up as it cures, the air expanded and bubbled up through the resin. I did not get a perfectly clear layer of plastic in the bottom of the bucket, but it did seal everything up as hoped.
Cedar Bucket Sealed with Resin
It looks good overall though, and I am happy with it. Once you get some water in it, you can’t really tell the difference between bubbly resin and bubbly water. I have my bucket and it really does look like the inspiration. One commentator suggested that I make two more. The theory is that by the time I make the third one, I’ll have all the problems worked out and the third one will be perfect. That will have to wait for Spring, but I just might do it.
Way back in the mists of before-me time, Sharon‘s sister Megan (with Sharon’s mom’s help) made a grocery list holder as a gift for Sharon. It holds an old-fashioned roll of receipt paper (and a pencil) up on the wall so that you can quickly and easily jot down items for the next grocery trip. Sharon has used this holder for grocery lists ever since, and I dutifully started using it when I moved in with Sharon in the Spring of 1996. When you are ready to go grocery shopping, you pull down on the list until it is below the crossbar, then use the crossbar as a tearing guide to remove the list.
There is only one problem: we make two grocery trips a week because the two stores have different merchandise. Most weeks, Sharon goes to one store and I go to the other. Keeping two lists on one holder doesn’t work very well. If the “upper” list needs to be detached before the “lower” list, then the lower list winds up getting tucked into the crossbar and it is difficult to add things. Also, the detached list now has limited room. The solution was for someone (me) to make a second grocery list holder.
Two Grocery List Holders – Megan’s and Mine
I made mine from some of the pine board that I planed down to 5/8-inch for the Medium Japanese Tool Chest project. That’s why it looks a little smaller than the original. I did all of the cutting on the band saw, and smoothed all the saw marks by hand with a plane and some sandpaper. I used copper nails instead of iron nails, because I like the way that looks. Megan and Ivy used a rustic stain-only finish, which is fine and enables it to develop a patina. The pine on my list holder is finished with blonde shellac to seal it more completely for a brighter look.
Ivy says that she based the first one on a list holder that was on the wall of her parents’ house while she was growing up. When I sent a picture of these two to Megan, she said that she could really use one of these, so I will probably wind up making at least one more. Megan’s oldest offspring is now living in his own place, so he should probably have one as well. Maybe I should draw up some plans and write some instructions so that I don’t have to do all of these myself.
I decided to try to make a sort of medium-sized Japanese tool chest, according to the more modern style. The main purpose of this experiment was to try to make a chest that used less lumber, that could then be sold for less money than the full-size tool chests.
Medium-sized Japanese Tool Chest in Pine
I started with two 6-foot 1-by-10s, and I have a little bit left over for other projects. I planed the 3/4-inch lumber down to 5/8″ to decrease the bulk, and I ripped all of the skinnier pieces from the wider lumber. that’s why the sides are the height they are; rip a 9.25″ 1-by-10 in half and after planing off the saw marks you wind up sides 4.5″ tall. Deeper tool chests, I have found, result in to o much layering of tools. That is, things get buried. The box is about 2-feet long, which makes the whole thing a nice size to fit in car trunks and the like. The cost in lumber and nails is about $40, and I’m thinking of selling these for $100. What do you think?
As you know, most braiding in Japan is performed on braiding stands, called “dai”. A braiding researcher in Japan clued me in to the fact that this braid was made traditionally on three different braiding stands, but only one of those pieces of equipment is used today. The two other dai are rarely seen even in Japan these days, and most braiders outside of Japan have never heard of them.
If I lived in Japan, I could probably make an appointment to travel to one of the few braiding studios that still possess them. In the USA, if I wanted to experiment with these stands I was going to have to DIY them based on some of the few photos that exist on the Internet.
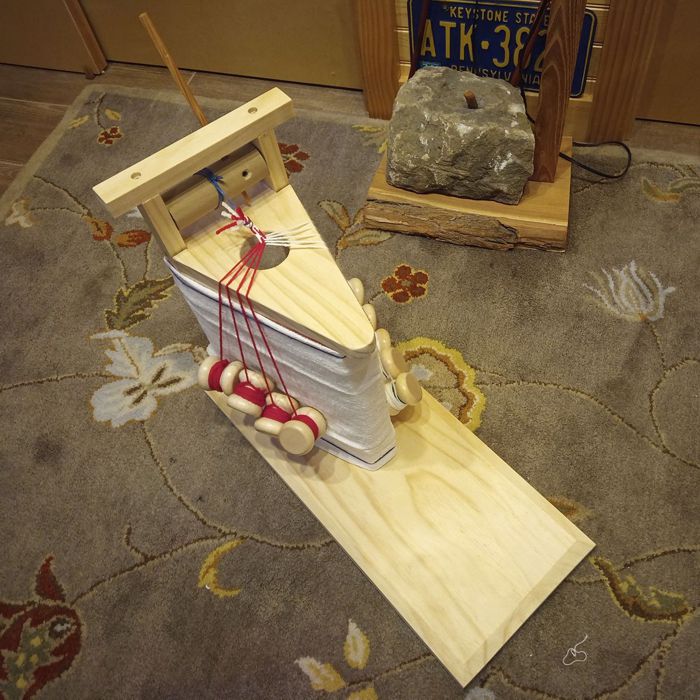
The first is a stand that appears to be specialized just for the shigeuchi braid, since it is called the “shigeuchi-dai”. The unbraided strands hang down over the sides of the dai, and are wound around weighted bobbins called “tama”. The strands are passed between other strands and moved from side to side and to create the braid at the center. The completed braid passes over the “torii” at the top of the dai and is wound around the roller at the back. For scale, this stand is about 2 feet tall.
The second stand is used for several different braids, but usually with an odd number of strands. It is called a “sankaku-dai” because of its triangular (san=3, kaku=angle) top. The strands are (again) passed from side to side, but over the top instead of across a gap. This stand is smaller, at about 16 inches tall.
Both stands are made from pine to keep them affordable, and assembled with screws to keep assembly (and disassembly) simple. Learning to braid on these dai has been fun and informative. My researcher friend in Japan tells me they are most likely the only dai of their kind in North America!
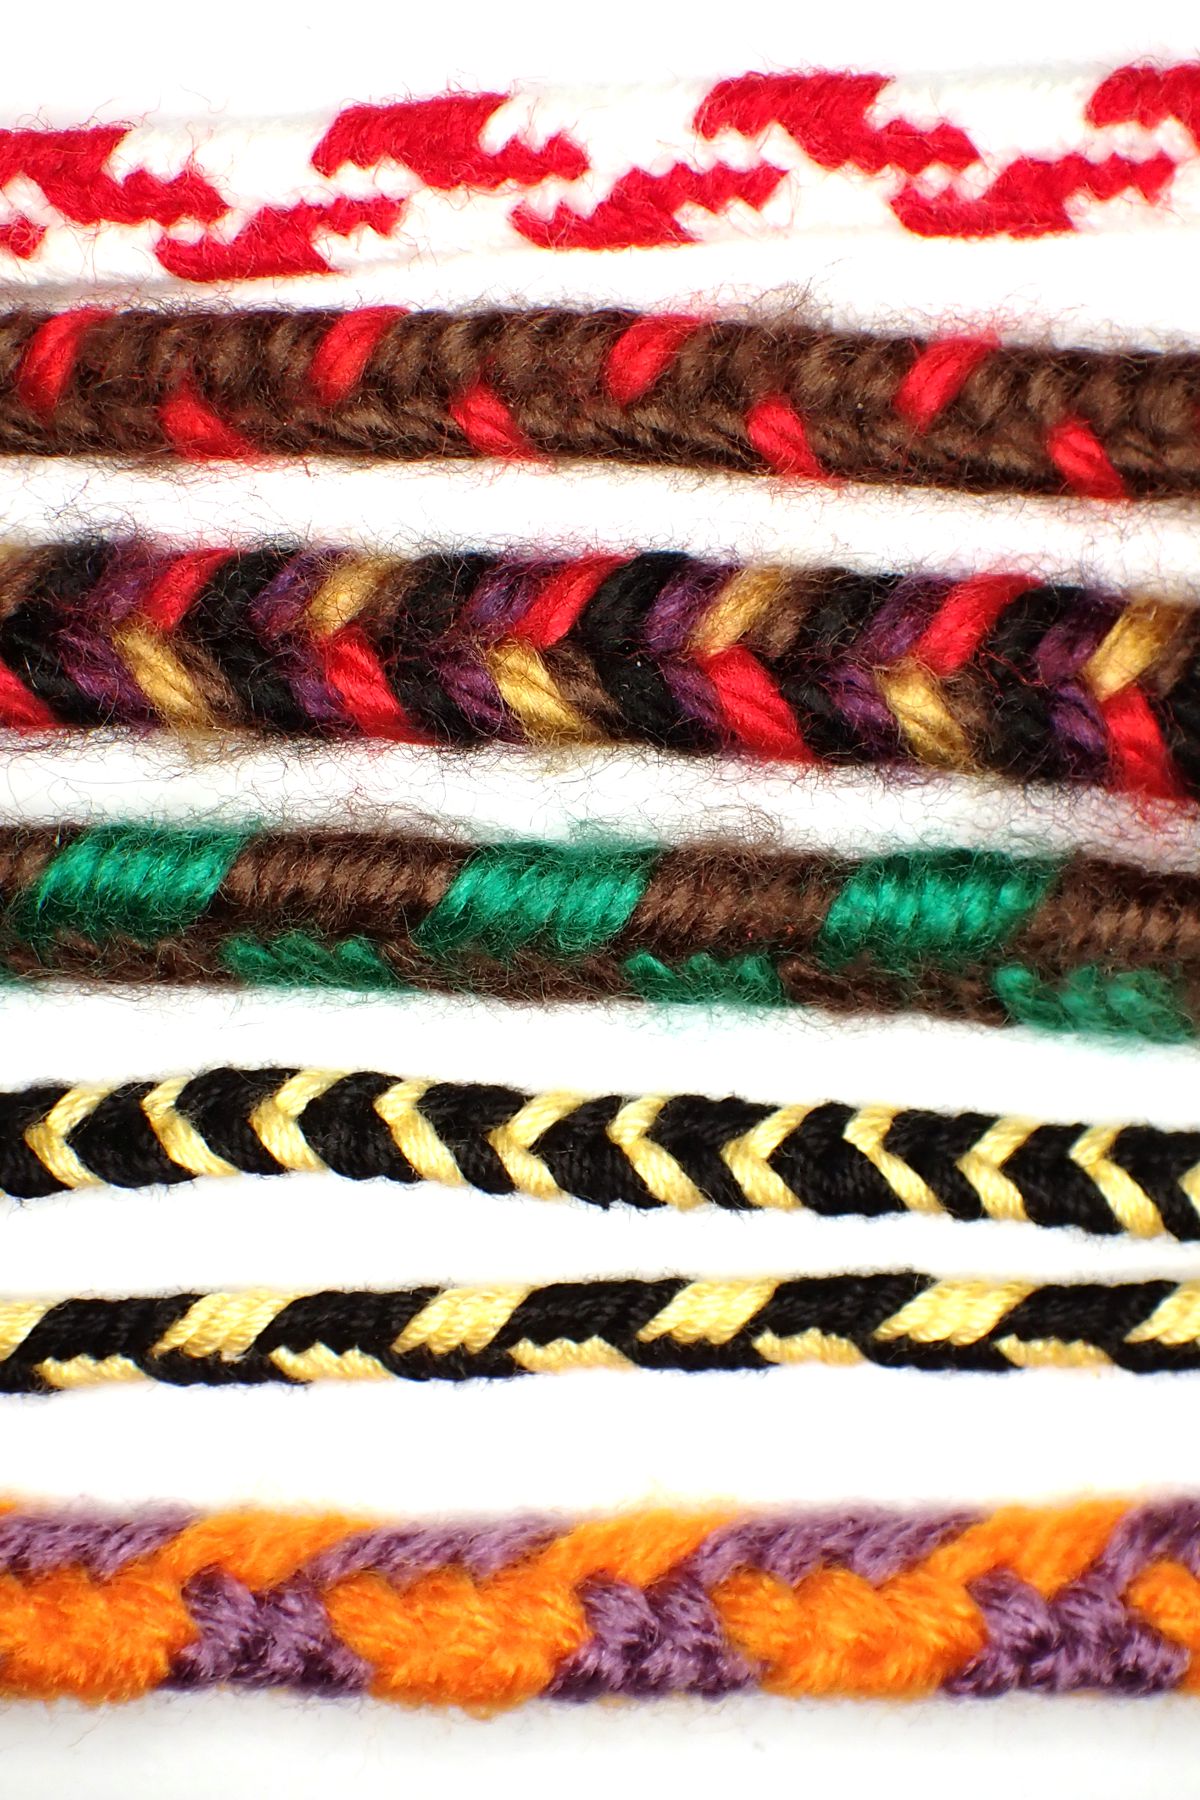
Here is a sampling of sankakudai braids in various materials and colors:
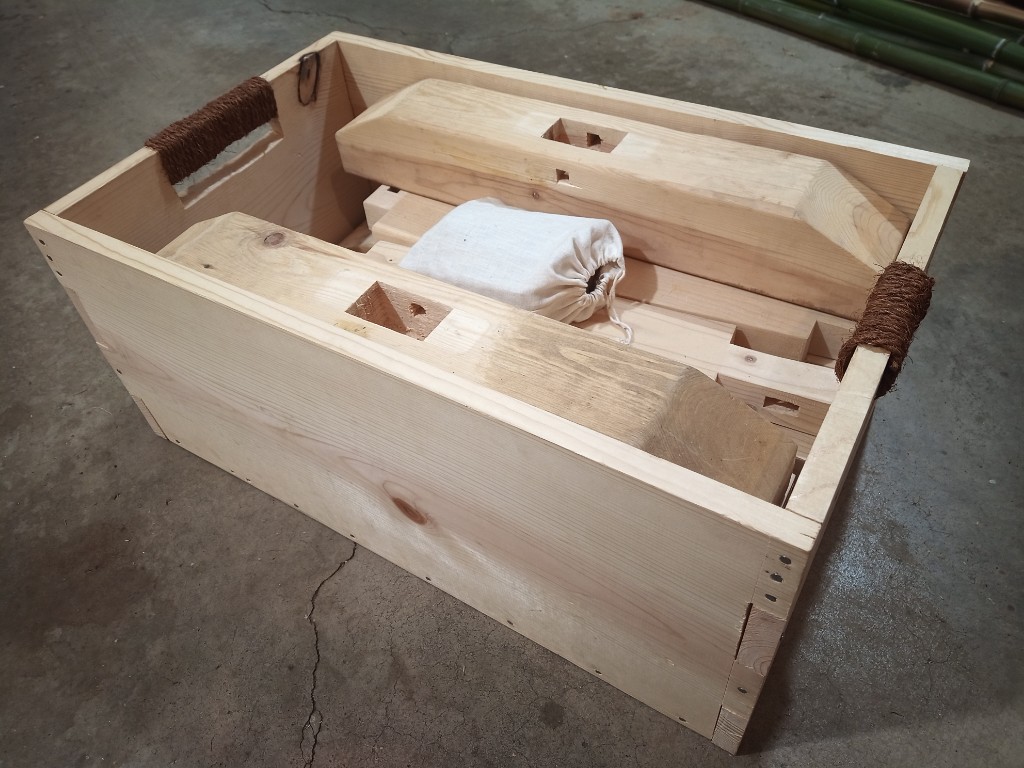
I made four Japanese-style sawhorses several years ago, but I realized recently that I had no way to transport them except to toss the pieces into the trunk of my car or pile them in a wagon. Then, some friends of mine moved away and gifted me with a pile of lumber they had been using as storage shelving. I spent a few days at the 51st Pennsic War medieval event constructing this 26″x16″x11.25″ crate using only hand tools, as a demo of Japanese style woodworking.
Sawhorse Crate from Pine 1-by-12
I used a ryoba nokogiri saw to do all the cutting of the pieces from the boards, and some of the joinery. I used oire nomi chisels and a mawashibiki saw to cut the remainder of the joinery and the handle cut-outs. A yotsume kiri gimlet came in handy for pilot holes so that the wood didn’t split when I drove in the nails with a genno tsuchi hammer.
Contrary to common belief, Japanese carpenters would not have used fancy joinery without nails to construct such a simple workman’s item. That kind of specialty carpentry was mostly used for devotional items or religious buildings. They probably would have used forged nails instead of wire nails, but I don’t have any of those handy. The big chunky box joints are seen a lot in shipping and storage boxes.
The linen bag holds the wedges and pegs that hold the horses together when assembled. I wrapped the handle cut-outs with some of this great palm rope from Hida Tools. I call it a crate instead of a box because there’s actually an opening in the floor because I just used two pieces of 1-by-12, leaving a 2-inch gap in the middle. This should let the sawdust and shavings out.
The completed box plus sawhorse parts is pretty heavy, so I have to store it on a lower shelf instead of storing the loose pieces on the highest shelf in the garage. I might try to figure out a packing pattern for only one horse’s worth of pieces, then make 2 of those for the other 2 horses.