bookmark_borderNew Older Japanese Tool Chest

Most of the Japanese toolchests I make follow the pattern established by Toshio Odate, which makes them very traditional, but very modern.

From Page 10 of Odate’s
Japanese Woodworking Tools

So what were Japanese toolchests like in the medieval period? Similar in some ways, but a lot less sophisticated.

From the circa 1309 emaki
Kasuga Gongen Genki-e

In this fourteenth century illustrated scroll, two apprentices take a break from working on the construction site of a new temple. One leans against a tool chest that is open, showing some tools inside. We can estimate that this chest is about 3 feet long, about 1 foot wide, and six or seven inches deep. The end handles and clever locking mechanism are missing, but the cross battens keep the lid from falling in. The wood seems very thin, represented by a single line whereas the battens are shown with rectangular ends. No joinery or fasteners are visible, which makes them something of a mystery. Butt joinery is used on the modern chest, so we can assume it was used here, too. No edge to the bottom of the box is visible, so the bottom piece is most likely fully captive. Nails are used on the modern chest, so it’s likely they are used here, though they may be wooden nails or pegs.

Here is my interpretation of the fourteenth century toolchest:

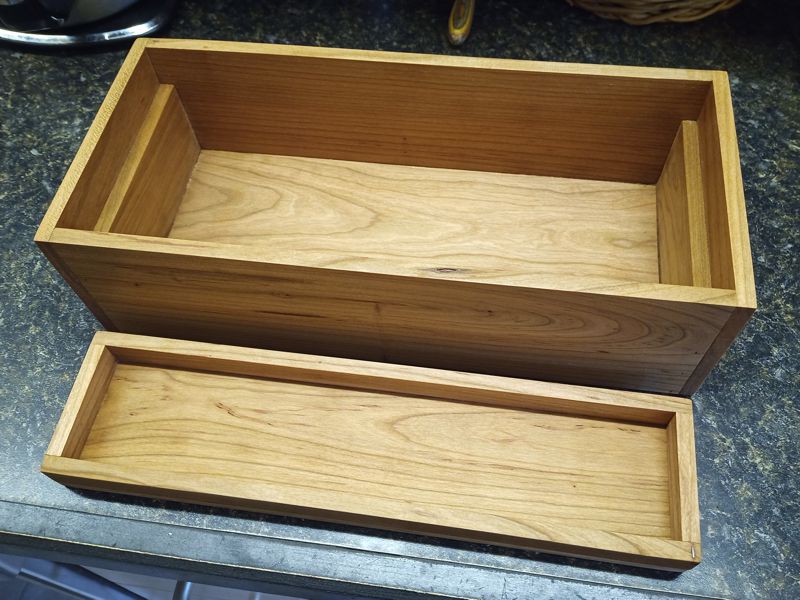
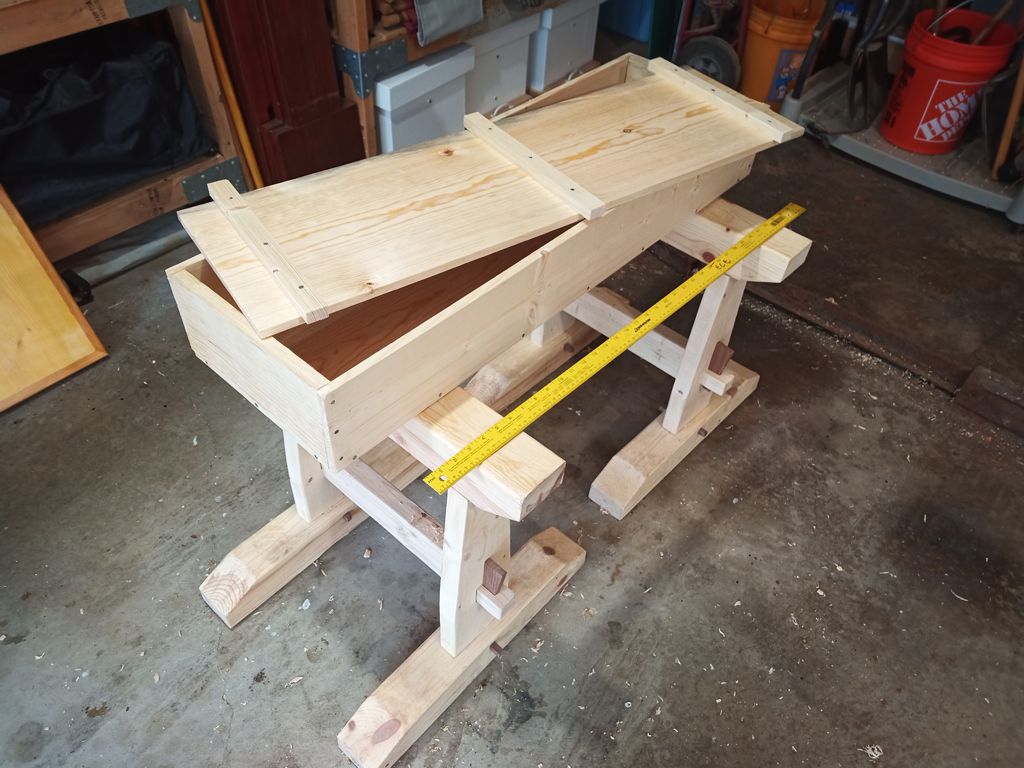
My New Older Japanese Toolchest

I ran a 6-foot 1×8 and a 6-foot 1×12 through the planer to shave it down to a half-inch thick. I cut the bottom, lid, and two ends from the wide wood. I cut the sides and battens from the “narrow” wood, ripping the 7.25″ width into 2″ battens. Then, I nailed it all together.

My New Older Japanese Toolchest, Opened

I deadened the nails for the lid, so it should hold together pretty well. The whole thing is 29 inches long, which was about the biggest chest I could make from the two boards with which I started.

What did I learn? My chest isn’t long enough, and it’s possibly too deep. The proportions just don’t look right. My battens should be made from thicker wood, and should be both narrower and closer to the ends of the lid. Because I used thinner wood, this chest is a lot lighter than a previous attempt. Very little wood is wasted, unless you count the one third of the lumber that got turned into shavings.

bookmark_borderBaronial A&S Satchel

Speaking of regalia, I have made enough regalia for my current Baronial office that I was starting to worry about keeping it all together. When you have three storage boxes full of surplus fabric, no problem is unsolvable provided it can be solved with fabric! I decided to make a simple shoulder bag big enough to hold the banner, belt favor, and medallion of office. Then I decided to add a populace badge and A&S badge. Soon enough, I was finished.

Baronial A&S Satchel
Satchel Open, Showing Contents

It’s just a simple fabric satchel with a flap closure and a wide fabric strap for shoulder wear. The whole thing is linen, including the strap. It’s about 15 inches deep, so I can tuck the banner all the way in. It’s only about 14 inches wide inside, so the banner won’t fall all the way to the bottom. I thought about adding some pockets to the inside, so that small items like the medallion won’t fall to the bottom, but I realized that if I got into designing a pocket system inside, I would never get it done.

bookmark_borderKingdom A&S Baldrics

A “baldric” is a type of sash, typically used in the SCA to show heraldry, denote an award of some kind, or designate the wearer as a holder of an office. These are similar to belt favors (link, link, link, link, link, link) but they are a little more formal and are visible from the front. Anyway, I was told that until I made the Arts and Sciences Belt Favors, the office of Kingdom Arts and Sciences Minister had possessed absolutely no regalia. Since this is a serious office that sometimes requires participation in court, I decided to at least partially remedy this lack.

Aethelmearc Kingdom A&S Baldrics

These are linen baldrics about seven feet long total, though of course they are doubled over. I guess they are about seven inches wide. The Kingdom populace badge is one of the professionally embroidered patches I had made, and the A&S badge is machine embroidered. this kind of baldric is meant to be worn from the left shoulder, draped diagonally across the body to the right hip, with the badging over one’s heart.

Ad gloriam!

bookmark_borderBut what do you use it for?

Most of the braiding I do is either for practice or for making medallion cords. People are always asking me at SCA events what historical Japanese used kumihimo for. Here is a list of things I know about, but I am sure there are more:

  • Armor construction and attachments
  • Sageo and suspension cords for swords
  • Suspension and fastening cords for banners and scrolls
  • Garment embellishments such as:
    • kotsuyu (little knots) on hitatare
    • sodetsyu (sleeve cords) on hitatare, suikan, or kariginu
    • tasuke cords for tying sleeves back
    • munahimo (chest ties) on hitatare
    • hirao sash on sokutai sugata [early hirao were wide karakumi]
  • Fastening cords for hats such as kanmuri and tate eboshi
  • Cords for manmaku (indoor curtains)
  • Cords for boxes small {bako} and large {karabitsu}
  • Cords for marking pottery before firing [the grandparent]

I should probably write up that outline as a research paper with pictures. Let’s see how long that takes me. Probably at least ten years.

bookmark_borderMakin’ Curry

A few months ago, somebody was chatting online about making curry at home using store-bought curry mix. Now these mixes are basically just the roux, the thickener you put in at the very end to turn the broth into sauce. They are super shelf-stable, so this somebody was recommending just keeping a package of this roux in the cupboard for quick dinners. I like curry just fine, but these store-bought roux use things like butter, soybean oil, and wheat flour that some members of my household cannot digest. So, this became a science project.

First, I bought a package of the recommended roux so I could make sure I knew what the store stuff tastes like. It’s good, no mistake, but as mentioned, indigestible. Because I knew I would be making it for myself, I made a tofu curry so I could be sure it would not get eaten by somebody else by accident. It was good, and I had it for lunch three or four times. The basic way to make curry is to add cut up onions, potatoes, carrots, and protein to a pan to fry for a bit, then add water or broth and simmer for a bit, then turn off the heat and thicken with roux.

Next, I found a recipe for making my own roux at home. This made way too much roux, which thickens the sauce into a kind of spicy pudding. So, here is my redacted recipe:

  • 1/2 stick of unsalted butter or plant-based, non-dairy, soy-free, gluten-free butter substitute
  • 1/4 cup flour of some kind, I used gluten-free rice flour
  • 1 Tbs. Japanese curry powder
  • You can also add small amounts of cardamom, cinnamon, cloves, coriander, cumin, mace, mustard seed, nutmeg, pepper, red chili, and cayenne if the curry powder is not spicy enough for you.

This makes enough roux to thicken a quart of broth, and here’s how you prepare it:

  1. Use a fork to smoosh the flour and butter together in a small frying pan.
  2. Heat gently until butter melts and the flour begins to toast.
  3. Stir in curry powder and other spices.
  4. Continue to heat and stir until everything is blended, then turn off the fire.

My second curry was a chicken curry made with the largest onion we had, skinless boneless chicken thighs, about a pound of little potatoes (each cut in half to speed cooking), two chunked up carrots, and a quart of chicken stock. Put some oil in a skillet, fry up the ingredients until they are a little toasty, add the stock, simmer for a half hour, then turn off the fire and stir in the roux. Serve with rice. Then make more rice later in the week because there are like two more dinners coming your way.

My third curry was fancy fancy. I used the second largest onion we had, a pound of cubed lamb meat, a pound of little potatoes (cut up), an entire acorn squash cut into chunks, a quart of beef stock, and the rest of the roux. Oh my. I’ve had the “pumpkin curry” in Thai restaurants and this is almost as good. They probably use more of the extra spices. My only advice would be to add the lamb earlier and the squash a little later after the other ingredients have simmered for a bit. My squash was too squashy. I did also peel the squash before chunking; I now wonder if that is necessary.

No pictures because curry doesn’t look as appetizing as it smells or tastes. Sorry!

bookmark_borderBraids for Spring Coronation

I did these braids back in the fall, but I held onto them for a while and then put them into the Baronial gift basket to the crown for Kingdom coronation. I’m posting today because Coronation was yesterday.

Coronation Braids, Spring 2022

From left to right there are two 9-strands flat braids, three 16-strand round braids, and one 8-strand flat braid. They are all silk, and all intended as medallion cords.

I don’t know if all that is exciting enough to withhold “the surprise” for six months, but there it is. Now it can be told.

bookmark_borderChalk Holder

For those of you who, either at my recommendation or independently, purchased the “Dritz Chalk Cartridge Set” chalk holder, or (perhaps more so for you who) did not purchase the Dritz model because it is made of plastic, it should be noted that the chalks that come with the Dritz holder are 3.8mm in diameter, and can be inserted into the “Koh-I-Noor 3.8mm Clutch Pencil 5356″ which is made of metal.

Dritz (top) and Koh-I-Noor (bottom) 3.8mm Holders

I have never seen the Koh-I-Noor 5356 in any store, but it is available from several online retailers. I won’t attempt to bias you for or against any particular retailer. The down side are that the 5356 does not come with a supply of chalk or a sharpener.

I have yet to compare the Koh-I-Noor colored artist’s leads to the Dritz chalk sticks in terms of marking and washability. So far, the Dritz chalks have lasted several years and one pack may be a lifetime supply.

bookmark_borderSecond Kanmuri Box

Back in October, I was idly searching eBay for Japanese antiques, and I found a kanmuri for sale at a very reasonable price. So, I bought it. This one is not as old or as nice as my other one, but it was less expensive and is in better shape. I won’t be as afraid to wear it or lend it to others. However, it should still have a better storage container than the corrugated cardboard box in which it was shipped to me.

I made two separate boxes to hold the parts of the first kanmuri. This was partially because of the shape of the tail, and because the body of the first kanmuri does not break down into parts. This second one comes apart much better, so I could build a single flat box to hold the parts.

Second Kanmuri-bako, closed

This kanmuri-bako is a simple rectangular, lidded box. The top and bottom are thin birch-faced plywood, and the edges are maple scants. I put a couple of coats of shellac on the outside for protection, but I left the inside unfinished so that the wood can absorb and release moisture as needed.

Second Kanmuri-bako, open

Inside, there is enough room that the pieces of the kanmuri can be individually wrapped to protect them from rubbing. There is actually enough room inside that I am able to store some other formal accessories in there to keep everything together. I can fit a shaku in the bottom, my sekitai, and my hirao. There’s probably enough room to add my gyotai if I ever need to.

Second Kanmuri

Because I just realized that I never posted to my blog about the first kanmuri, here is a picture of the assembled second kanmuri. the tail removes easily. When you remove the horizontal pin, from the hat part, the upright tube can also be removed.

bookmark_borderMonitor Riser

first project of he new year! Sharon’s been asking for this for a while, and I finally got around to it. It’s a desk riser to boos her monitor a few inches so she can see the monitor over the laptop screen and have a place to stow her flatbed scanner when she’s not using it.

Sharon’s Monitor Riser

So yes, this is more left-over shelf material from the old house. I spent so much time staining and finishing these shelves that I could not bear to throw them away when we moved six years ago, and I have been cannibalizing them as pre-finished materials for little projects ever since,

this riser is 21 inches of pine 1×10 shelf supported by some 3.25″ lengths of 1×10 to make the riser about 4 inches tall. The “legs” are joined to the top using furniture dowels (left over from IKEA purchases) and a couple of brass right angle brackets to make sure it does not wobble. I added some stain and water-based polyurethane to the cut edges to give the riser a completed look. I even did most of the cutting by hand because it was faster than setting up the table saw for four cuts.

Sharon needed 17.5 inches between the legs to stow the scanner without kinking the cord, so the 18 inches I gave her is more than enough. So much classier and more useful than a couple of phone books!

bookmark_borderPlaylist 2021

Each year, as I acquire new music, I add new tracks to a yearly playlist for occasional review and December retrospective use. This was 2021 (in order of acquisition):

ArtistYearAlbum TitleNotes
Linnell, John2021Roman SongsFun little disc of unintelligible babble
Mogwai2021As the Love ContinuesRock on, you Scottish punks
Zombi2021Liquid CrystalI hope they keep releasing an album every year
Wintergatan2013WintergatanFinally got this disc of earworms direct from Sweden
Sigur Ros2020Odin’s Raven MagicThis recording is a remarkable achievement
They Might Be Giants2021Secret Music: Volume 2You must be thinking of some other band
Orb, The1997Asylum (Singles and Remixes)Found this in a TheExchange and bought on a whim
Mono2021Pilgrimage of the SoulWould love to finally see these folks live
Ludwig Goransson2020TENETAmazing soundtrack to an amazing film
Gary Hoey2003Wake Up CallGary Hoey has kept putting out albums. Who knew?
Gary Hoey2006American MadeBesides all the Xmas stuff, I mean.
Stereolab1997Dots and Loops2019 remastered edition of this 1997 album
Stereolab1992Peng!Their first album, finally found one
Stereolab 2009Not MusicAt last, my collection is complete
They Might Be Giants2021BookBook edition and everything
Gary Hoey 2019Neon Highway BluesWhat it says on the tin: blues rock. Well done!
Playlist 2021