A very good friend of ours was elevated to the Order of the Mark yesterday for his years of excellence with thrown weapons and related service. Hara and I made this hitatare sugata for him to wear for his elevation. Hara found the wonderful silk brocade online, and she made the hakama. I made the hitatare and the braided embellishments.
Silk Brocade Hitatare
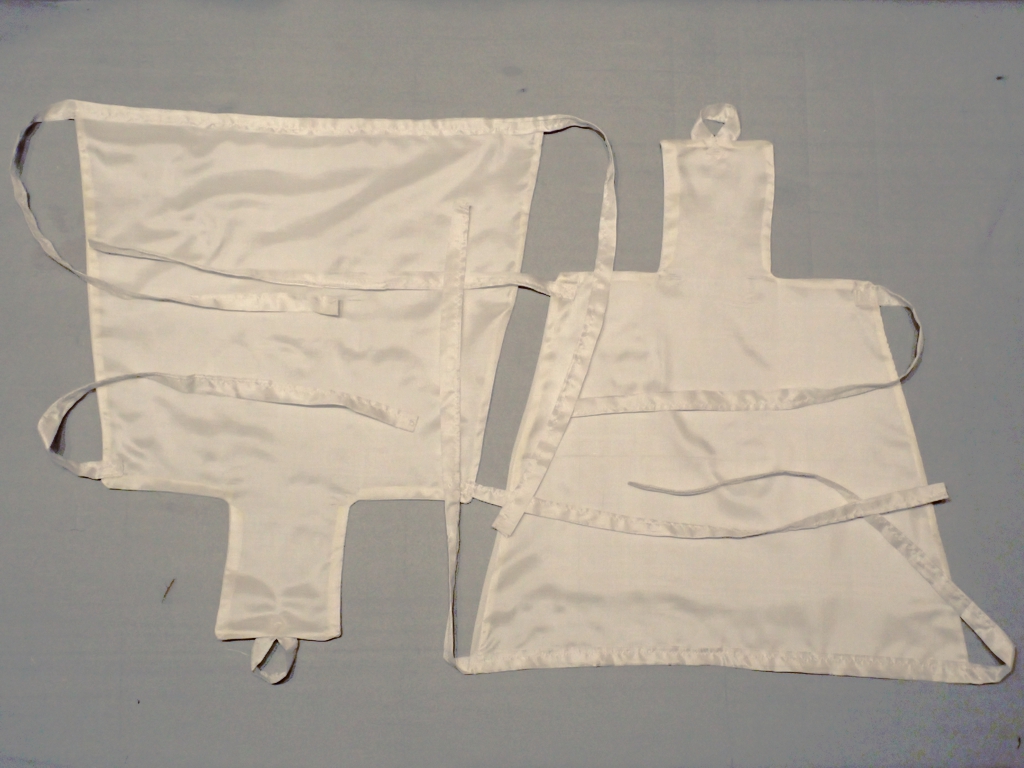
I also made the white tekkou bracers from some excellent white silk, and lined them with white linen.
White Tekkou (Bracers) from Silk
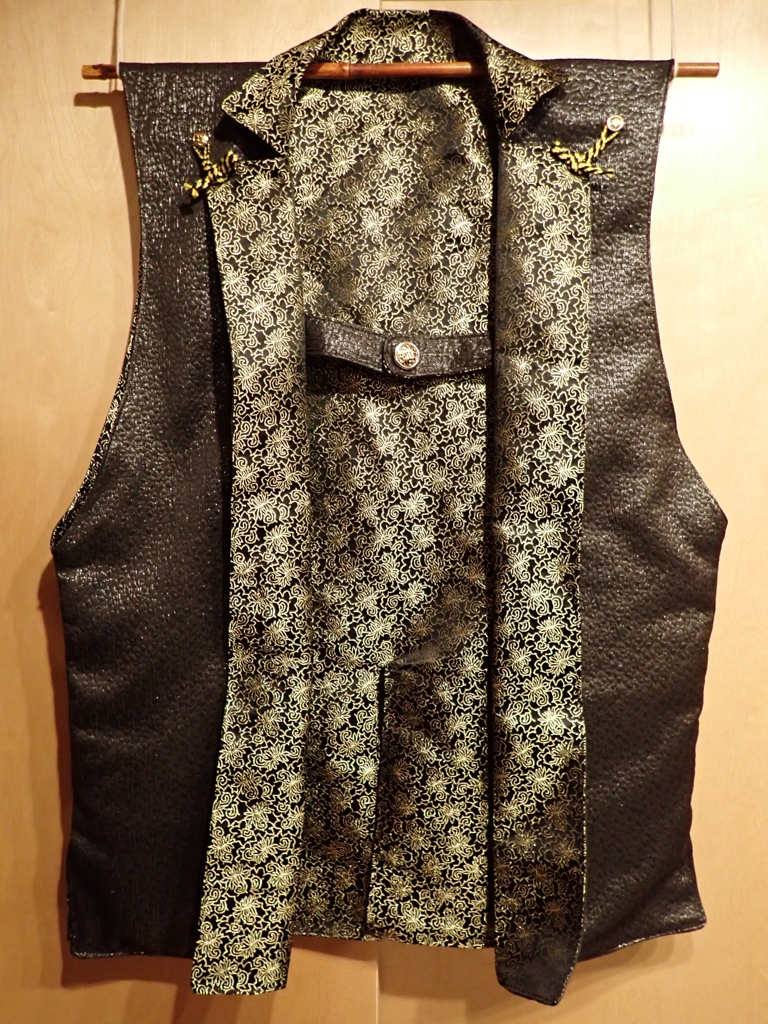
I also made the jinbaori arming jacket. Hara bought the lining, and Alime bint Yorgi found the shell fabric. We might later replace the buttons with new buttons shaped like the Mark badge.
Jinbaori Front
On the back, I embroidered a Mark badge onto some of the extra lining fabric, then turned the edges under and sewed the square down to the center of the back.
Jinbaori Back with Mark Badge
This is some of the shiniest, most extravagant garb I have ever made. It was my special pleasure to make these garments for Kuma because I was otherwise prevented from attending his elevation.
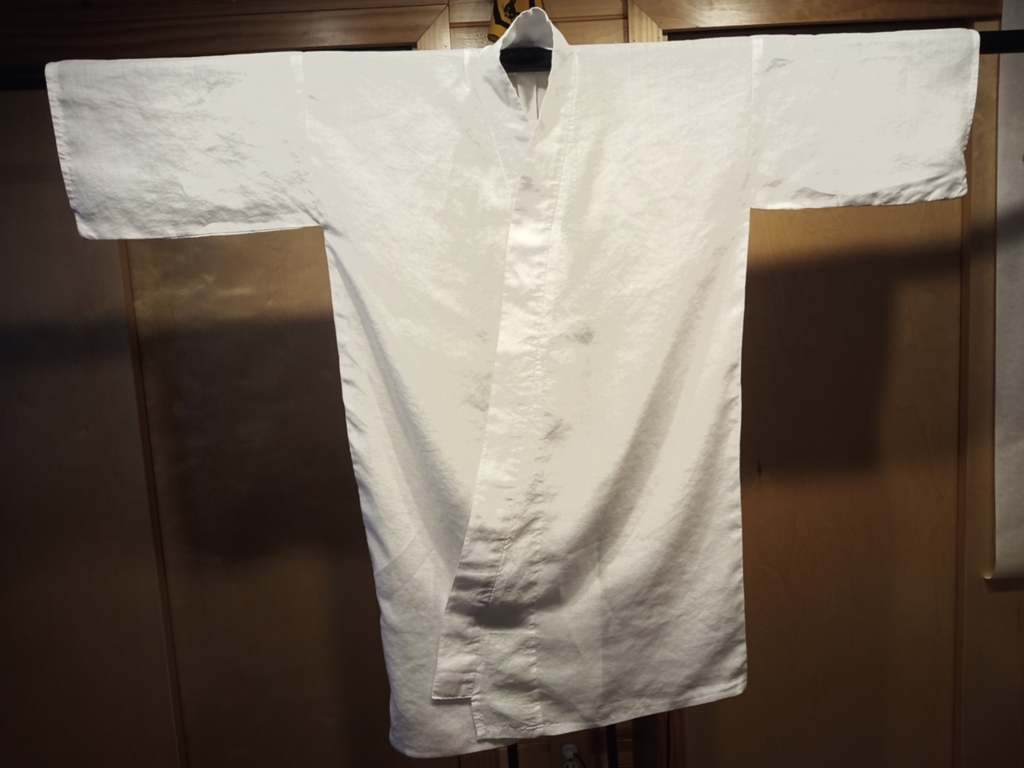
The first is another white kosode. I’m having to retire one of my old, old kosode because the cotton fabric is failing, so I need a kosode with narrow sleeves that can fit through narrow spaces in older garments. I have modified all of my older kosode to maximize the opening where the sleeve meets the body, but some of them just don’t have a lot of height to the sleeve itself.
White Kosode 2025, from Linen
I only had a few months left to make my white kosode for 2025 anyway. This one is from the nice white linen I have been buying at Pennsic for the last few years. Due to some poor planning, I was not able to use the most au courant sewing pattern for kosode. I also decided to cut the piece for the neck band a little wider than normal, so it would stay more visible when worn under other kosode. This meant that the okumi overlaps are a little small. Oh well.
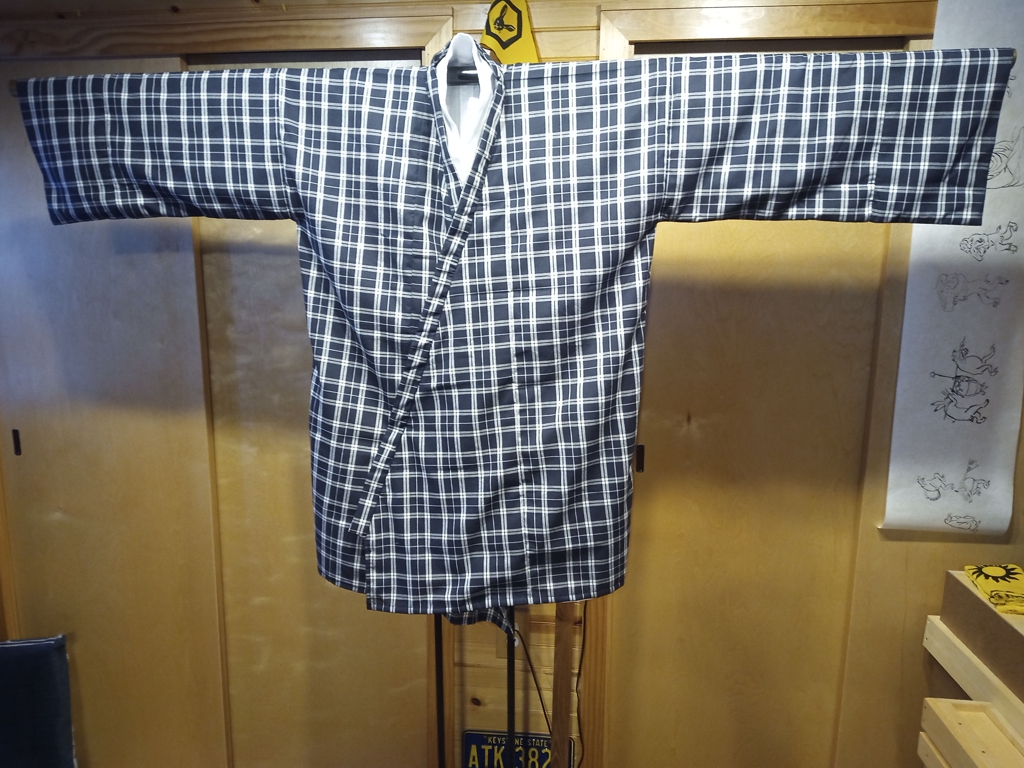
The next one is more exciting and more interesting. It’s made from a black and white linen tartan fabric I also bought at Pennsic, I think from the same merchant who sold me the linen for the recent green hakama. The pattern is woven in, not just printed on the surface. It’s very nice fabric.
The overlaps are a full panel width! They are joined at the edges of the neck opening! Neither the body panels nor the overlap panels are cut to make them narrower or angled, they are just folded! The sleeves are 1.5 panels wide, but those panels are not cut either! The sleeve ends double back on themselves to make self-facings! If you look closely, you can see I’ve done some clever things at the seams where sometimes the grid matches up and sometimes it doesn’t. I know all that sounds very technical and maybe doesn’t make sense to you, but trust me, I’m very happy with the work that went into this one.
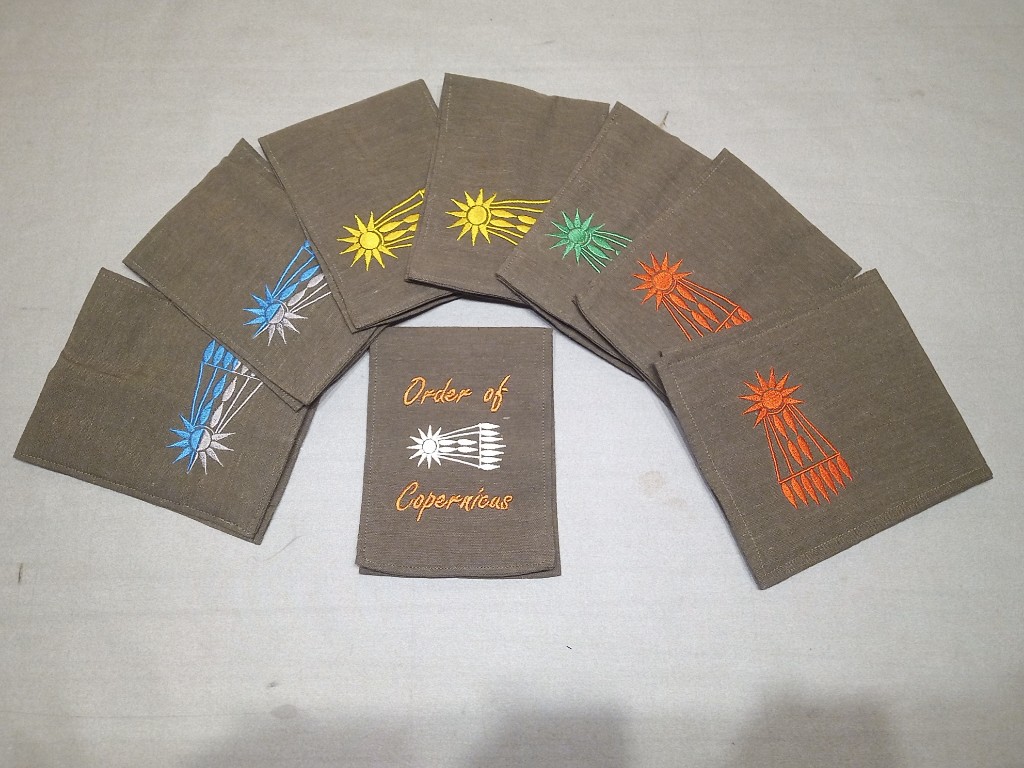
We have some big SCA events coming up in the Barony, and our Baronage loves recognizing people for their hard work by inducting them into our Baronial orders. Tradition has it that we give all inductees something they can use to display their membership in the order, and the one thing I can make most reliably is a “belt favor” machine-embroidered with the symbol of that order. Here is the most recent harvest from the fertile fields of my surplus fabric stash:
These are all made from surplus fabric green linen from my recent Basic Hakama project. The red comets are for martial activity, gold for service, blue/silver for arts & research, and green for “friend of the Barony”. The comet on the Order of Copernicus favor glows in the dark!
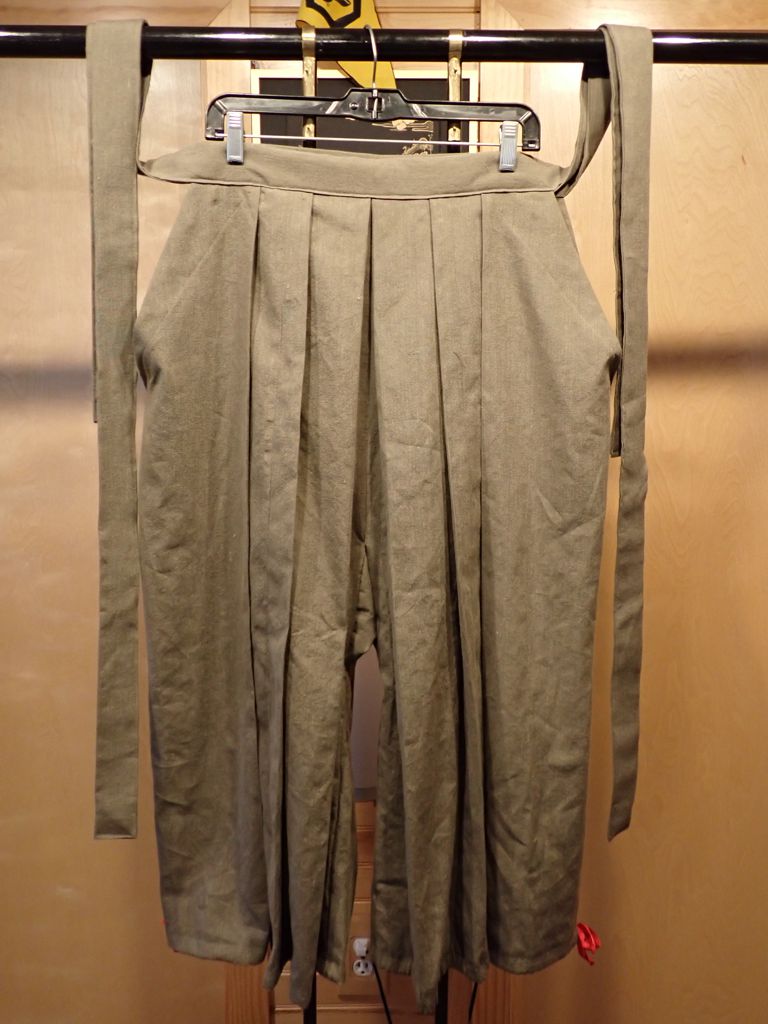
Here is a more recent project than some of the backlog docs I’ve been posting lately. This past Pennsic was the first Pennsic, after more than 25 years of going to Pennsic, that I was able to spend the full two weeks mostly on site. There is a basic pair of blue linen hakama that I rarely wear during the year that I got a lot of mileage out of at Pennsic. It’s a little more historical looking than the monpe I usually wear for informal use. So, I bought a few yards of this nice olive green linen to make another pair of basic hakama for informal wear.
Green Linen Hakama
They only have 3 panels per leg, two in front and one in back. This makes them lighter to wear and much lower class than the 4 panels per leg I normally make for semiformal wear. Each panel is about 14.5″ wide. The legs are 36″ long from waistband to hem, which is a little shorter than I normally make, and there is a drawstring through the hems so they can be drawn up just under the knee. I expect to get a lot of mileage out of these as well.
A while back, I made an early-medieval kyousoku from poplar. That one is more what comes to peoples’ minds when Japanese floor-seated armrests are considered. However, in Traditional Japanese Furniture Kazuko Koizumi mentions another kind of armrest. “A sturdier, box-shaped armrest featuring feather-stuffed pads on top and usually storage space underneath emerged,” during the Muromachi/Momoyama period.
Koizumi, page 166
During Pennsic this year, I went over to the Alben sawmill and bought some excellent maple. Ray had already run it through the planer so it was pretty smooth, but it was still almost an inch thick. I knew that because of that thickness and because of the hardness of the maple, that my ability to make things out of this maple using the small selection of hand tools I had brought to Pennsic was going to be somewhat limited. I decided I would make a siple box, and this idea quickly developed into making a box-shaped armrest. I was able to get all the pieces cut, and and most of the joinery.
Once I got home, and had access to more tools and a sewing machine, I was able to finish shaping the pieces and assemble the armrest. I made a custom cushion out of cotton canvas and polyfill, and used to to upholster the lid of the box. I used copper nails to secure the joinery so it should be quite sturdy. given the density of the wood and its thickness, this completed box weighs more than ten pounds.
The inside of the box is roughly twelve inches by six inches, and four inches deep below the inner lid. I think it’s a bit smaller than the one in the image, but it’s a comfortable armrest when seated on the floor next to it, and I can fit a bowl and cup inside it.
It is not a comfortable seat, although you could probably park a midsize car on it.
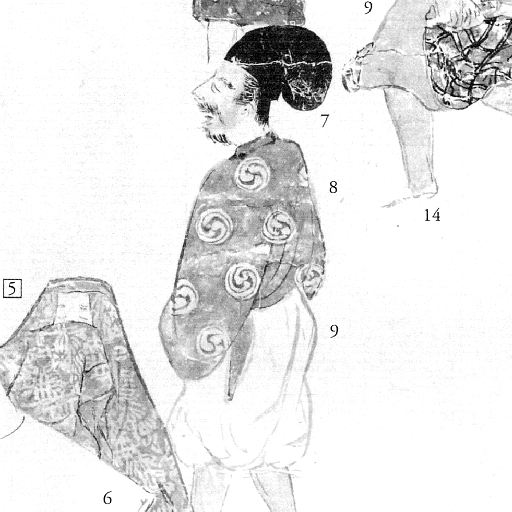
I have made dozens of eboshi over the years, both for myself and other people. One thing has always kind of bothered me about my eboshi, though. I tend to put a white headband on my eboshi because it is mostly what people are expecting, but many of the eboshi you see in historical illustrations do not have these white bands. Here, for instance, is an illustration from the Kitano Tenjin Engiemaki:
#7 indicates nae-eboshi
I picked this illustration because it is a fairly accurate portrait of me. You can see that the nae-eboshi in that image does not have a white band, but is all black. Quite simple to make a couple of eboshi using black fabric for the band instead of white.
Black Band Nae-eboshi
You will probably notice that the eboshi in the illustration is less pointy at the top than mine, and also does not have the long fabric ties that hang down in the back. I have some theories about that, but one change at a time, folks.
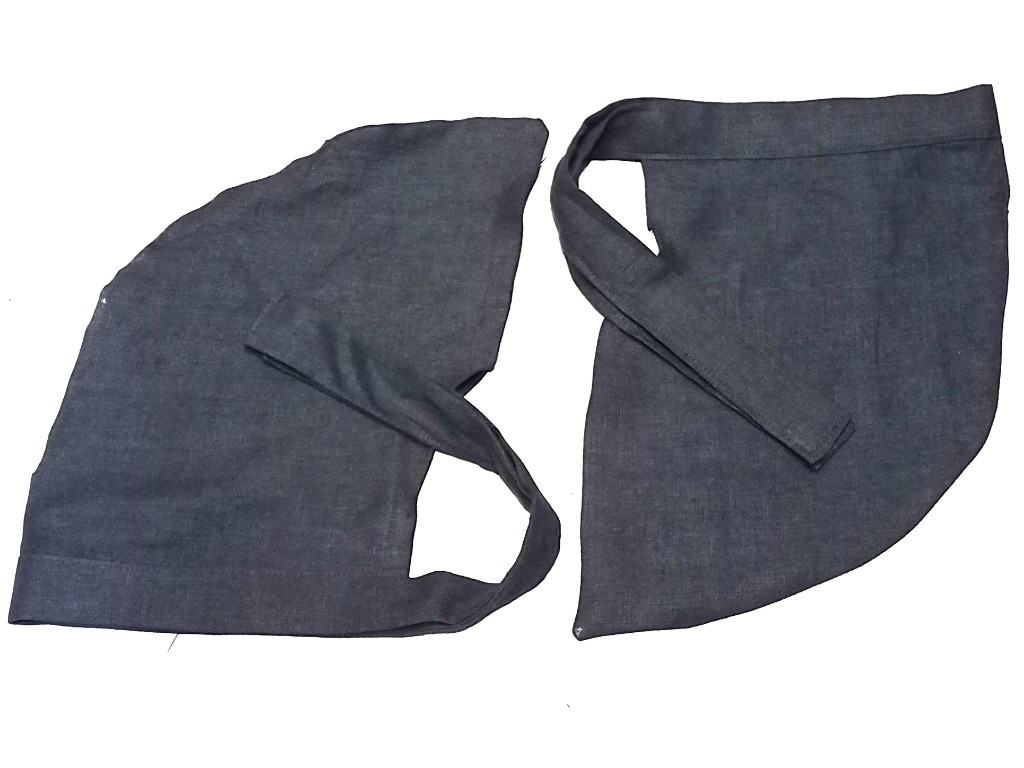
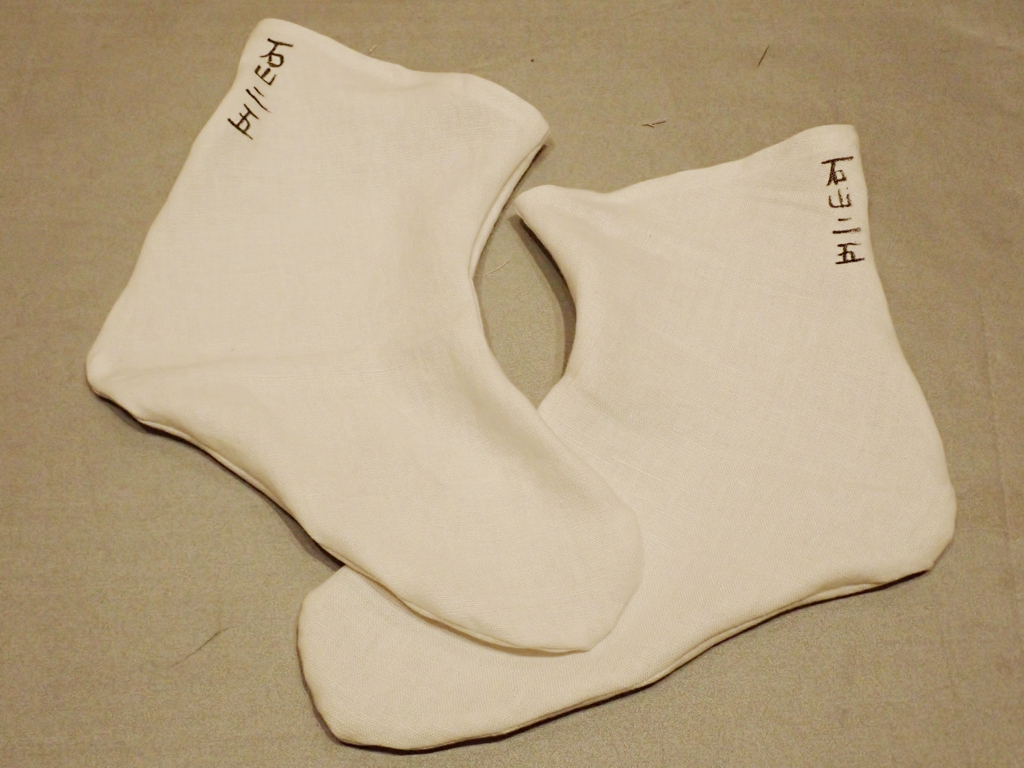
The next step in the long running Bunkan Sokutai Sugata project, I’m working my way down to the feet. When wearing the sokutai, asagutsu shoes (really more like clogs) protect the feet from the ground, and shitozu socks protect the feet from the asagutsu (or is it the other way around?). Apparently, they pre-date the split-toe and the idea that walking on a seam all day will cause blisters.
Shitozu in Linen
Mine are based on this one in the Shoso-in Imperial Treasure Repository:
Sock of bast-fiber cloth, No. 53.
I traced the photo in a drawing package, scaled it up to the size of my foot, printed the pattern, cut two pieces from surplus cotton canvas, sewed them together, everted the sock, and tried it on. Too tight. Modify the pattern a bit and iterate. Still too tight. Iterate. Success! That was actually pretty rapid for this kind of thing.
Now that I had a working pattern, it was time to cut four pieces and make the final copy out of white linen. A couple of cuff hems, and some decoration with a fabric marker, and they are ready to wear once I finally make the asagutsu. According to the Shoso-in site, the original bears the seal of “Tōji-kōin”, and if you visit the page to view the back there appears to be writing up near the cuff. It’s probably something like “worn on the occasion of his birthday” or something. I wrote “Ishiyama 2 5” on mine. If I ever make a real seal I’ll stamp them.
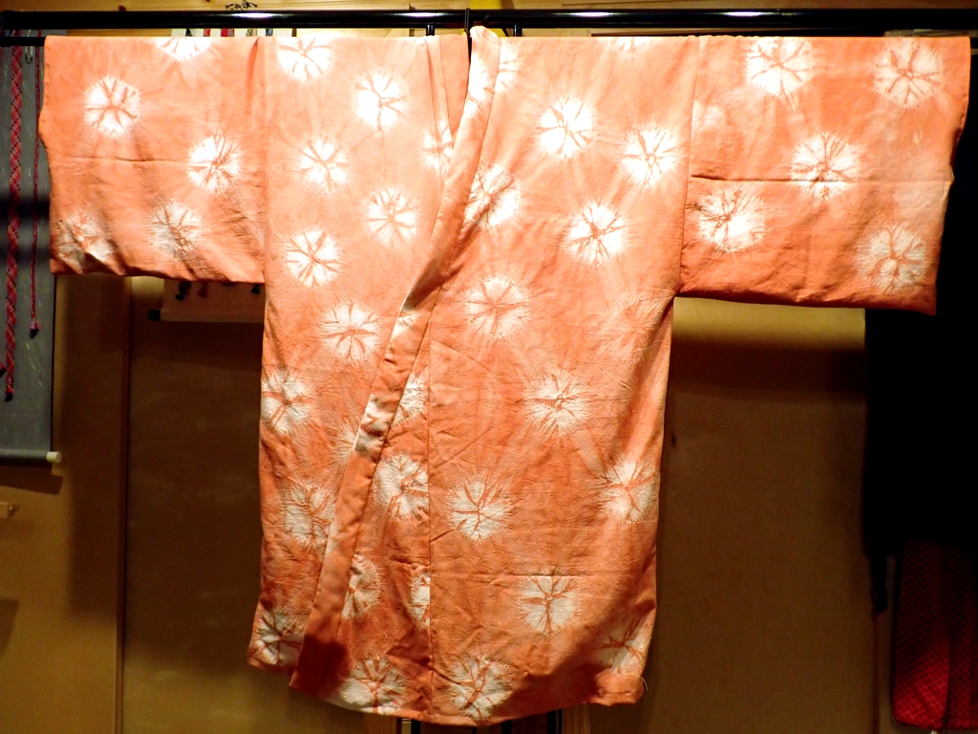
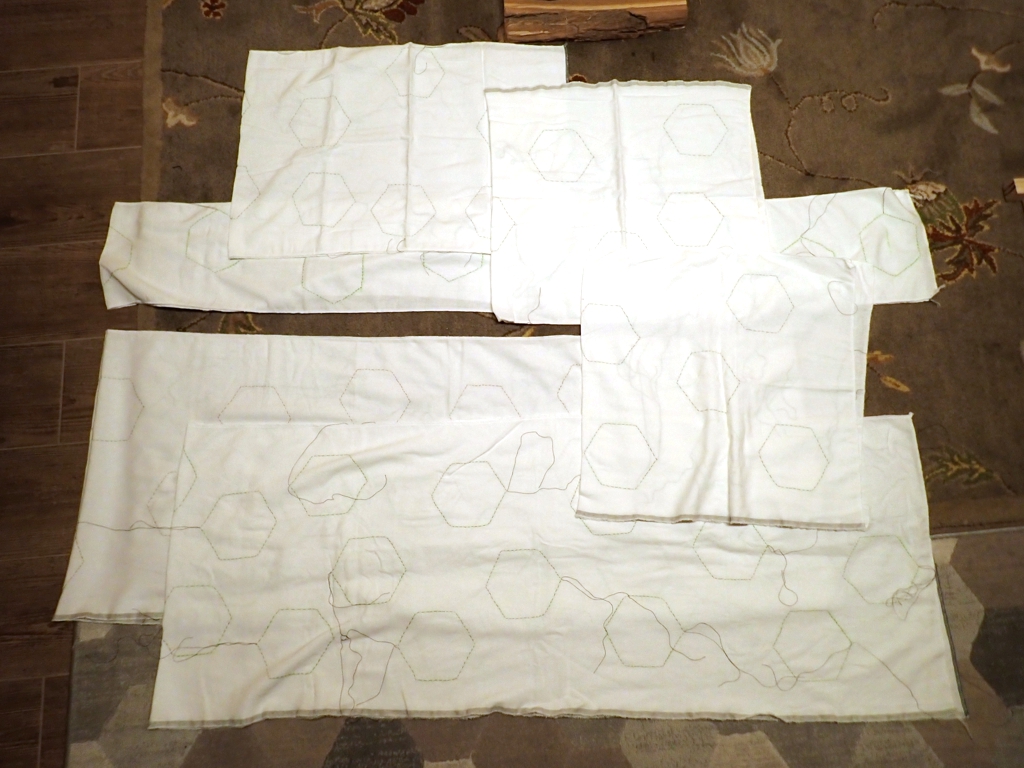
This kosode is made of linen that has been hand-dyed in madder, using a stitched-resist shibori technique to create hexagonal patterns in the fabric. From purchase of fabric to completion of garment took more than a year, though obviously I did not work on it constantly for all of that time.
Red Hexagon Shibori Kosode, from Linen
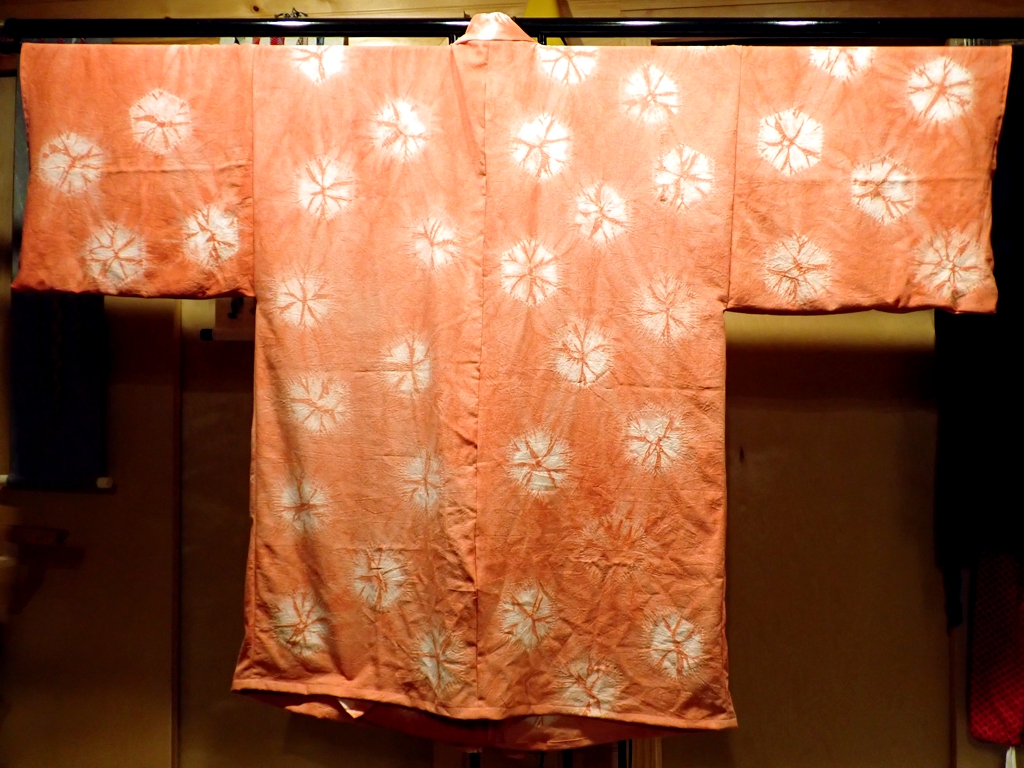
Back of the Red Hexagon Shibori Kosode
I started by purchasing some soft white linen from a merchant at Pennsic. This soft linen uses shorter fibers, which means it will not last as long, but I like the texture and have found that it works very well for shibori dyeing. I then cut all my pieces and serged the raw edges to create false selvedges and to keep the cut ends from fraying during the rest of the process. This was the easy part.
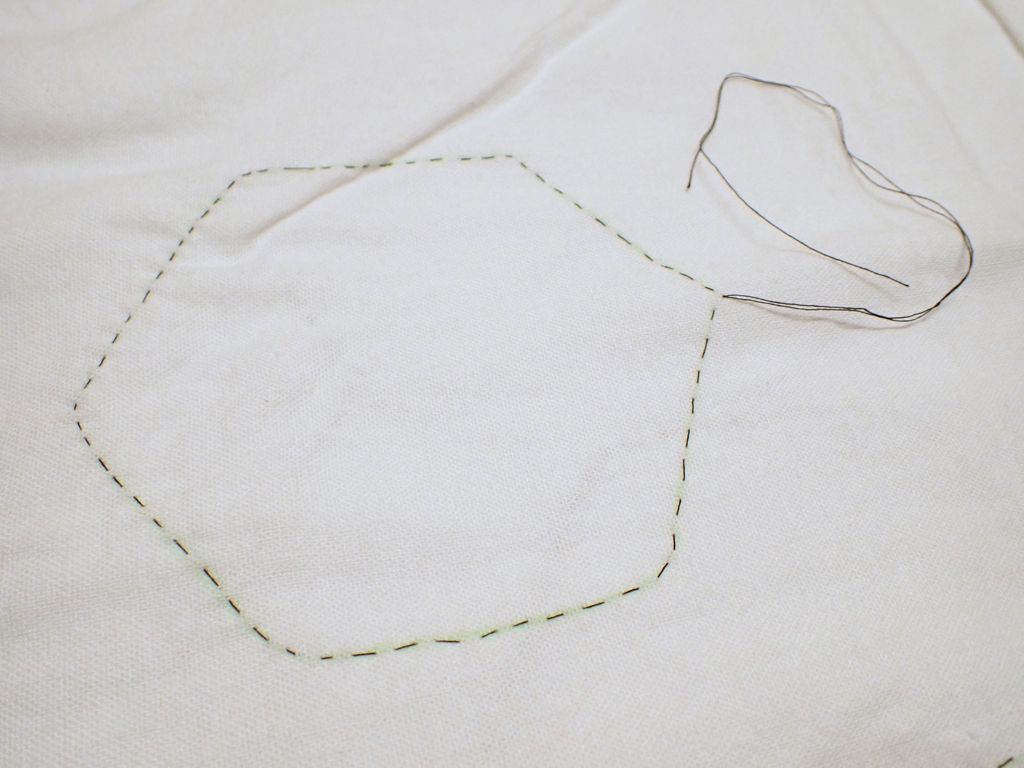
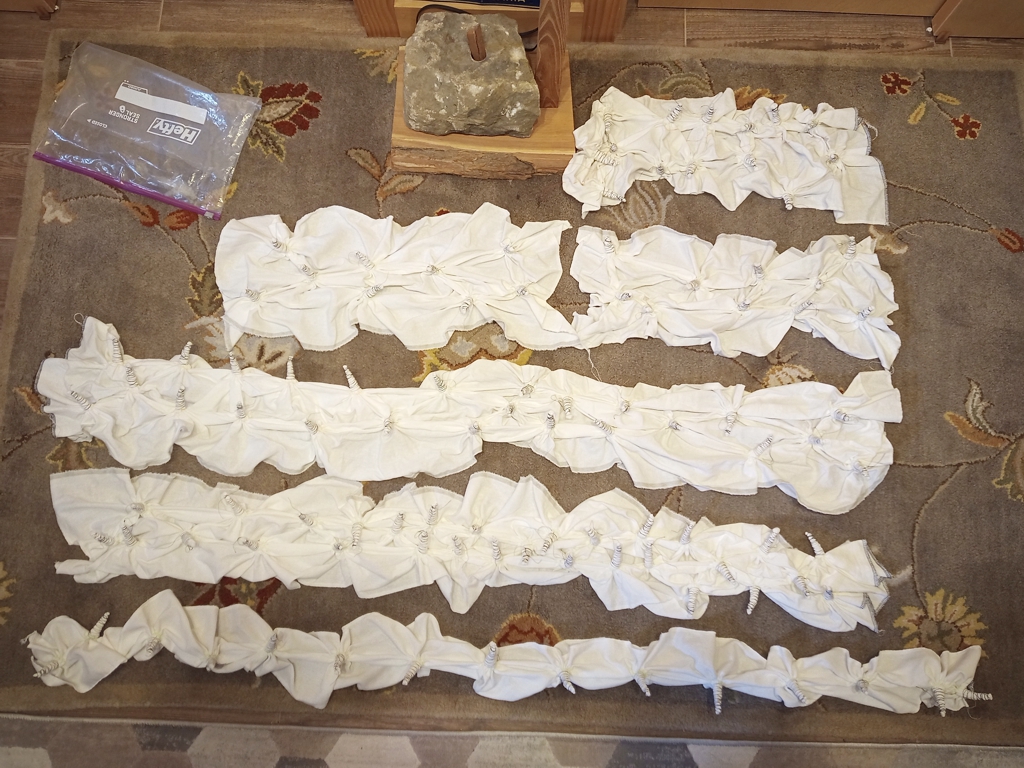
Then, I started adding my hexagonal resists. The process for this was to trace a pattern hexagon with chalk, then hand sew a running stitch around the chalk using about three times as much thread as needed. Once all of the pieces were stitched, the hexagonal stitches were then drawn up, and the ‘extra’ thread was wrapped around the small bundle of fabric this creates. I stitched, drew-up, and tied 103 separate hexagons. You can see in the above photos two places where the stitching broke or the binding came loose during the dyeing process. Such is life.
One Stitched Hexagon
103 Stitched Hexagons
103 Bound Hexagons
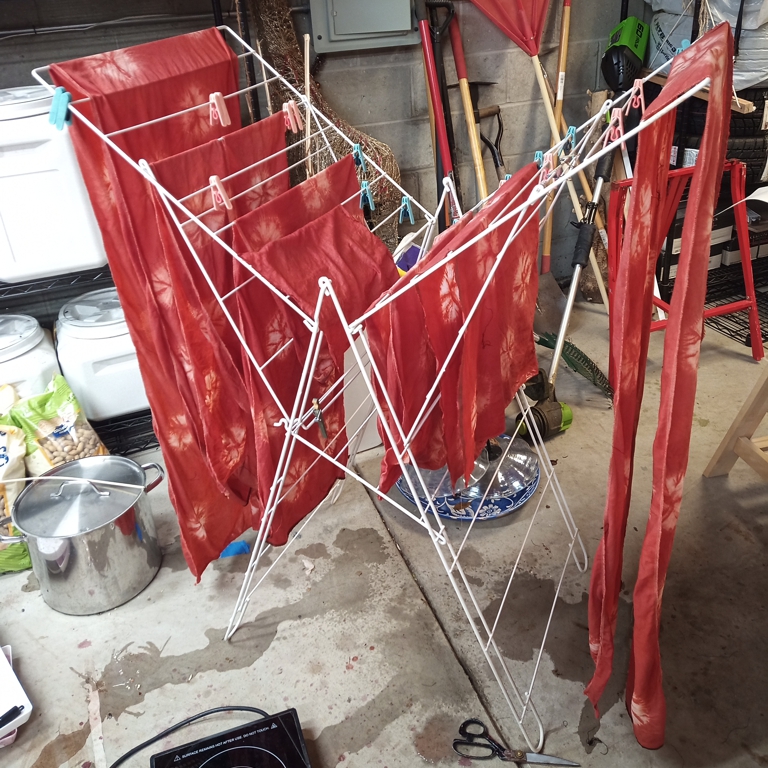
The next step was dyeing. My friend Rei kindly offered her assistance and the use of her dyeing studio full of equipment. I bought my own madder powder, and reimbursed her for the (considerable) cost of mordants and other chemicals. It took a full day in the studio (~10am to ~6pm) to prepare the dye baths (I used 4 pounds of madder powder for 2 pounds of fabric, plus a little alizarin to boost the red), stimulant bath, and mordant bath, soak the fabric in the baths, and undo all of the stitching so that the fabric could dry overnight. This process would not have been possible without Rei’s knowledge, amassed references, equipment, and time. Thanks Rei!
Dyed Fabric Drying on the Rack
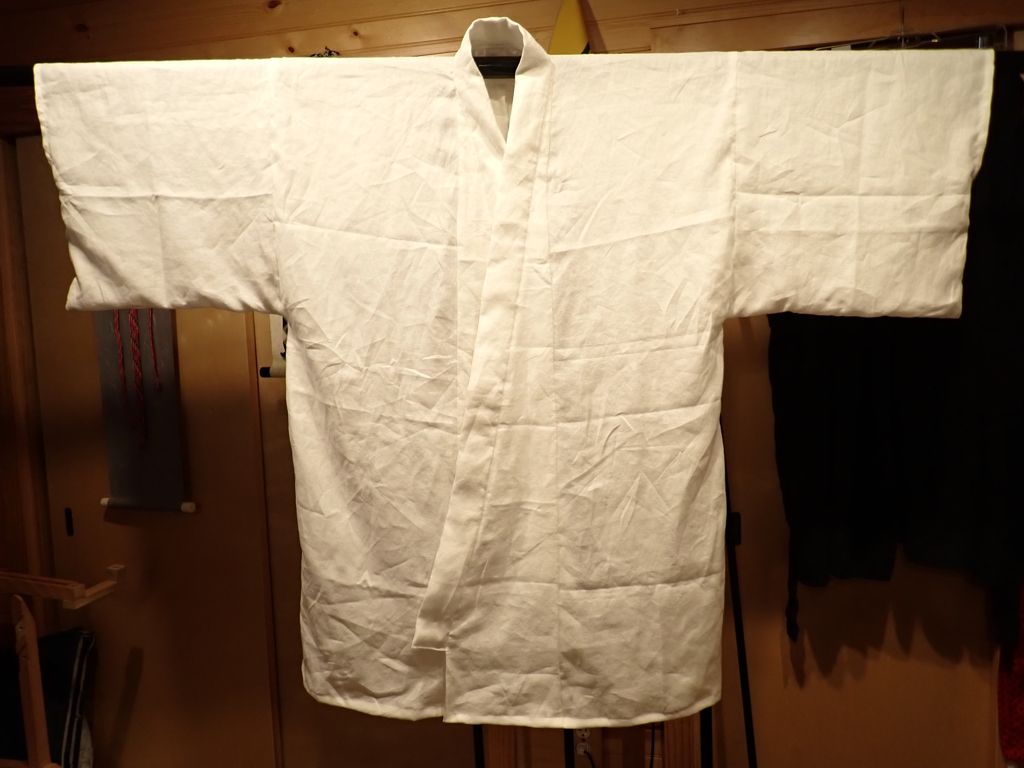
Once dry, I laundered and ironed all the pieces, then sewed it into a kosode. It is large, and kind of heavy actually. After washing, the hexagons became even more defined, and the color gradations across the fabric from all the wrinkling and folding caused by the bound hexagons give it an interesting visual texture. I’m very happy how this all came out. Every bit of money and time I spent on this project has been worth it to me.
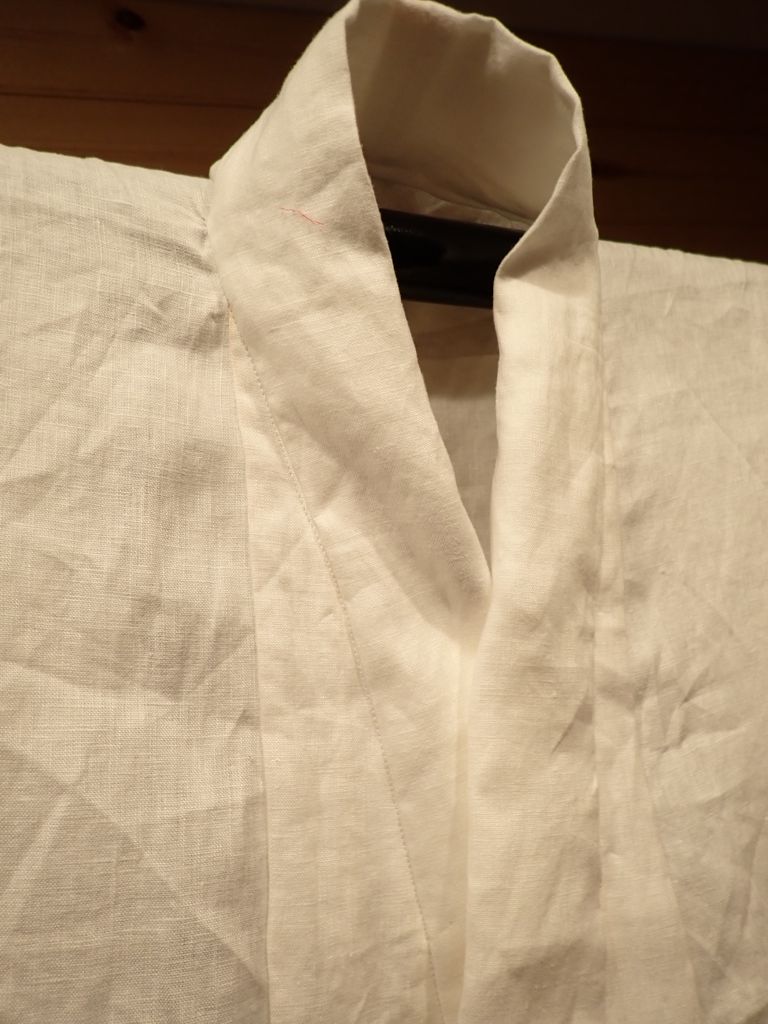
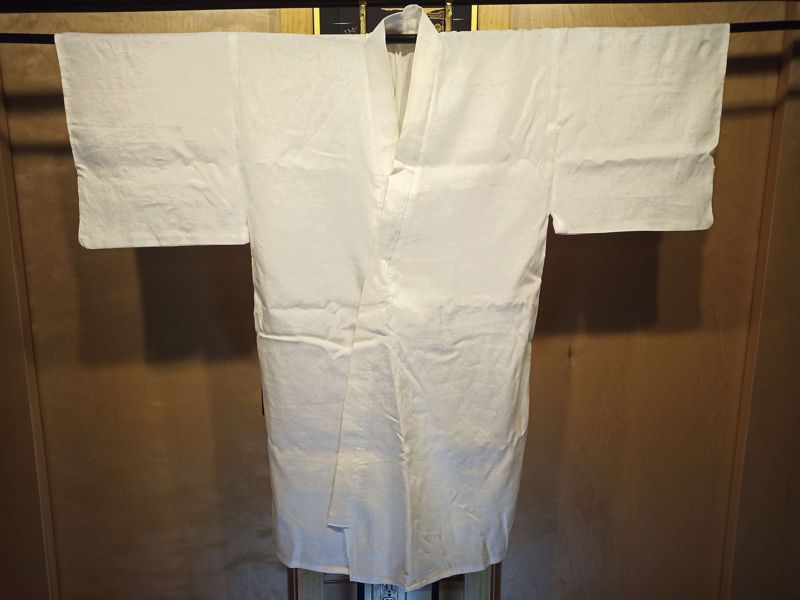
Managed to squeak this one in near the end of the year, but well within 2024. This year’s white kosode is made of some very nice linen that I bought at Pennsic from a vendor who specializes in fabric for historical reproduction. This linen is heavy, smooth, and luxurious. There are some changes in the pattern based on some more recent research that people in the SCA have done over the past few years. Most of the differences are in the overlaps and collar area.
White Kosode from Linen, 2024 edition
The learned can see the difference
Don’t worry, it’s looks better now that it has been laundered and ironed. I’m quite happy with the way this turned out. It does mean that I now have 14 white kosode. This is not only two full weeks worth of kosode, but the shelf where I keep my folded kosode is basically full. Most probably next year I will put one of my old cotton kosode into the garb swap to make room.
With the Pandemic lightening up enough for the SCA to start having regular events once again, I decided to restart some of my garb-making activities. The last new white under-kosode I made was way back in 2020. Anyway, I finished this kosode back in mid-December. It is entirely white linen, some very nice white linen I purchased at Pennsic 50.
Kosode from white linen
There’s nothing much special to this kosode, other than it conforms a little better to what we now think a kosode should be. The sleeves are almost entirely attached to the body. The overlaps are still “old-style”, but I’ll work on that for the next one.


