I was in the fabric store that shall not be named a couple of weeks ago, and they were having a sale on all cotton prints. Their selection of Japanese prints was pretty bad, so I bought a cute bunny rabbit print from the “Easter” colection, to make a new pair of pajamas.
Me wearing the pajamas
There’s no crosses or anything, just white bunnies cavorting on a pastel purple background. Very cute, and the cotton fabric is lightweight and good for summer wear.
Bunny Pajama Shirt
I used my favorite pajama pattern, since I know that I like the fit. I think I did a better job of placing the shirt pocket on this iteration than I did on the natural shop coat, and the collar attachment was quite smooth.
Bunny Pajama Pants
I greatly simplified the pants, though. I left out the false fly, which is a nice accent, but serves no functional purpose. I also left out the pockets, which are nice to have sometimes, but rarely used and not worth the added bulk and trouble in my experience. I also did a drawstring waist instead of an elastic waist, but I usually do that.
This project took me about two days worth of work. I’m very happy that this kind of thing is a weekend project for me now.
Not so much lately, given the extreme heat we’ve been having, but for much of the Spring I found my blue shop coat to be extraordinarily handy. I’m the kind of person who won’t really leave the house without a jacket or coat of some kind, so a mid-weight, durable chore coat was nice to have. If I’d worn it recently for actual woodworking, it was probably too dusty to wear out in public, though.
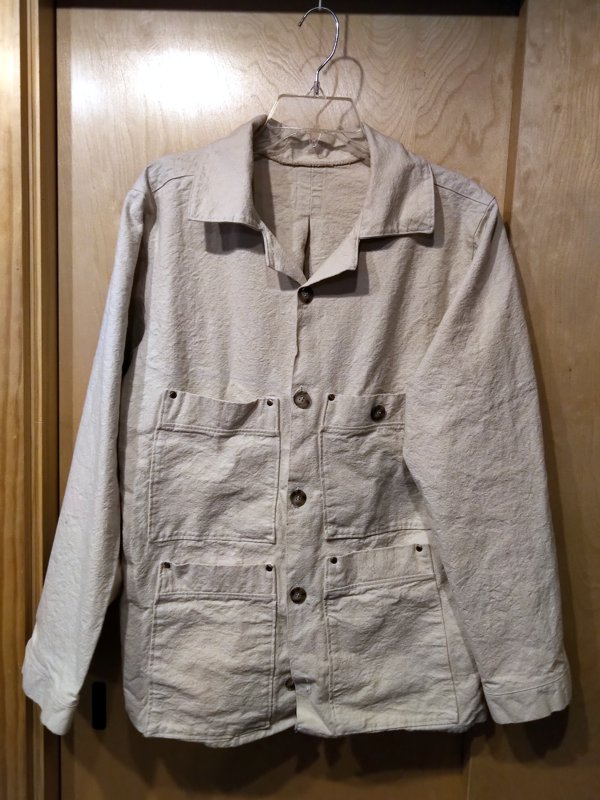
I thought it would be handy to have a second shop coat, but I didn’t like any of the other colors of cotton duck cloth that the store had in stock. Blue is a good neutral color, but I didn’t want another blue one, and black is really not my style. I decided to use this “natural” duck cloth.
Shop Coat in Natural Cotton Duck
Sharon points out that the unbleached “natural” color will probably hide sawdust very well. It sure does get wrinkly in the wash, though. That “crumpled paper bag” texture you can see in the photo is not exaggerated by the lighting; that’s what it really looks like.
Also, for some reason I wound up attaching the pockets really low on this one. The upper pockets on the blue coat are up near the first button, but there are down at the second button, about 5 inches lower. The pockets are also larger on this one, so it gives the coat a bottom-heavy appearance. It’s far too late to worry about it now, though. Maybe I will add a pocket or two higher up, or some decorative embroidery.
I also added a button to the left breast pocket. I found that it was very tempting to put my phone in that pocket, but on the blue coat there was always a risk that the phone could slip out and be damaged on the shop floor (like my last two phones were). I should really add a flap or something to the blue coat’s breast pocket.
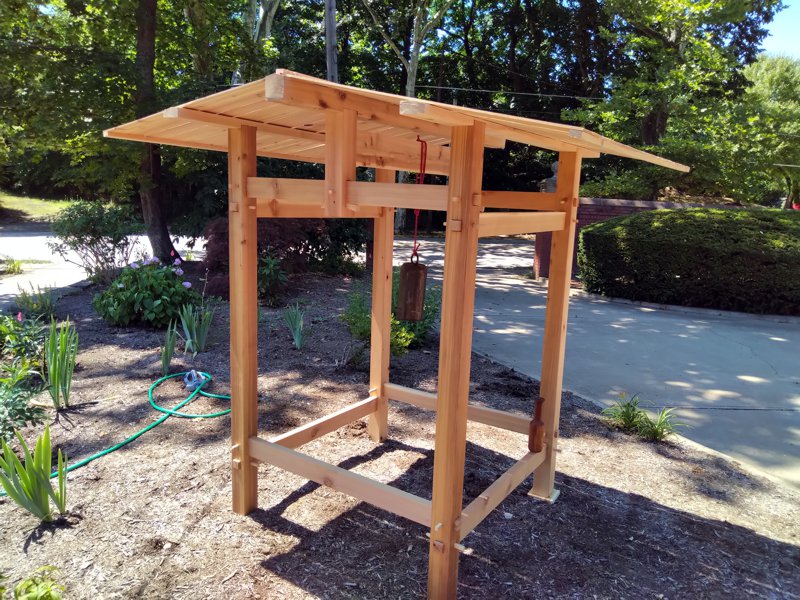
Sharon bought this bell maybe ten years ago up at Pennsic. It was in the basement at the old house, then it was in the garage here at the new house. I have planned, for all this time, to build an enclosure in which to hang this bell, to give Sharon’s garden a Japanese accent piece. Well here it is.
Bell Tower
This belfry, or shourou, is made entirely of cedar, except for the pegs and wedges, which are cypress. The vertical posts are 4-by-4. Cutting all those through-mortises in 4×4 was no picnic, let me tell you. The cross-braces are all 2-by-4. Cutting the large tenons and small securing mortises on those was fun by comparison. The roof is all quarter-inch by 4, which I made by re-sawing 1×4 on the band saw, and then planing it down to remove the saw marks. In spite of the power tools, this was ten 1x4s, and quite a bit of work.
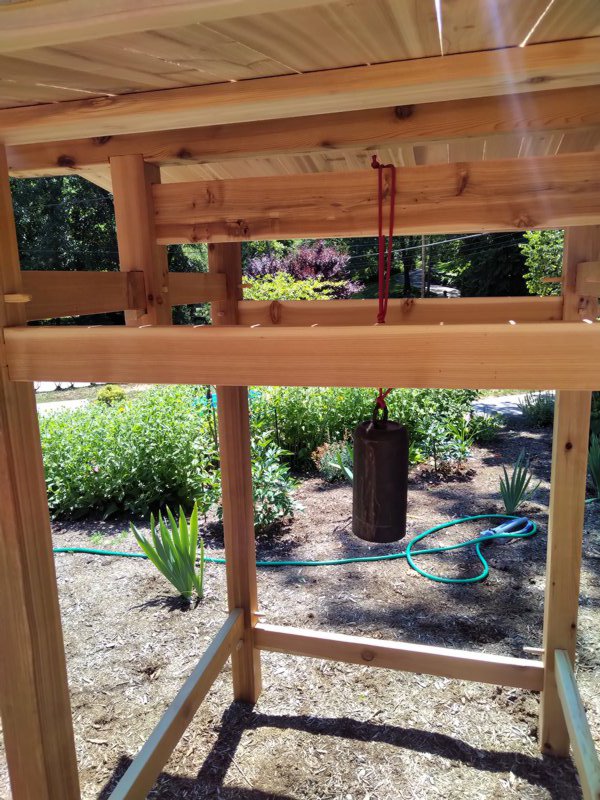
The corner posts are six feet tall, so this is a human-scale project. There’s a ranma panel between the center roof supports that’s made from a single panel of 1-by-6. The bell hangs from this.You can see a cherry-wood mallet sitting on one of the lower cross beams, for striking the bell. The bell is made from a an old SCUBA tank. It has a pleasing sound.
I put about six days of work into this, if you don’t count the trip up to Mars Lumber to buy the cedar. I could pretty much only cut one of the vertical posts per day. I drilled out the mortise holes, the chiselled the corners out of the holes to make square mortises. To keep them square with the faces, I marked both ends of the mortises and went in from both sides to the center. This means that cutting the four large mortises and four small mortises was like cutting 16 mortises on every post. So, one per day. I would only re-saw a few of the 1x4s and cut a few 2x4s each day, too. Spreading out the work made for more variety each day, which was necessary given that I was working out in the garage in 90 degree heat.
When enough pieces were ready, I started assembling the structure. The tenons on the end of the 2x4s were pretty tight in the mortises, and the pegs to secure them had to be hammered in to tighten the joints. once I had the frame assembled, I set it up in the garden and cut the three roof beams. These have notches cut in them to hold them on the posts, and there are hidden construction screws to secure them. I could have gotten fancier with the joinery here, but I did not.
Once all the roof pieces were sawn, planed, and cut to length, it was time to make a roof. The roof pieces are all nailed in place with brads from a nail gun. Strips under the edges of the roof keep the ends of the pieces together, and a cap rail on top secures the top ends of the roof pieces. It’s not waterproof, but it does not need to be.
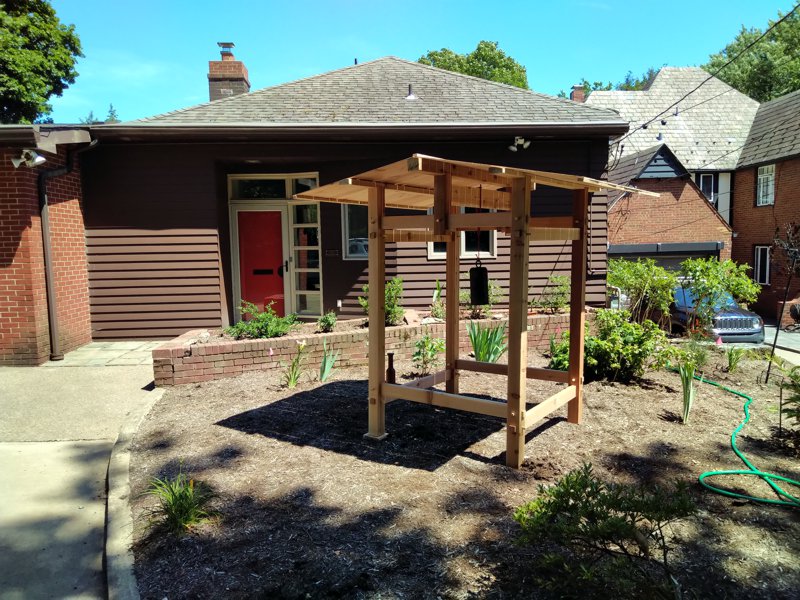
I’m really happy with the way this project came out. It’s big, but not too big, and very solid. The thin roof provides shade, but doesn’t make the structure too top-heavy. The bell looks great hanging there, and sounds terrific when you strike it. Lamost all of the project went according to plan, so if I need a similar structure someplace else, I know that I can make all the pieces and then construct it on-site with minimal fuss. My ultimate goal is to build a small Japanese-style house on a trailer for camping at Pennsic. This is a good step in that direction.
Two of the 16 pegged corner joints
The center support is pegged to secure it, then wedged to keep it tight and square.
The ranma panel is just inserted into mortises in the center supports.
So what did the little collection of tools on a stool look like at the end of the project?
Bit of a mess
You can see I’ve added a sashigane, a larger ruler, a socket awl and a drilling block. The awl is useful for making a hole where the brad point of a drill bit can go to keep the bit from skating around as the hole gets started. The block keeps the drill bit perpendicular to the surface of the wood as the hole is drilled. The other black plastic thing is a right-angle block.
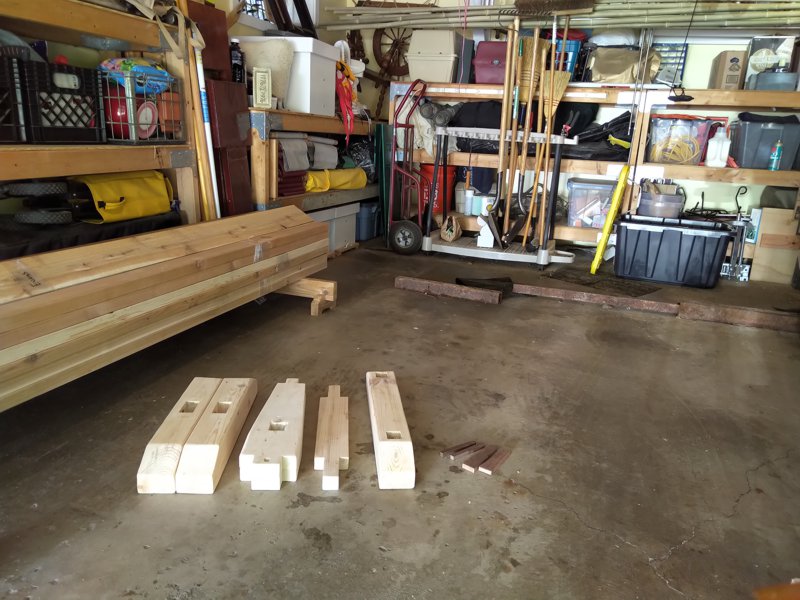
I realized that it might be a little mysterious how those sawhorses I made actually fit together. Here are some assembly instructions.
1) Collect the pieces
You’re going to need two feet, two legs, one stretcher, one top, two pegs, and two wedges. The legs have a wide end and a narrow end. The feet have one mortise in their top sides. The top has two mortises in its underside. you’re also going to need a small hammer or mallet.
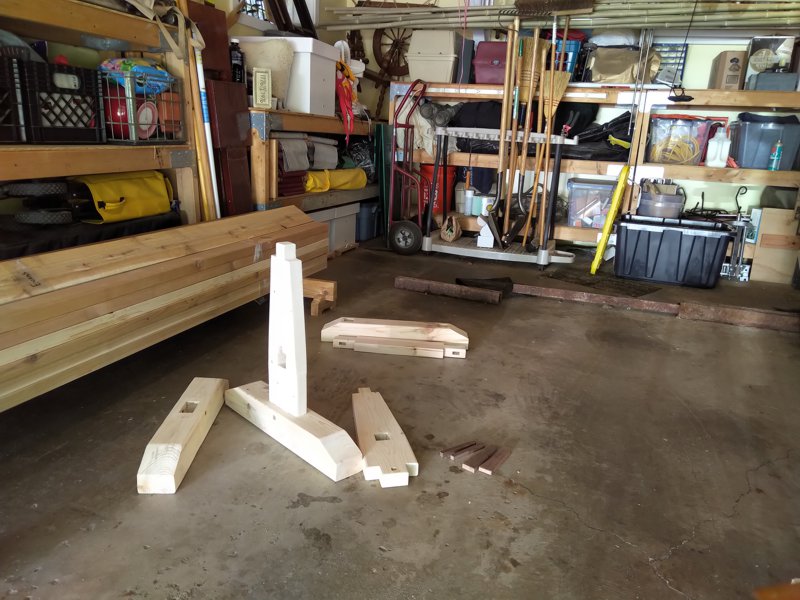
2) The foot bone is connected to the leg bone
Insert the wide tenon of one leg into the mortise in the top side of one foot. It is very tempting to hammer the top of the narrow tenon, but this may mash it making ti difficult to insert later, so resist the urge.
3) Add ye peg
Use the mallet to hammer a peg all the way through the sideways through-mortise in the foot. These are designed to be drawbores, which means that the mortise in the leg does not line up perfectly with the mortises in the foot. This makes it more difficult to hammer in the peg, but as you do so it draws the joint tighter.
4) Play it again
Repeat those steps to assemble a second leg/foot combo.
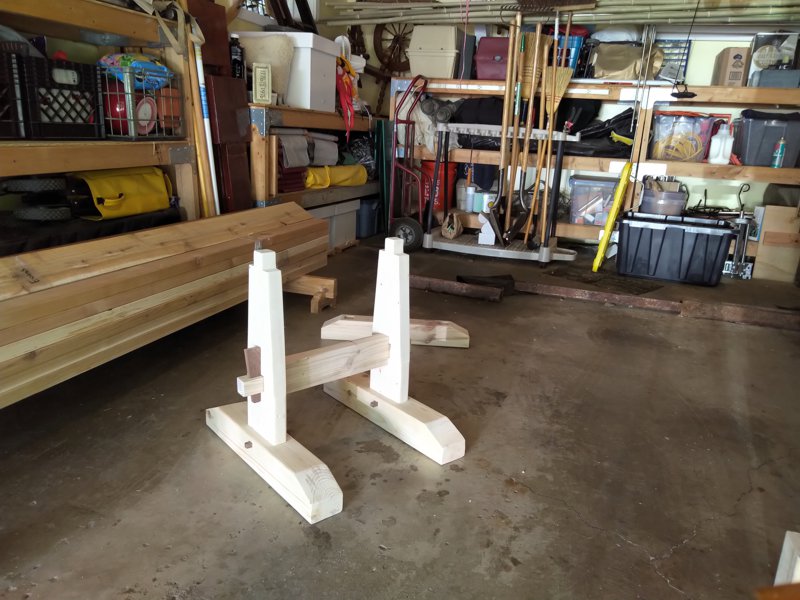
5) Add stretcher between legs
Insert the stretcher between the two legs, sliding the tenon at each end of the stretcher entirely through the sideways mortise in each leg. Note that the wide dimension of the 2×4 is vertical. The mortises and tenons are square, so make sure the stretcher isn’t sideways.There’s no “inside” or “outside” to the legs, so whichever way fits better, just go with it.
6) Wedge the stretcher
Insert a wedge into the through mortises that run vertically through the tenons at each end of the stretcher. Hammer these nice and snug, or the resulting horse will be wobbly.
7) Add the top
Slide the top down onto the tenons at the narrow ends of the legs.There should be enough tension in the assembly to hold the top firmly in place once the horse is assembled. If there is too much tension, and the top just won’t go on, remove the wedges to release the tension, add the top, then replace the wedges.
Ta-da! Now do it three more times. You made four, correct?
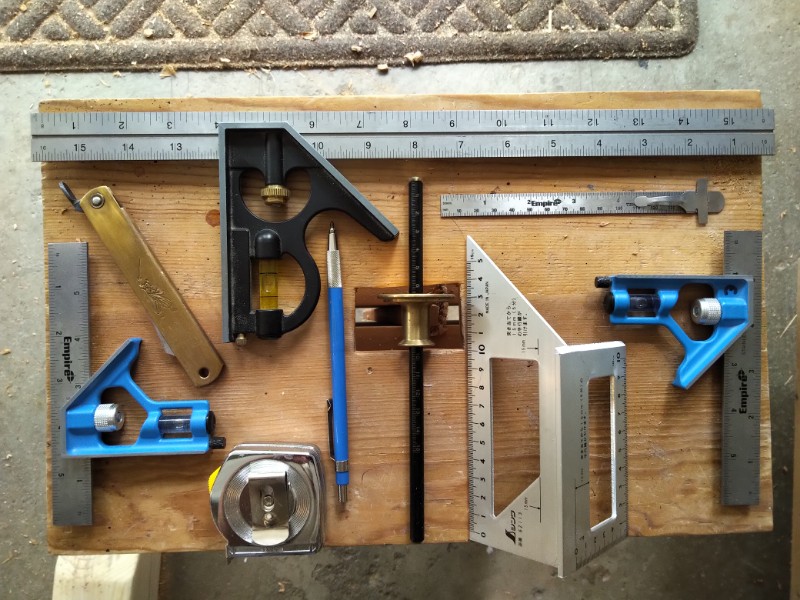
I’ve been working on a new large carpentry project, and it involves a bunch of joinery that for some reason I have decided to cut by hand. Everything needs to be measured out and marked, regardless of hand or machine cut, since I almost never trust jigs or templates for this kind of thing. Here’s the kit of measuring and marking tools I have assembled for this particular project.
Tools
So yes, there are three adjustable squares here, so that I don’t have to keep setting and re-setting them for the different lengths I need. The tool right in the middle is called a wheel gauge. You set the length you want, run the large brass bit against the edge of the board, and the little metal wheel at the end cuts a groove in the wood. I do have a Japanese kebiki gauge, but I have a difficult time getting accurate distances with it. The larger aluminum tool next to the wheel gauge is a modern Japanese marking square that is awesome because the large sides let you mark around the corners of lumber, so it’s easier to get straight cuts on 2x4s and other similar pieces. The small metal ruler is very useful for drawing lines between marks, and inserting into small holes as a depth gauge. I mostly mark things out in pencil using the blue 2mm drafting lead holder. but the pocket knife in the upper left is helpful for cutting a groove to start saw cuts, particularly on rip cuts.
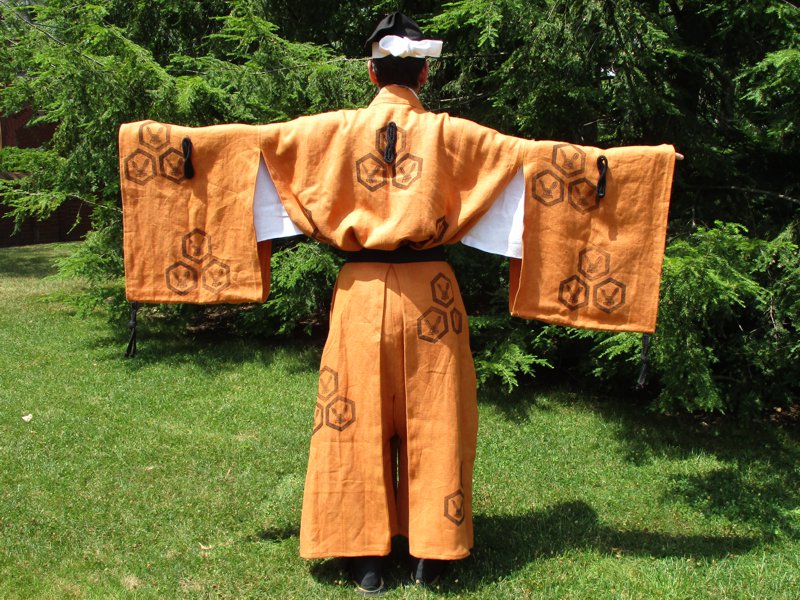
I sewed the Daimon Hitatare Sugata some time ago, and added some kotsuyu embellishments and munahimo some weeks ago, but only got around to taking new pictures recently.
Completed Daimon Hitatare
Daimon From the Back
While the scroll I based this outfit on does not show these cords, I feel they are necessary. I am guessing that the scroll does not show them because the warrior in the image was not rich enough to afford them.
Some years ago, I made a pair of low Japanese sawhorses for my workshop. They’ve been great, and very useful (mostly for keeping lumber off the floor in the garage), but it was time to take the next step up. My rickety western sawhorses spend most of their time sitting outside in the rain and snow, so they are not in very good shape. A set of mid-height Japanese sawhorses would be nice to have, because they are designed to break down into pieces for transport and storage.
Sawhorses Four
These sawhorses are about 24 inches tall, 24 inches long, and 22 inches wide at the feet. This height is just short enough that I can put my knee on a board to hold it while sawing, but tall enough that I don’t need to worry about scraping my saw along the ground. All the joinery is mortise and tenon, and there is no metal hardware in anything.
They are made almost entirely from pine. Given their modest stature, I could cut all four horses from three 4×4’s, two 2×6’s, and one 2×4. This means that there is only about forty dollars of material in the whole set. The pegs that secure the feet to the legs and the wedges that secure the legs to the stretchers are made from some surplus walnut I had in the shop. It’s always best to make the fasteners from wood that’s harder than the wood it is securing, but maybe walnut was an extravagant choice.
I wanted to make these from cedar instead of pine, but it turns out that these days cedar is five times as expensive as pine. It used to be only twice as expensive as pine. My next big woodworking project is going to cost me $500 instead of $100 for the lumber alone. Gasp.
I cut all the pieces to length by hand, but I used the mortising machine to cut nearly all of the mortises, and the band saw to cut nearly all of the tenons. I smoothed the walnut fasteners with a hand plane, though. After completing all of the shaping and joining, it took me about three hours with the orbital sander to clean everything up and remove most of the saw marks.
When taken apart, I can fit all the pieces for three horses into a single large (27 gallon) storage tote. This means that in the winter I can put the horses away in the garden shed instead of having them sit outside like the old ones.
The tachi is a type of Japanese sword that is similar to a katana, but it is worn differently, has different fittings, and is usually used as a more of a formal/ceremonial sword compared to a warrior’s katana. I bought a small tachi as part of my mission to recreate a full bunkan sokutai.
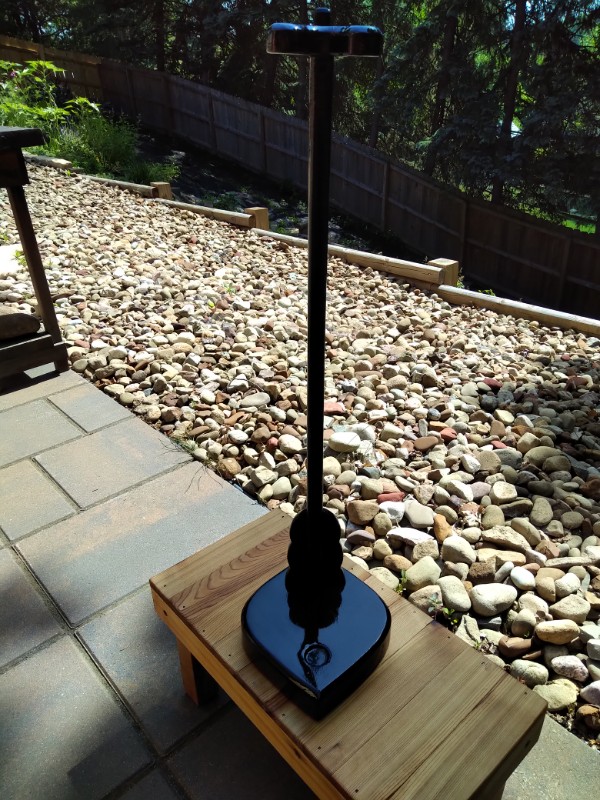
When not in being worn or in storage, the tachi would have been displayed nearby the bearer in a vertical stand called a tachi kake. These are readily available to buy, both as new items and antiques, but of course I wanted to make one myself. I was able to settle on a design, and I still have an excess of surplus wood in the garage.
Tachi Kake Before Finishing
Here’s what it looks like after cutting and shaping, but before finishing. It’s a little easier to see the shapes of the pieces. This is all pine lumber. The upright and the bracket at the top are just 3/4″ thick cut from 1by. The brace at the bottom of the upright is 1/2″ thick pine I had around; most of the examples I see online are only 1/4″ thick. The base is cut from some surplus 2by, to keep it bottom-heavy when unoccupied. The brace is fitted in a slot that I cut all the way through the upright. Tenons at either end of the upright fit into through-mortises for ease of assembly and disassembly.
All told, this item is about 26 inches tall when fully assembled. The tapering curve on the upright piece is one of my favorite shapes ever. I did almost all of the cutting on the band saw, though, because it made things like this curve so much faster to make. I also used a router to bevel and round over all the edges on all the pieces to give it a softer look.
Tachi Kake After Finishing
Here it is after about a half-dozen coats of black-tinted polyurethane. This stuff makes a good affordable lacquer substitute, and it dries in hours instead of weeks. I sanded the finish between every couple coats, but it still needs some final polishing. I also want to add some embellishment like I did for the kyousoku arm rest, but that might not happen until autumn.
For a better sense of scale, here’s another picture of the tachi kake before finishing, with my ko-tachi in the stand like it is supposed to be:
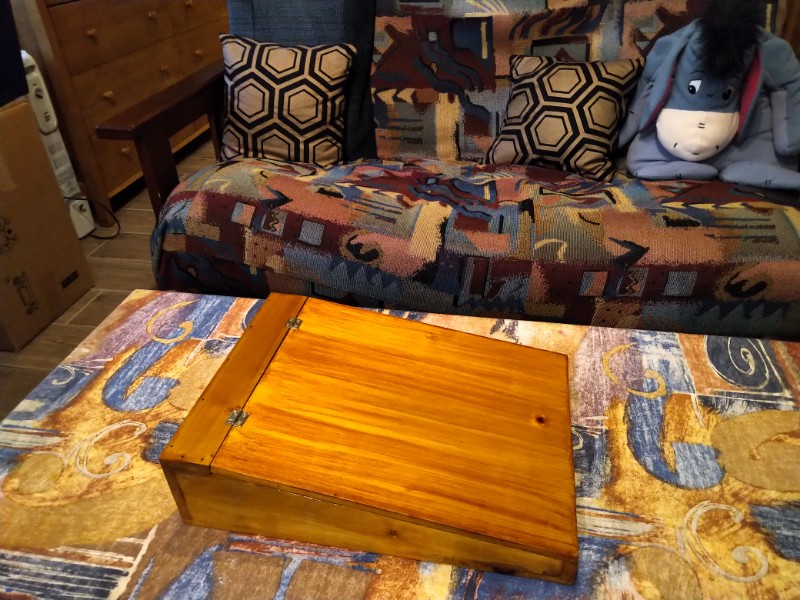
When I was getting the Debatable Lands Woodworking Guild started, I polled the people who were attending planning meetings to see what projects we could work on as a group to produce things for the Barony. One of the ideas was to produce “portable desk” type scribal boxes that the Baron and Baroness could gift to scribes. It’s taken me some time to get around to it, but I was finally able to plan out what such a thing might look like, and use up some surplus wood from the garage to make a prototype.
Closed Scribal Box
This simple, hinged-lid box is made entirely from pine, and finished with amber shellac. The walls of the box are half-inch thick, and the larger surfaces are 3/8″ thick. both thicknesses are the result of planing down some 3/4″ lumber to remove severe cupping warpage. The top and bottom were made from some 1×12 shelving, so I was able to make the full width of the box from a single piece without resorting to plywood.
The work surface is 11 inches wide and about 12.75″ tall, a fine size to accommodate 8.5″x11″ or 9″x12″ paper with some room to spare. A slight slope should make work a little easier on the wrists.
I have no historical examples for this kind of box, I am merely imitating other scribal boxes I have seen in use around the SCA.
Open Scribal Box
The interior of the box is about 10 inches by 14 inches, able to hold supplies slightly larger than average to a depth of about 1 inch at the front and 3 inches at the back. It’s slightly less than that because I decided to add the two battens underneath the lid to support the thin wood during use and keep it from warping.
The box is assembled using modern wood glue and wire nails, and finished with three coats of amber shellac. I’m not sure why my shellac came out so streaky this time. It could be that the shellac needs more alcohol in the mix, or that it was very hot in the shop yesterday causing the finish to dry more quickly than it could even out.
Because I had suitable material on hand, shaping and assembly of the box took less than a day. I did some hand sawing, but a lot of the sawing was done on the band saw. Assembly was entirely by hand, even to the level of hammering in the nails by hand to avoid blowing out the thin wood sides with the nail gun.


