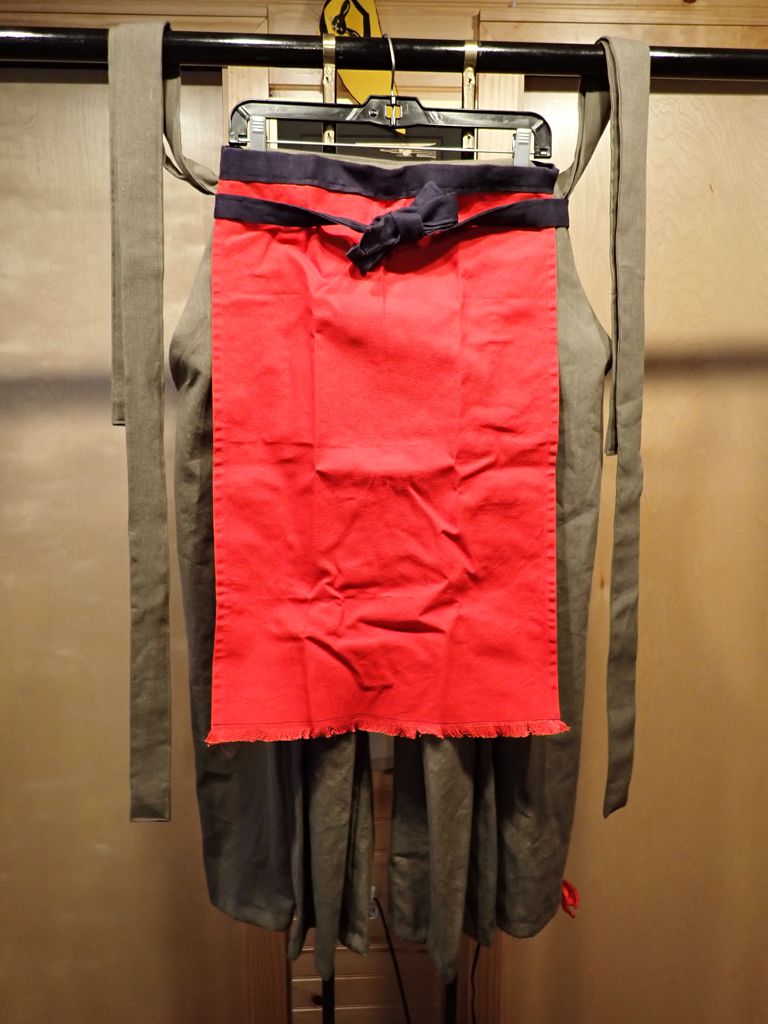
Back when I was making the Mizuoke based on this inspiration image from Spirited Away, my attention turned to the blue apron-type garment that Lin wears in the film.
There are better shots of it in the movie. There are even some scenes where she wears it tied around her neck as a kind of halter top. It turns out that this kind of apron is called a maekake, and it is basically just a length of indigo-dyed fabric with a waistband. These are common even today in Japan, where they are sometimes seen as a kind of folk art. They will often be printed with the name or logo of the business where the wearer works, so older ones will even be sold as antiques for that authentic decor accent. Modern ones often have art or promotional designs.
I went through my fabric stash, but I didn’t have a good piece of blue canvas or heavy linen. Instead, I picked some red and yellow canvas pieces. I had enough blue linen for the waist ties, though.
I hemmed the edges to simulate selvedges. The bottom edge would have just been left raw to make the fringe, but I decided to stitch across just above the fringe to keep it from fraying too much.
Red Maekake Apron, Flat
Yellow Maekake Apron, Flat
You can see that I did my standard 4-layer waistband. I made the ties about 3 yards long so that they can go around the waist twice and tie in front. The ones you can get today in Japan appear to have special fabric woven for the waist ties that is just doubled over instead of 4-layer. Hard to tell for sure.
Red Maekake Apron, Detail of Waistband
Yellow Maekake Apron, Detail of Fringe
I might eventually paint or stamp designs on these. An escarbuncle on the red one and a comet on the gold one might be fun. I will have to figure out a good placement.
I bought a woodturning lathe more than ten years ago, but I set it up so rarely that I have not made very much progress on learning how to do anything interesting with it. There are three things that most people want to do with lathes: spindles, handles, and bowls. I will have plenty of use for spindles when I get back into making marudai, but they are not really a part of my woodworking needs. Handles don’t interest me very much because they are mostly a way for companies to sell you hardware you don’t really want to make tools you don’t really need. I don’t really need bowls, but bowls are cool, right? How hard can they be, right? They don’t have any hardware, so they won’t make you buy more stuff, right?
OK, so totally wrong on most counts. I had to buy a real chuck for the lathe so that I could start the exterior of the bowl using what is called a woodworm screw to hold the bowl blank steady. Then, of course I had to buy a special gouge, and special scrapers to cut the interior of the bowl. Then, of course I had to buy better jaws for my chuck so I could hold the size bowl I wanted to make. Also, the lathe spent so much time sitting around that I had to order a new drive belt from the lathe manufacturer because the old one was falling apart.
Anyway, bowls are still cool. A pain, and a risk to life and digits, but cool. The value of these handmade bowls justifies the hundreds of dollars I have spent on stuff to make them, right?
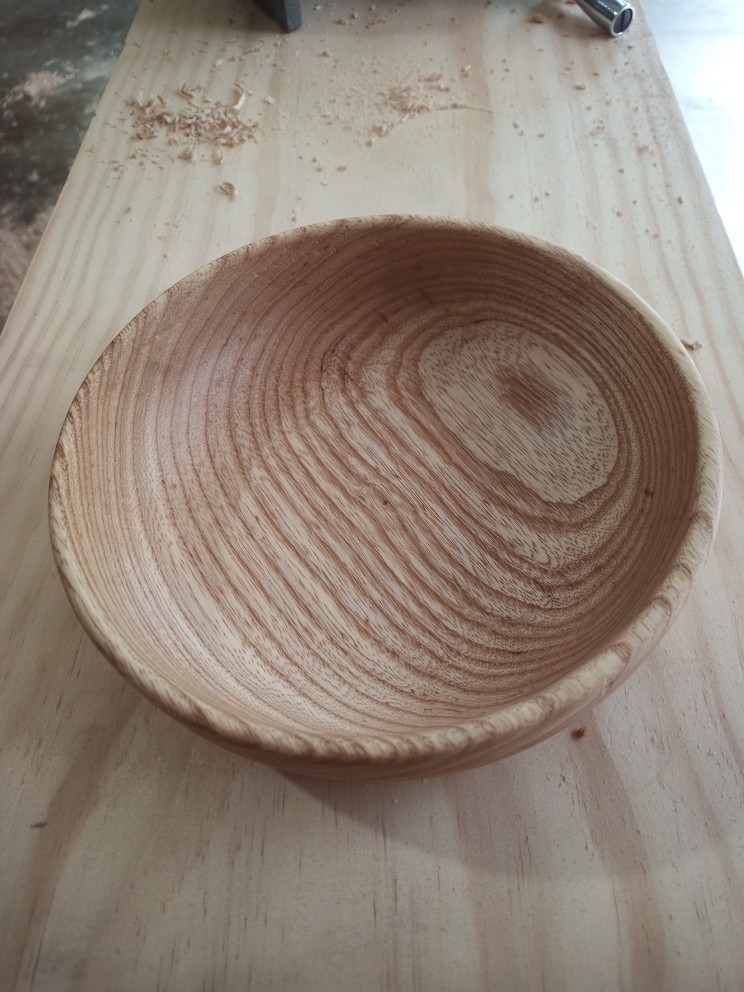
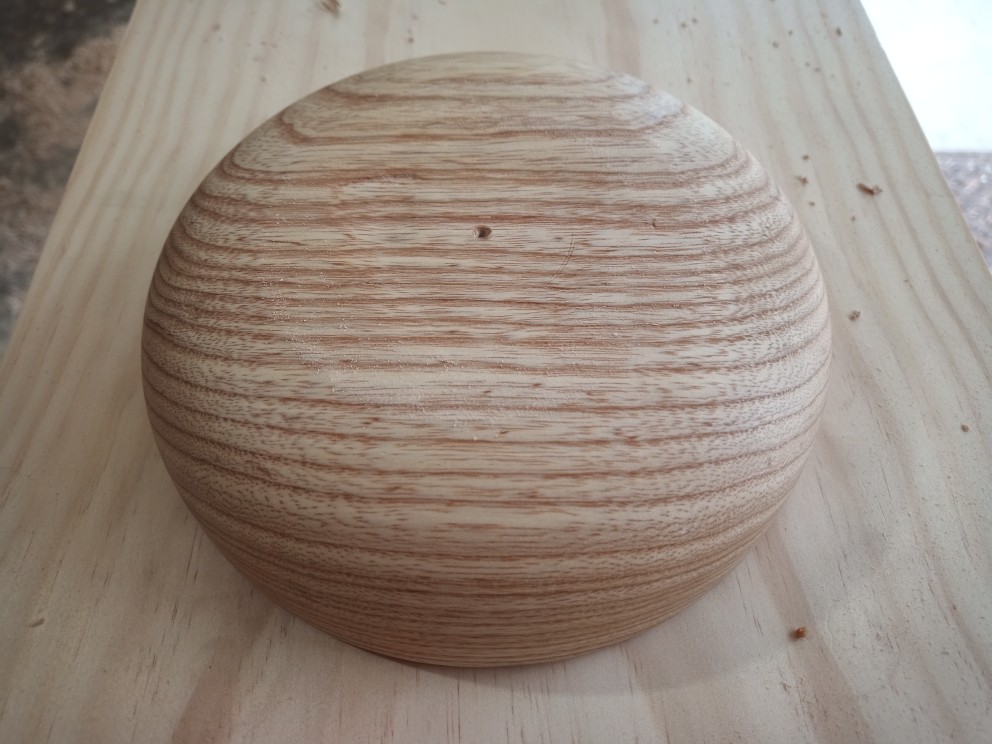
The first bowl is turned from some surplus ash. It is about seven inches in outer diameter and two inches tall. The foot was damaged during turning, but I just removed it with a chisel and sanded the bottom mostly smooth so it is hard to notice.
7″ bowl from Ash
I really like the way the angled grain in the blank produces those cool ripples in the finished bowl. There’s some food-safe beeswax finish on the which really makes that grain pop, I think.
Ash Bowl Exterior
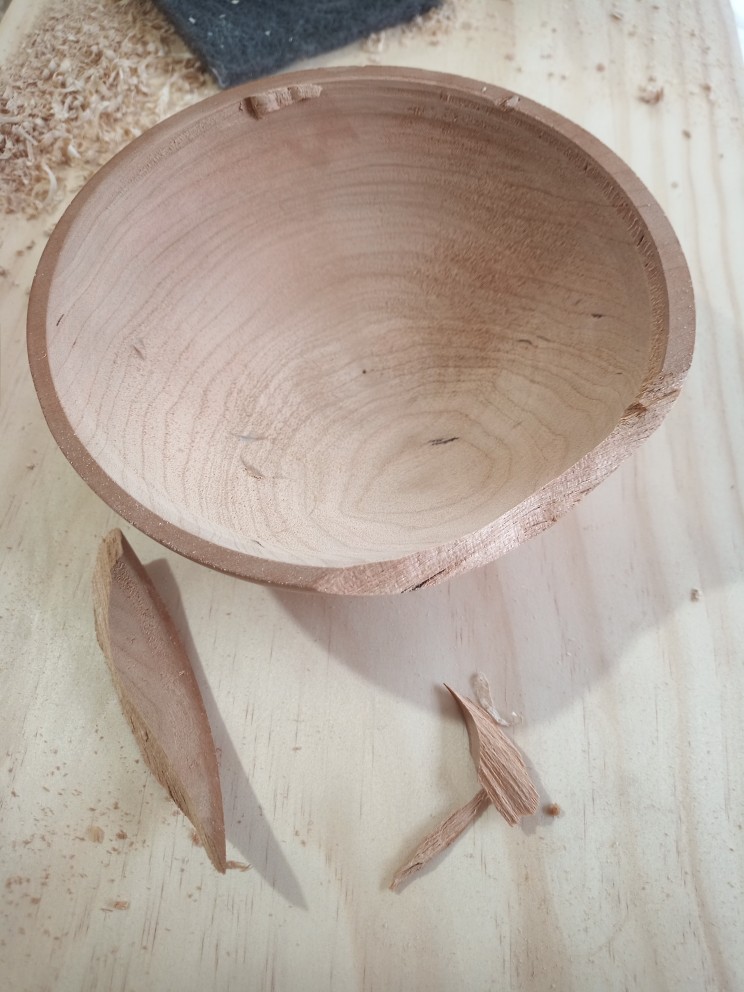
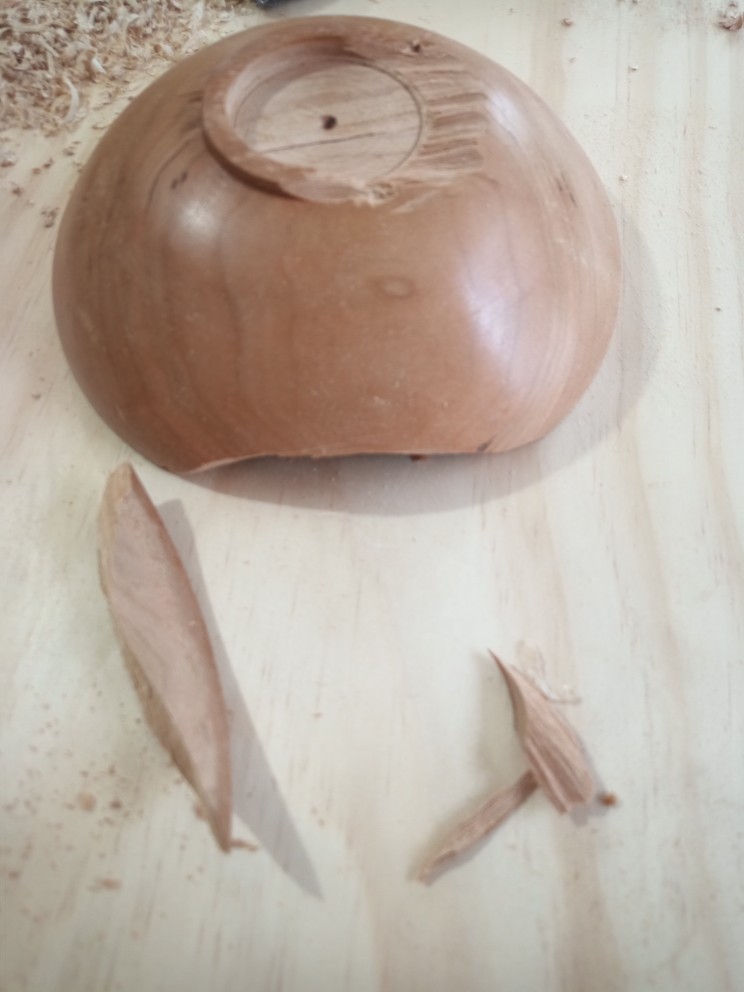
The next bowl was a spectacular failure and a waste of about an hour’s work. What happened was that after shaping the exterior and switching to the inside, the scraper caught (technical term) along the rim of the interior (visible in photo) and wrenched the bowl off of the chuck jaws, breaking the foot of the bowl. Then, when the spinning bowl hit the concrete of the shop floor, the rim broke.
Failed Bowl from Cherry
I declared this bowl a loss and put it in the burn bin. It’s frustrating to spend time on something, and just look at that grain, and then throw it away, but I really could not figure out how to salvage it after so much of the foot was lost.
Too Much Missing Foot
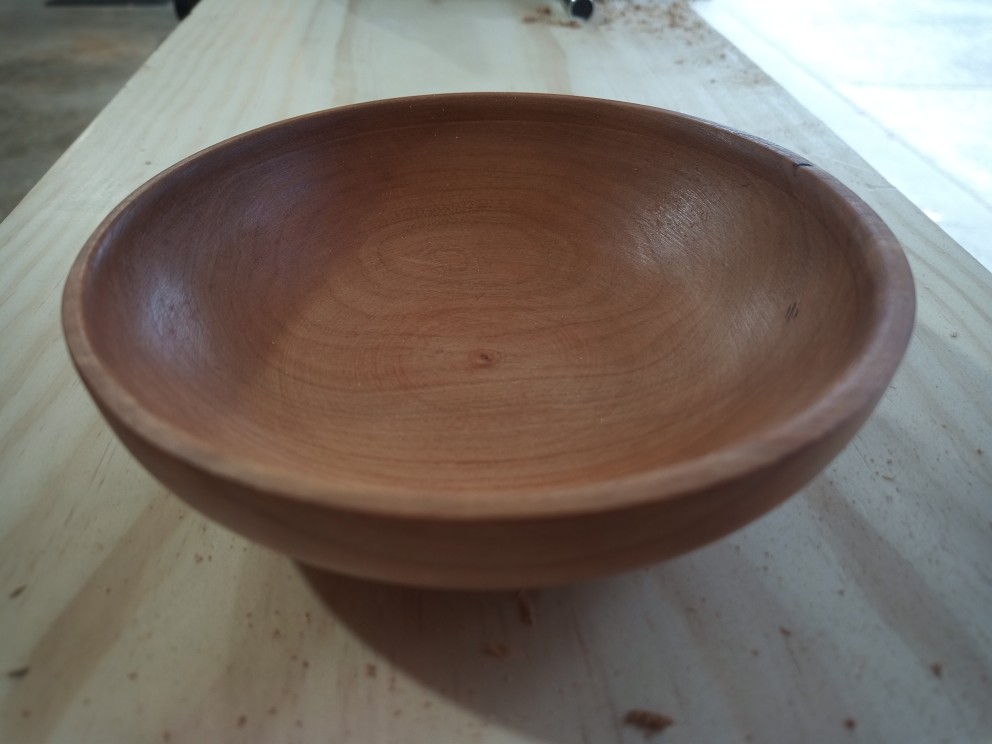
Luckily, I had one more blank to go. This one got started at some point, then I must have had problems with it, so it wound up on the shelf. I drilled out the center for the woodworm and got started. Learning from the two earlier bowls, I left a much beefier foot on the bottom so it did not fail even when I had problems with my tooling.
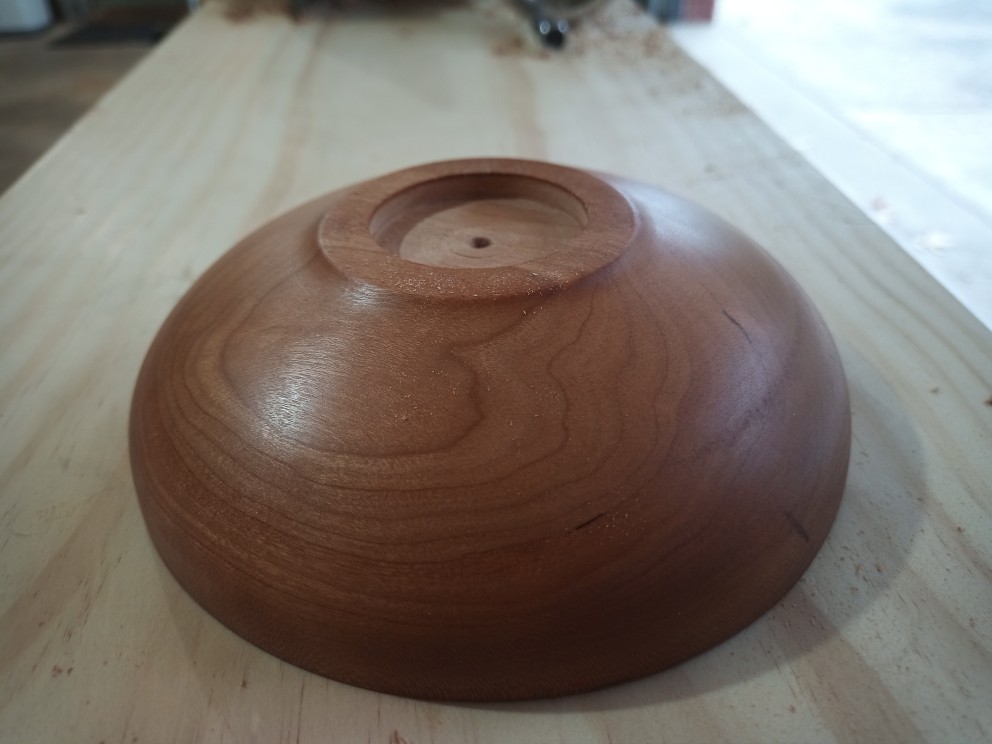
6″ Bowl from Cherry
Third time lucky, I guess. I’m pretty happy with this one. No major problems, no major errors or failures, just a simple little bowl.
Cherry Bowl Exterior
I mean, you can really see how much thicker and better supported the foot is on this one. It really gave me the stable grip the chuck needed for me to work the rest of the bowl.
I feel like I learned a lot during these three bowls, including how I have been possibly mis-using one of my tools. Now I have two usable bowls, too.
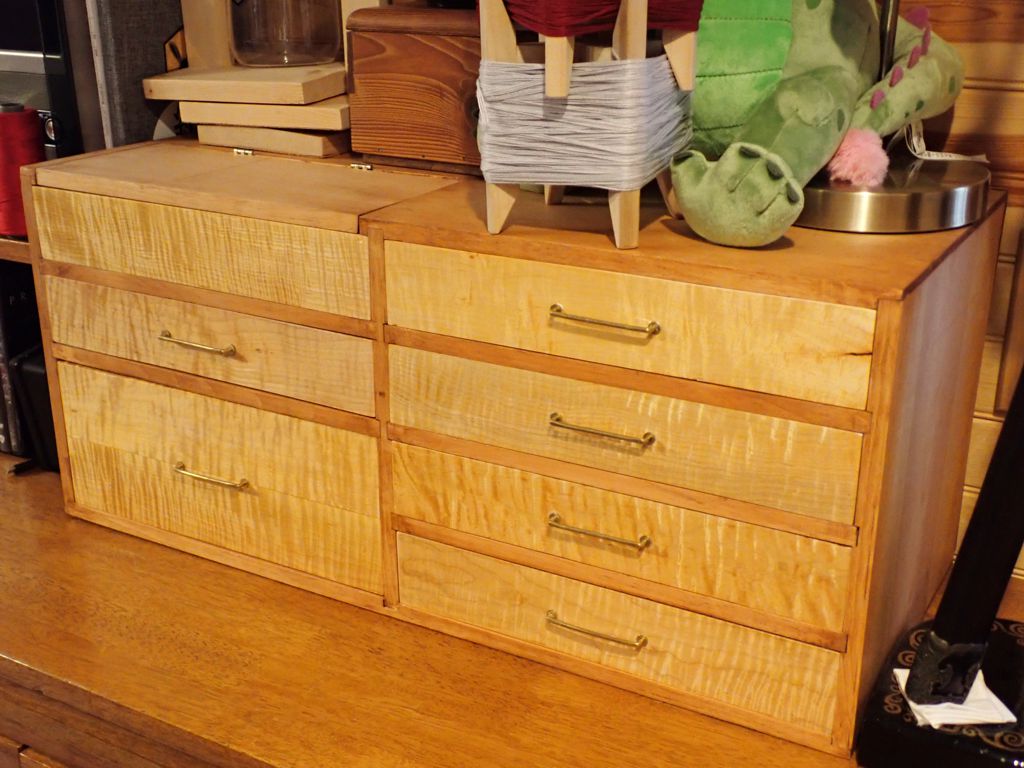
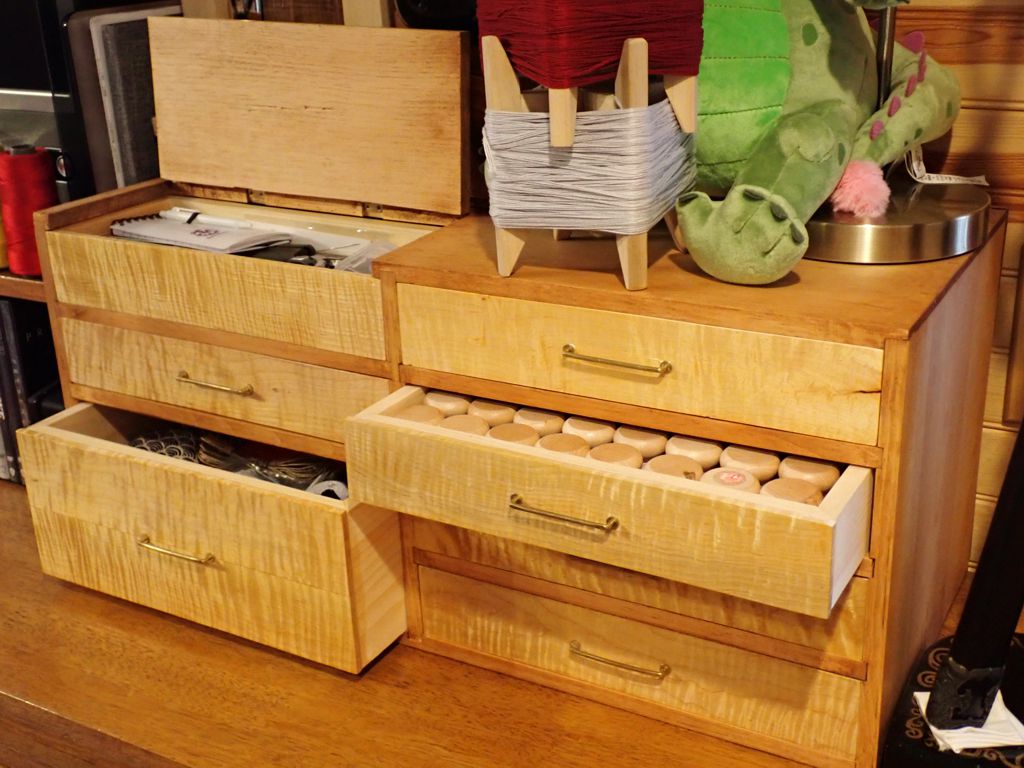
I am very excited to tell you about this next project because it has been “in progress” for a very long time. Once I made the tama storage trays, I started thinking about how to keep them all together in a tidy fashion. I could just put them into drawers, or I could make them into drawers. Sweetie and I have a couple of Japanese haribako sewing toolboxes, so I could base a small chest of drawers (kotansu) on the existing trays and that basic design.
Small Chest of Drawers, or Kotansu
That went pretty well. I was able to make the carcass in a day or so. It is just pine common boards that I planed down to half-inch thickness to reduce bulk. Cutting the slots to hold the drawer supports in place was tricky, especially since I wanted to have the double-depth drawer in the lower left. There is also a not-drawer in the upper left which is actually top-loading bin with a hinged lid. I wound up cutting the lid for the bin with a traditional Japanese hand saw called an azebiki nokogiri which is designed to start cuts in the middle of a board. I bent the drawer pulls myself from brass rod. and installed them in the drawers in simple friction-fit holes. Since the carcass is deeper than the drawers, there are wood blocks behind each drawer to keep the drawer from sliding in too far.
The kotansu sat in an unfinished state for some time, until this summer when a friend of ours gave me some curly maple scants he had cut and planed for making knife handles. After cutting some of them to size to match the drawers, I finished them with shellac and glued them into place. Lining up the holes for the pulls was somewhat tricky, and fitting them closely to opening in the carcass took a lot of fine-tuning. Once the drawers were complete, I felt that the bare pine of the carcass was a bit too bright, so I gave it a light coat of wood stain just so it contrasted better with the maple.
Kotansu with open drawers
Now it looks like furniture! It is so satisfying to be able to finally call this project “done”. I made the original trays almost two years ago, and assembled the carcass about a year ago. Completing this third and final (?) phase is a big relief. I use the tools that I store in here all the time, which means I use this project all the time and having it look so much nicer is wonderful.
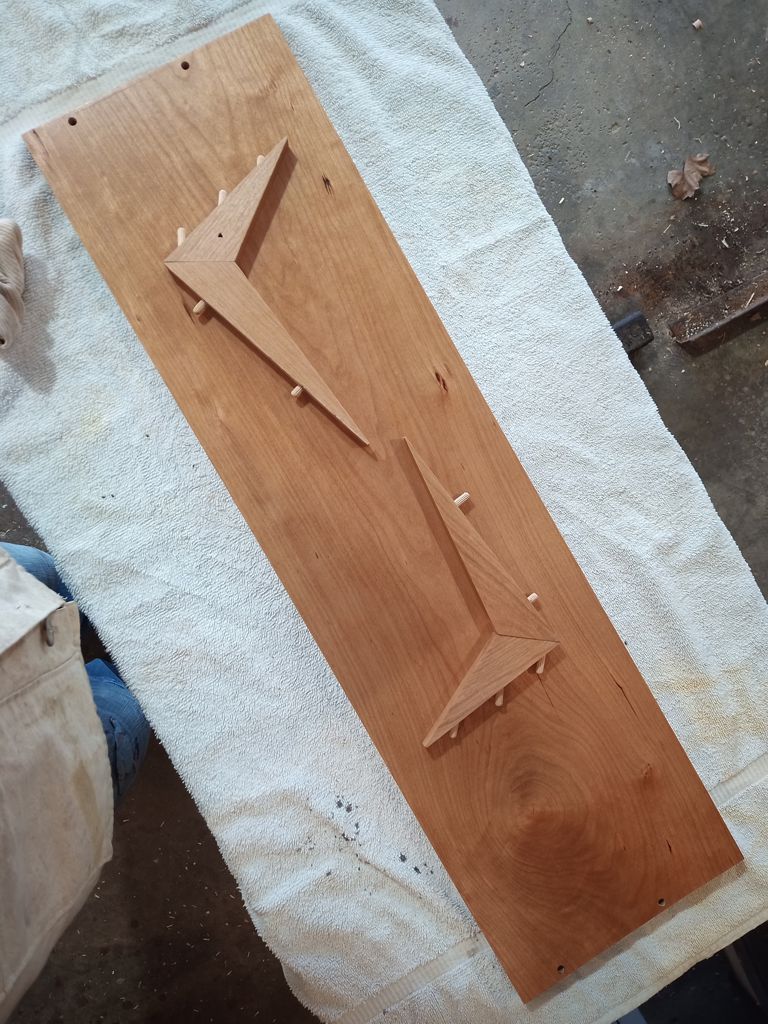
One of the wonderful mid-century modern things that came with the house we live in now is a “Cado Royal” wall unit in the upstairs den. This is a really great wall-hung modular shelving and storage system, but the pieces are now collectible and so it’s a pain to expand an existing installation to accommodate, say, an ever expanding media addiction. So, once I had the plant shelf all done with some cherry lumber left over, I decided to try my hand at making my own shelf.
Pieces for One Shelf
The angle-y, peggy things are the support brackets. The 45-degree dowels slide into angled holes in the wall standards. The 90-degree dowel stubs go into hole sin the underside of the shelf and hold the shelf in place. As you might imagine, accuracy of measurement and placement is vital to this system working as intended. Here is what it looks like with my new shelf added to the existing installation:
Shelf in Use
The cherry will darken over time to match the teak or whatever that stuff is that the existing shelves are made of. I think my shelf is actually nicer than the others. The existing shelves are all veneered, whereas mine is solid wood. The ends of the existing shelves don’t show any end-grain!
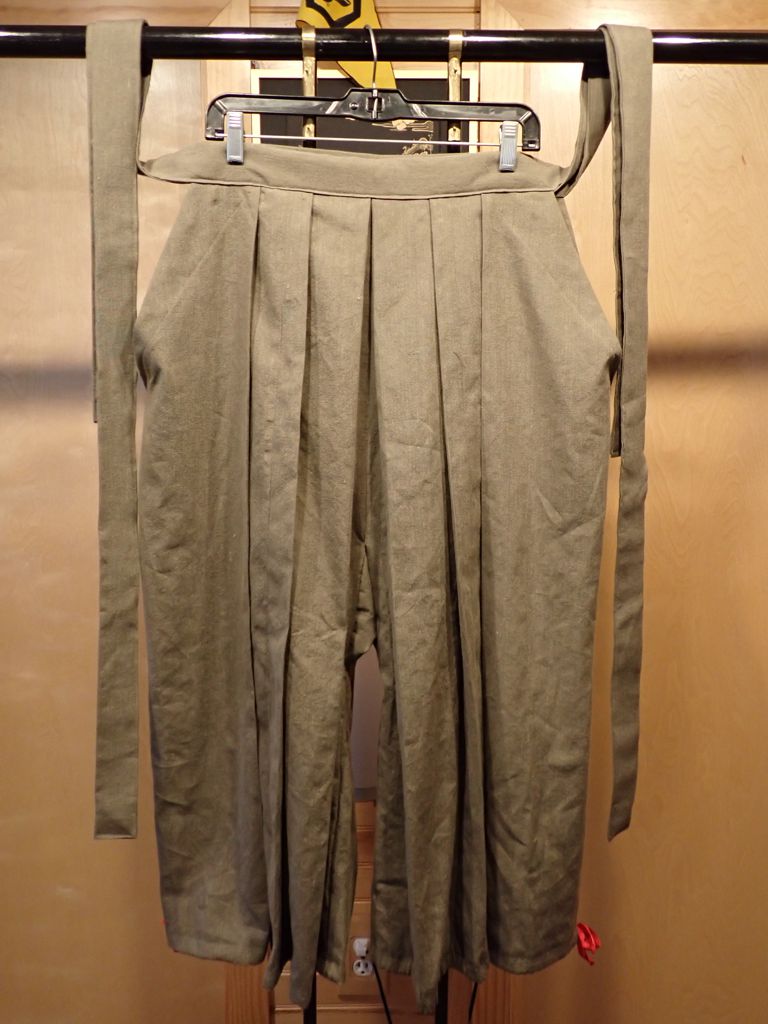
Here is a more recent project than some of the backlog docs I’ve been posting lately. This past Pennsic was the first Pennsic, after more than 25 years of going to Pennsic, that I was able to spend the full two weeks mostly on site. There is a basic pair of blue linen hakama that I rarely wear during the year that I got a lot of mileage out of at Pennsic. It’s a little more historical looking than the monpe I usually wear for informal use. So, I bought a few yards of this nice olive green linen to make another pair of basic hakama for informal wear.
Green Linen Hakama
They only have 3 panels per leg, two in front and one in back. This makes them lighter to wear and much lower class than the 4 panels per leg I normally make for semiformal wear. Each panel is about 14.5″ wide. The legs are 36″ long from waistband to hem, which is a little shorter than I normally make, and there is a drawstring through the hems so they can be drawn up just under the knee. I expect to get a lot of mileage out of these as well.
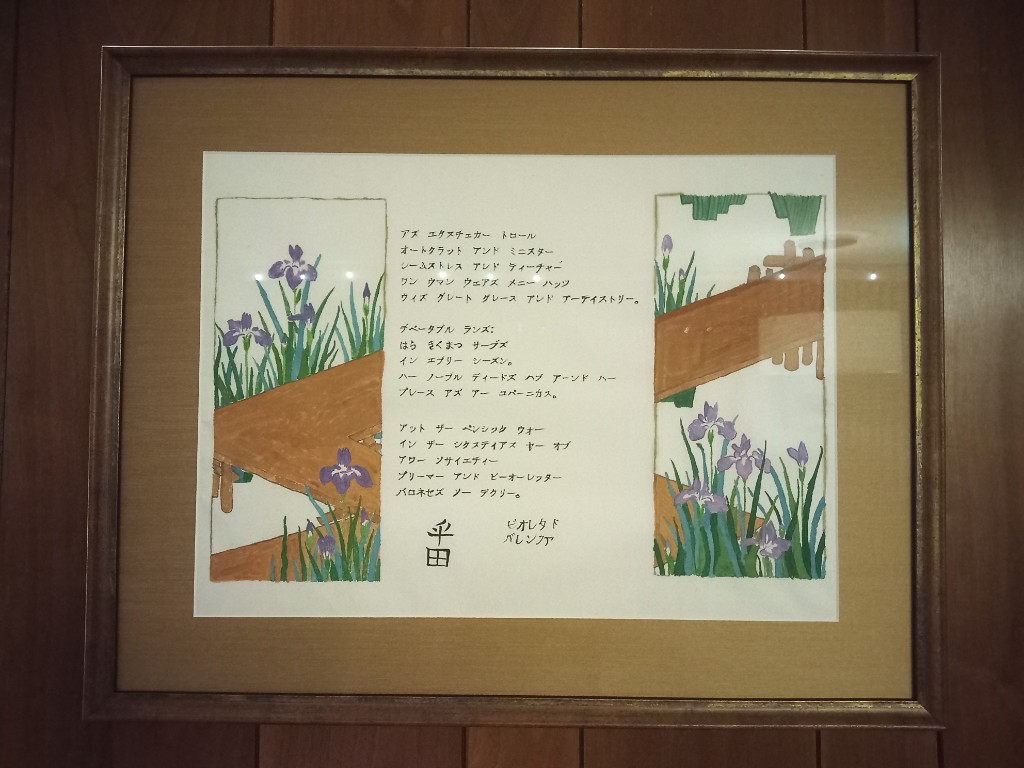
Back before Pennsic, I was contacted by our local group’s “Signet” (person in charge of organizing scribes and illuminators to make award scrolls) about illustrating an award scroll for my Sweetie. She was receiving the highest award for service that our Barony gives, so I knew it had to be something she would really enjoy. That meant irises.
Traced from “Irises and Eight-fold Bridge” by Sakai Hoitsu
Traced from an image in Beyond Golden Clouds (Yale University Press, 2009), edited by Janice Katz, page 153. The original is a two-panel “oshie-bari byobu” painted screen, roughly 52” tall. The Sakai family owned several paintings by Ogata Korin, and Hoitsu seeks to imitate his master’s style here in a screen titled “Irises and Eight-fold Bridge”. The original screen uses a background of gold leaf squares to create the illusion of golden sunlight reflecting off the surface of the water. Irises take significant tending, but the work results in a multiplication of blooms over time. I chose to leave the background of this copy blank to suggest that there is always work left to be done.
I did a practice copy on some of my regular (affordable) hosho paper, then did this fair copy on a large piece of kozo paper. Sweetie loves it so much that she had it framed for display in her den.
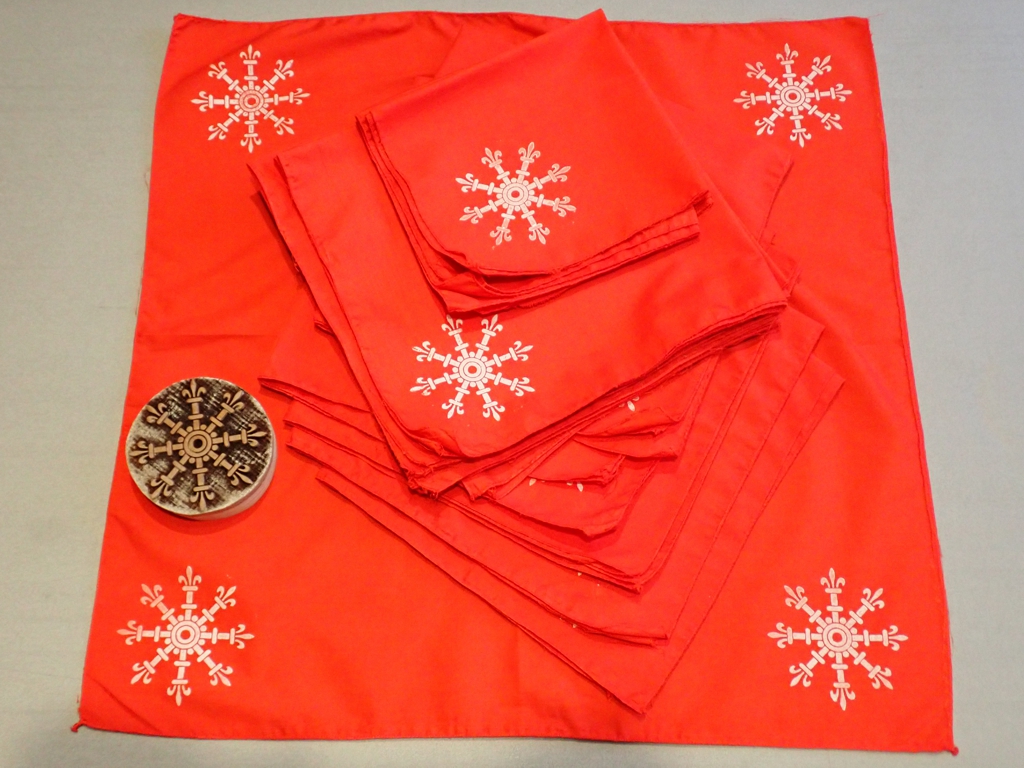
At Pennsic last year, I bought a laser-cut wooden fabric stamp of an escarbuncle. The escarbuncle is the symbol of our SCAKingdom. I decided to try out my brandy new stamp and make some simple decorated kerchiefs. I had a bunch of this red poly/cotton fabric left over from some jinmaku projects, so away we go.
I seem to remember making like a dozen of these. The stamp worked very well, provided I was very good about cleaning it between kerchiefs.
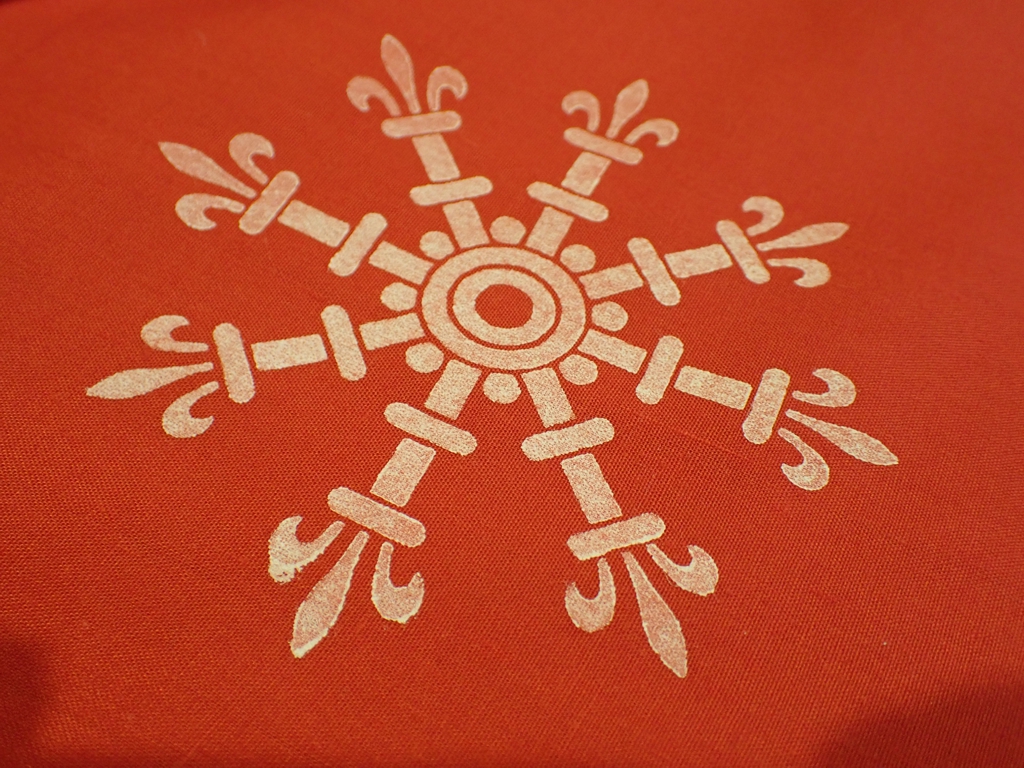
Here’s a close-up of one of the better stamped escarbuncles. The only problem with stamping textile color onto fabric (as opposed to painting) is that the stamp can only apply paint to the surface. It doesn’t force paint into the grain of the fabric the way brushing or screen printing does.
Anyway, I put all of these into the largesse derby back in January, so now they are the Crown’s to distribute.
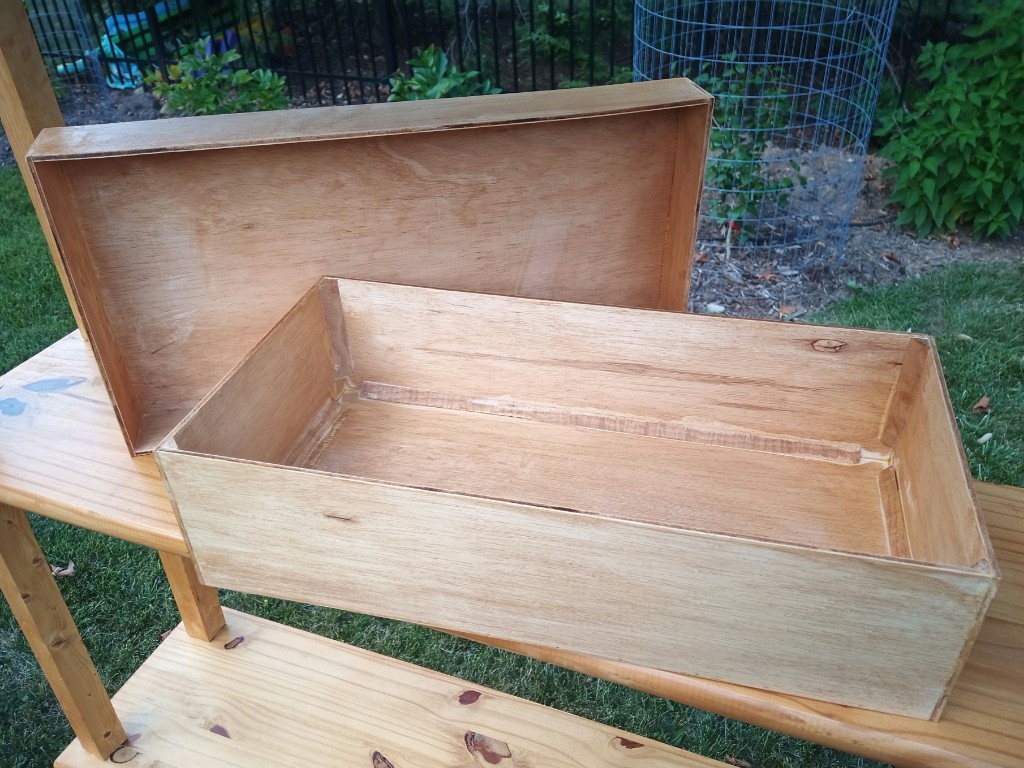
At Pennsic this past year, during the discussion of “things we need in camp” that led to the shelves project, a friend offered to barter for a wooden box in which they could carry around their feast gear. A few weeks later I was in one of the DIY stores and bought a piece of lauan plywood that I thought might make a nice box. Lauan plywood has two smooth faces of thin veneer, sandwiching a single core layer of lightweight wood. It’s basically the wood equivalent of corrugated cardboard. As such, it is lightweight, reasonably durable, and attractively priced.
The interior of this lidded box is roughly 24 inches long, by 12 inches wide, by 6 inches deep. The lid fits fairly snugly. I added some surplus maple strips to the joins to hopefully boost its durability. Everything is glued together and reinforced with 23-gauge pins, but I figured a little bracing could not hurt. I put a light coat of stain on the surface to give it a little bit of water resistance.
This was a quick project, and I was awfully glad to be able to just go out into the garage and make a thing that somebody I know needed. Maybe I’ll make a few of these to hide some of the plastic storage boxes and random items we have sitting around in camp.
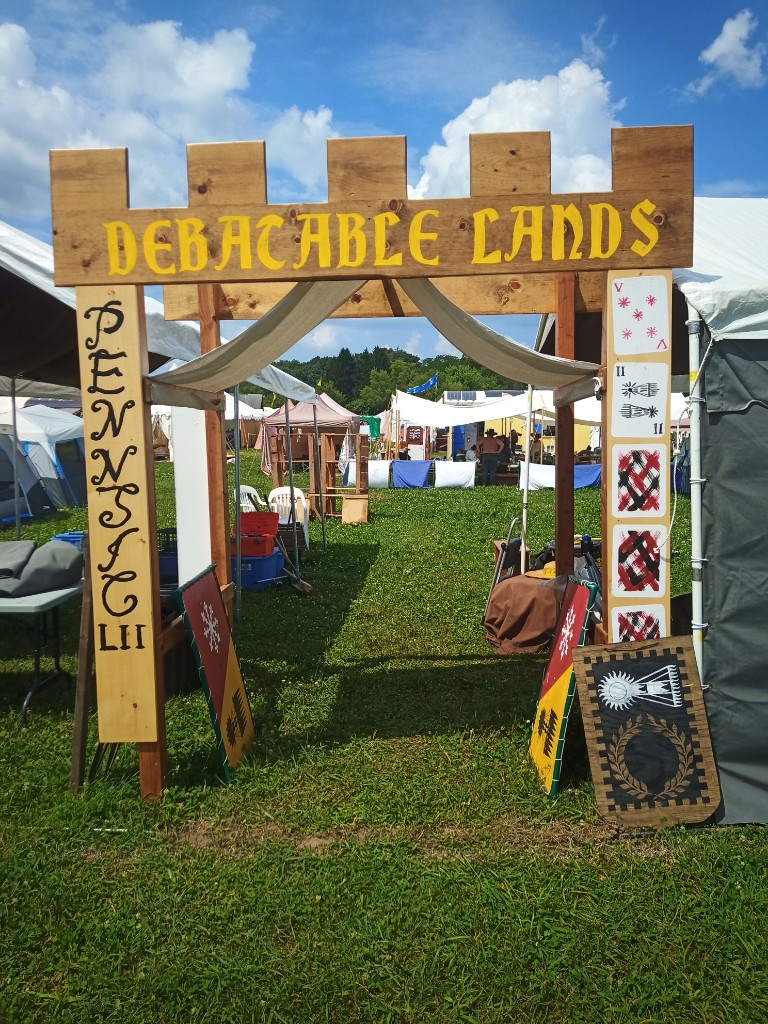
Last year, I made a new entry gate for the Debatable Lands Pennsic camp. Part of the design was for two panels, made from 6-foot 1-by-10 lumber, that are basically decorative and not structural. The idea was to use them as message boards that could be repainted every year or so depending on what people wanted to say. Last year, they honored 50 years of the Debatable Lands. (Because you can’t spell “Debatable Lands” without “L ans“.) This year I wanted them to honor Pennsic 52. (Now playing with a full deck!)
I bought two 1x10x72 boards at the orange DIY store and sanded them smooth. Last year I rounded-over the edges, but this year I did not bother. Then, I applied sanding sealer to harden the wood and sanded it (after drying) to create a nice smooth surface for painting. I did the “calligraphy” and playing-card “illustration” mostly by hand using enamel paint. The white rounded rectangles were taped off to make it easier to keep the edges crisp. rather than get too twitchy about making identical card backs, I just taped margins on the rectangles and kind of swiped the black and red brushes across. Most people seemed to understand what I was going for.
Anyway, these went over well and as a bonus, I can use the cards again next year since it’s 52 years as a Barony!
Here’s a project that barely has any wood in it at all! It’s another silk banner for a friend who was being elevated to the peerage in the SCA. Owen’s arms has one of those repeating patterns that make it an awful lot of work for a vertical banner like this, but the rams at the top are interesting.
I laid out the repeating pattern in chalk, then suspended the silk in my pvc-pipe painting frame and used black gutta resist to make the lines for the pattern. Then it was a simple if maddening chore to color in every other rhomboid with paint. Once that was dry I treated the upper portion with sizing, then traced and painted the rams.
I’m always a little paranoid about the paint, so even though I used the air-set additive in the paint I also did a bunch of ironing to heat-set the paint. I have to wash the silk to get all the chalk off, so I need to be sure the paint is well and truly set.
Anyway, this banner was done in plenty of time before Pennsic, and we used it at Owen’s vigil and his procession into court. Always happy to help out, and be able to contribute a gift that somebody can actually use.