bookmark_borderBurgundy Oilcloth Shop Coat

I decided that I wanted to make one more shop coat. The other two are great, even though I have less opportunity to wear them lately, but I thought that a third coat made from oilcloth would be a handy thing to have. The oilcloth would make it water resistant, if not waterproof.

Then, I had to find a source of oilcloth. Most oilcloth you can find on the net is not real cloth, it’s that flannel-backed vinyl that people use as tablecloths. Real oilcloth is real cloth (usually cotton canvas) that’s been soaked in boiled linseed oil and allowed to dry. It’s easy (if pricey) to buy garments made from oilcloth, but not so easy to find the raw material, and I didn’t want to make it myself.

At least one of the merchants at Pennsic usually carries oilcloth, but there was no Pennsic this year and none of the merchant websites listed oilcloth. Eventually I found Hamilton Dry Goods. They have a selection of real cotton oilcloth in stock and their service was reasonably fast.

Anyway, here’s the coat:

Burgundy Oilcloth Shop Coat

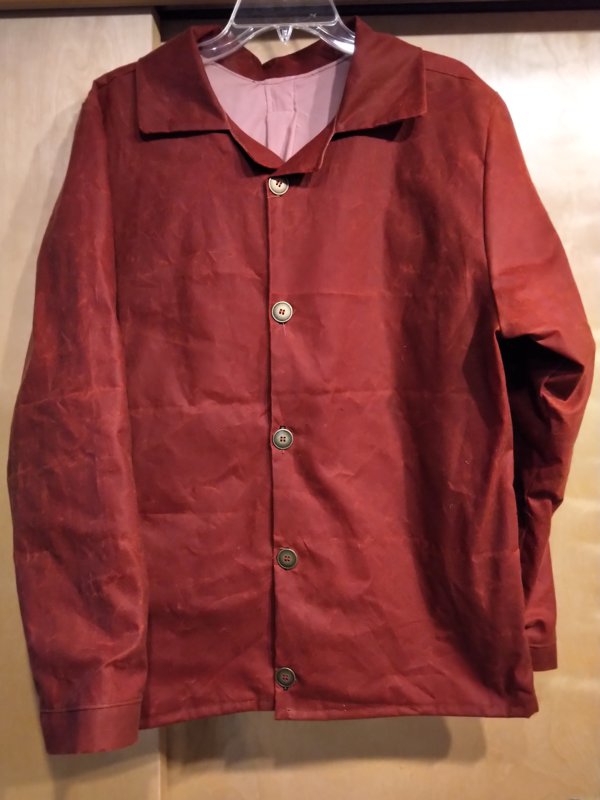
Because it’s meant to be worn in wet conditions, exterior pockets seemed like a bad idea. Because the oilcloth feels a little greasy even when it’s dry, I decided to put a lining in the coat, and put pockets on the lining.

Lining with Pockets

I had some of this rosy poly-cotton fabric all the way down in the bottom of one of my fabric supply bins, held in reserve for a project I was unlikely to ever make. It was a good hue match for the burgundy shell fabric, and a better feel against the skin.

The pattern doesn’t include instructions for adding a lining, so I had to figure all that out on my own. I only messed it up a little bit, at the lapels. I managed to effect a save without ripping out all the collar stitching.

A quick trip to the fabric store for some brass buttons, and this project was complete. Some time I need to figure out how to make one of these with a zipper instead of buttons. Not soon, though.

bookmark_borderNew Banner

My old shibori-dyed personal banner is getting a little faded, and my silk banner is too delicate to hang outside in the rain, so I decided to make a durable banner that I can mistreat.

Banner in trees

It’s 15 inches wide and 6 feet long of cotton duck fabric in this wonderful deep-yellow color. The black parts of the design are painted on with Jacquard Textile Color, with details on the bunny in gold Jacquard Neopaque fabric paint. The textile color is a really thick pigment type paint, that doesn’t forma film the way the acrylic Neopaque does.

I made a simple 8-strand suspensory braid in some polyester yarn, so that I won’t have to worry about it, either.

bookmark_borderCherry Andon Lamp

An andon is a type of Japanese lantern that is usually used indoors by people who are seated on the floor. I think that, technically, any “framed paper” lantern is an andon, but the word is most often used to refer to the floor-standing version. That may be because most hanging lanterns you see are the collapsible paper chochin type.

I’ve been wanting to make a tall, floor standing andon for about five years, and took the opportunity to cut pieces for this one when I was preparing materials for the Cherry Solar Flicker Lantern project.

Andon, from cherry

This andon is about 34 inches tall and 7.5 inches deep/wide. It’s made from cherry. To keep it from being tippy, the base is a solid block of cherry two inches thick. It uses a different lighting system than the hanging lanterns. This one is designed to suspend a NEBO Tools “BIG Poppy” lantern inside.

The view inside

Here you can see how the Poppy is suspended from the diagonal crossbeam. This is also a better view of the handle. I cut the through-mortise into a rectangular block first, then cut the curved handle from that block. You can also see the seam where the paper is taped closed at the front corner. Even in the light it doesn’t look bad.

bookmark_borderCherry Solar Flicker Lantern

This is the third lantern in a series of at least six. This simple Japanese frame lantern is made from some Western Pennsylvania cherry lumber that I bought a bunch of years ago and am still working scraps out of. It follows the same design as the Oak Solar Flicker Lantern and Maple Solar Flicker Lantern before it.

Lantern in cherry

I have a new method for applying the paper that I think yields a much tighter and smoother result. I’m using Warlon Taf-Top shoji paper, so I can’t just dampen the paper to shrink it. Unless the lantern is perfectly square, wrapping a correctly-sized strip of paper around it leaves wrinkles or bulges. Instead, I cut the paper oversized, apply it to the lantern, then trim the paper down so that it is perfectly straight and flat. It watses a bit more paper, but I think it is more attractive.

The shoji in the background were made about a decade ago, and are made from cedar. I bought the bunny painting from an antique store.

bookmark_borderStorage Box for the Stuff of my Sweetie

Just another lidded storage box made from birch-face plywood and maple (it turns out they are maple, not birch) scants. This one is custom sized so that it fits in the storage cabinet over Sharon’s desk.

A useful box to put things in

The cabinet has sliding doors, and the box she was using was too bit to fit nicely. If she put the box in long-ways, the door couldn’t slide shut. If she put the box in sideways, there was all this wasted room in the cabinet.

Old box, boo!

This box is a little shorter, and a little wider, so it fits in longways. Even the inner sliding door can shut, although the clearance is about 1/16th of an inch.

New box, yay!

the only real difference (besides size) between this one and the Storage Box for the Coronet of a Duchess is that I finished this one with “Garnet” shellac instead of “Blonde” shellac, so the color is deeper.

Storage box, open

bookmark_borderStorage Box for the Coronet of a Duchess

Some of you may remember that, earlier this summer, after inventorying the large selection of surplus plywood in the shop, I went on a bit of a storage box kick. Starting to feel like I was getting pretty good at making these simple boxes, I offered to make boxes for anything for which my friends might need a storage box. The only person (so far) to take me up on the offer is a friend of ours who is a Duchess in the SCA.

The title of Duchess is typically given to those who have been Queen two or more times. Those who hold Royal titles in the SCA (from Baron on up) are entitled to wear coronets that signify their rank. Sometimes, but not always, these come with a box. Sometimes, this box is too nice to be carted around, even though you want to take the Coronet itself to the event so that you can wear it to court.

Anyway, she sent me the rough dimensions of her coronet, and I added an inch to each of those dimensions to allow for a half-inch of padding all around. I did not feel that my standard lauan plywood box was sufficiently nice for this use, so I dug into the supply of birch-face plywood and birch scants that my wife bought for a project long ago.

The Duchess’ Coronet Storage Box, in Birch

It’s just a simple lidded box. The interior is roughly 10″x12″x5″ It is assembled using butt-joinery, glue, and 23-gauge pins from the nailer. Inside and out, the box is finished in blonde shellac. The table saw blade left some scorch marks on the ends of some of the boards, but other than that I am pretty happy with it.

Birch Storage Box, Open

It should be pretty useful for the coronet, or whatever else she might choose to store in there.

bookmark_borderBlock Printed Tenugui

In discussion within Clan Yama Kaminari, we thought it would be nice to have some tenugui hand towels printed with the Clan mon. I already had the printing block cut, so It was only a couple days’ work to make two dozen of these.

Cotton hand towels printed with the mark of Clan Yama Kaminari

Each tenugui is a yard long and about 15 inches wide. I used cotton muslin because it was on sale at the fabric store. Typically, tenugui use a looser weave of cotton.

I did a rolled edge on each rectangle using the serger to keep them from fraying. Tenugui made with traditional fabric have selvedges at the proper width, and the ends are just left to fray. If I buy tenugui, I usually hem them myself.

The mon is block-printed at each end, centered in the width of the fabric, using Jacquard Textile Color in “Ruby Red”. This pigment yields a good solid color, without changing the texture the way paint would, or bleeding along the fibers the way dye would.

bookmark_borderMaple Solar Flicker Lantern

Following on the heels of my Oak Solar Flicker Lantern, is this almost identical lantern made from maple.

Lantern in maple, with solar flicker lighting unit

I eventually need to make a half dozen or so of these, so I might as well use them as a study in materials.

Lantern at night, hanging in the shorou

bookmark_borderWhite Kosode 2020

I had meant to leave this year’s white kosode half-finished, so I could use it as a demonstrator for a class I was going to teach at Pennsic on kosode construction. Instead of leaving it to fester while we’re waiting to see if there will be a Pennsic next year, I decided to complete it so that I could wear it if we ever happen to have an SCA event ever again.

Gosh that all sounds pessimistic, I know, but there it is. Really, I’m much more optimistic about the future of the SCA than that. I think we will have to reconsider what makes an event and how we run them, but I’m sure we will have events in the future. They might just be very different from the kind of events we’ve had in the past, though.

Anyway, this year’s kosode, in white ramie. I’ve already made two kosode from the white ramie I ordered a couple of years ago. When it became time to make my 2020 kosode, I thought about getting some new fabric, but I realized I still had plenty of this terrific 150 gram ramie linen from Morex Fabrics, so why not use it? The pattern is my standard men’s kosode method, starting from 14.5″ panels. For my technically-minded friends, I continue to use half-panel overlaps and three-layer collars.